Use SADP Tool for On-Site Configuration
The SADP tool helps installers complete the activation and basic configurations of all LAN (local area network) devices, link network camera channels to the NVR, add devices to Hik-Partner Pro, and hand over the devices to customers. Most of these are done automatically and all are done smoothly, with just the Hik-Partner Pro Mobile Client, and no need for a computer or monitor, which greatly increases the installers' work efficiency.
This article contains the following sections:
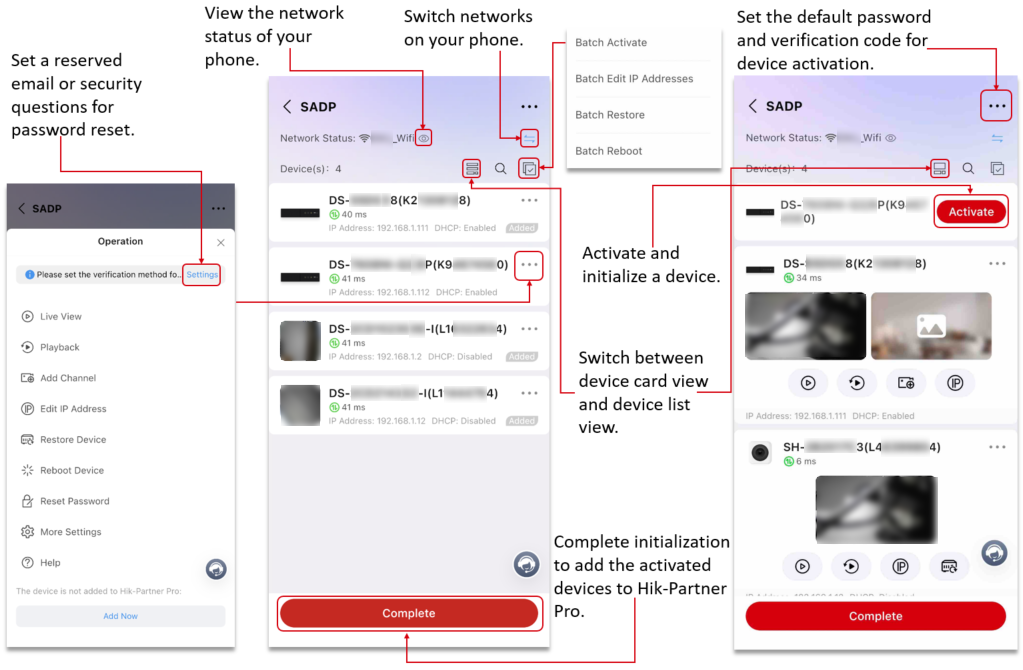
SADP Tool Overview
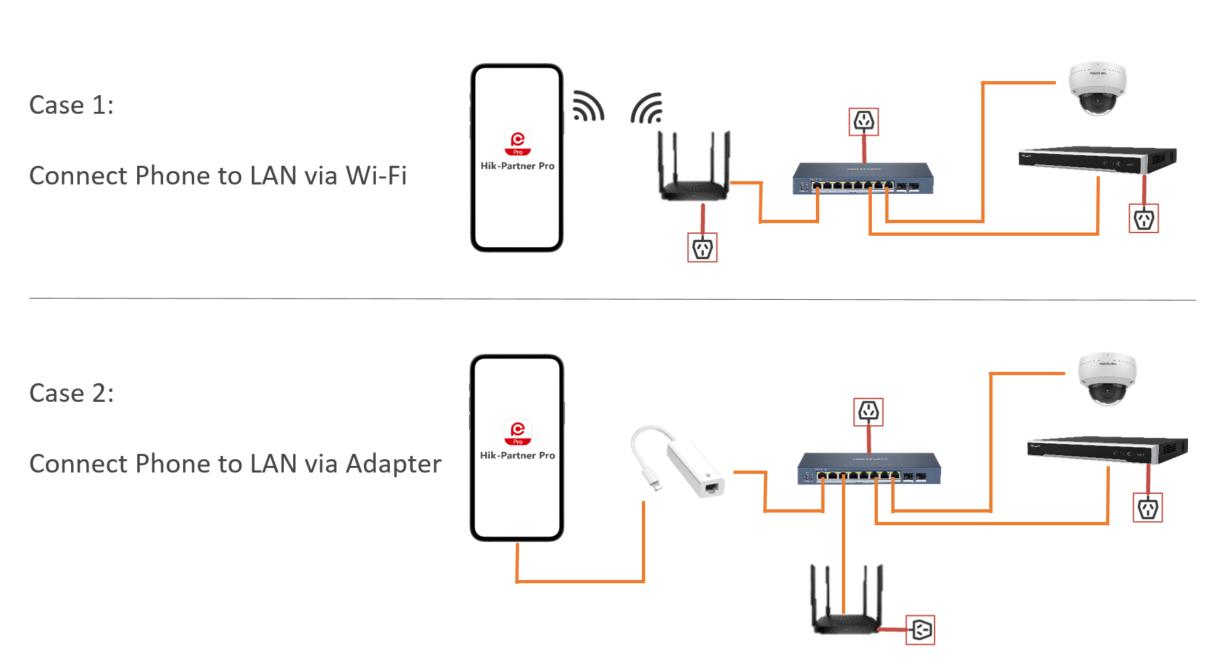
Prepare the Devices
To use the SADP tool on the Mobile Client, make sure the devices are powered on and connected to the LAN, and you should connect your phone to the same LAN as the devices' via Wi-Fi or adapter.
Search for Devices on LAN
The SADP tool searches for LAN devices automatically and constantly in the background.
-
After you log in to the Hik-Partner Pro Mobile Client and when your phone is connected to the LAN, the SADP tool will search for LAN devices in the background automatically and constantly.
-
When new devices are detected, the tool will check if there are any issues with the devices.
-
The tool tests and displays the ping values and levels in real time. Higher ping means poorer connectivity between the device and your phone. When the ping is high, remote configuration, live view, and playback may fail. Icons of different colors indicate different ping levels:
-
 : Less than 50 ms
 -
 : 50 ms to 200 ms
 -
 : More than 200 ms
-
-
When the SADP tool detects unactivated devices (except for alarm devices) on the LAN, the window of unactivated devices will pop up.
Figure 2 Pop-up Window of Unactivated Devices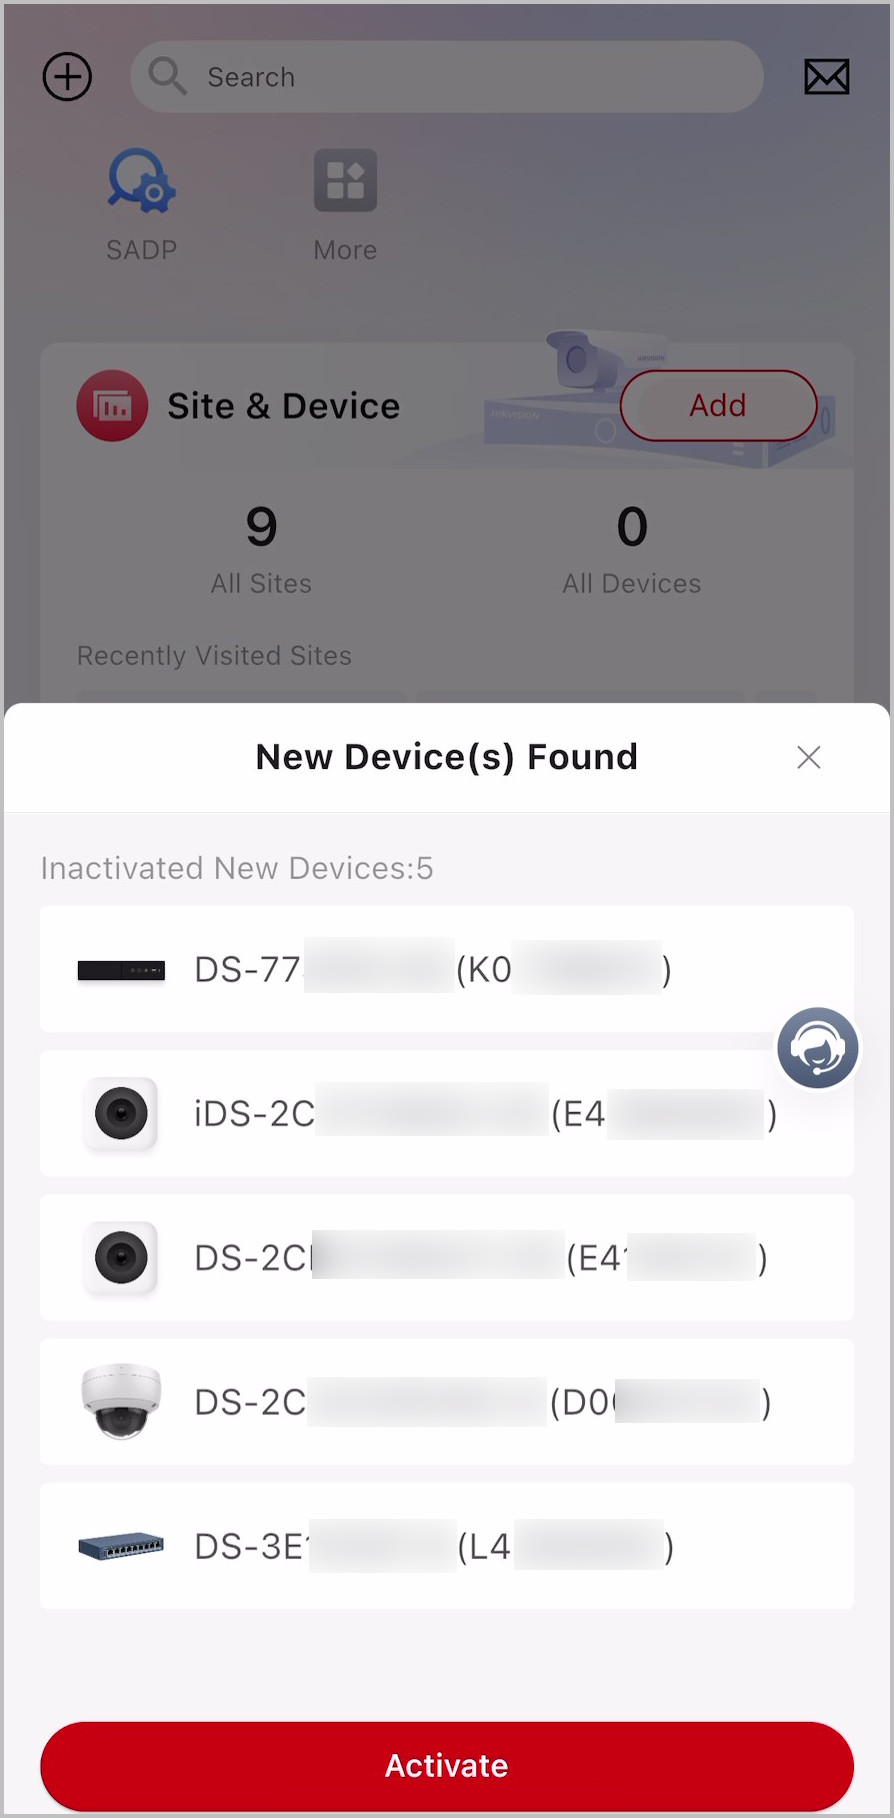
Initialize NVR on LAN
-
The Device Initialization page shows the whole process of the automatic NVR
initialization, which includes the following configurations:
-
Activate the NVR.
The SADP tool checks for device batch issues during the activation, and the activation can be completed only if there is no batch issue. (The check starts right away once the tool detects the device.)
After the NVR is activated, and if there are detected unactivated network cameras, the SADP tool will automatically activate the network cameras and automatically add them to the NVR. (This operation will not be performed if it is a PoE NVR and the PoE channels are enabled by default.)
-
Configure the device network based on your phone's network settings.
DHCP (dynamic host configuration protocol) is enabled automatically for the NVR so that IP addresses, gateway addresses, subnet masks, and DNS addresses can be assigned automatically to the NVR. Then, it performs ping tests to ensure accurate network settings for stable communication between your phone and the device.
-
Check the firmware update.
-
Synchronize the phone time and time format to the device.
-
Initialize the HDD / SD card.
The HDDs or SD cards will be initialized automatically if they are new and not initialized. If there are data stored on the HDDs and SD cards, they will not be initialized.
Figure 3 Automatic Initialization Process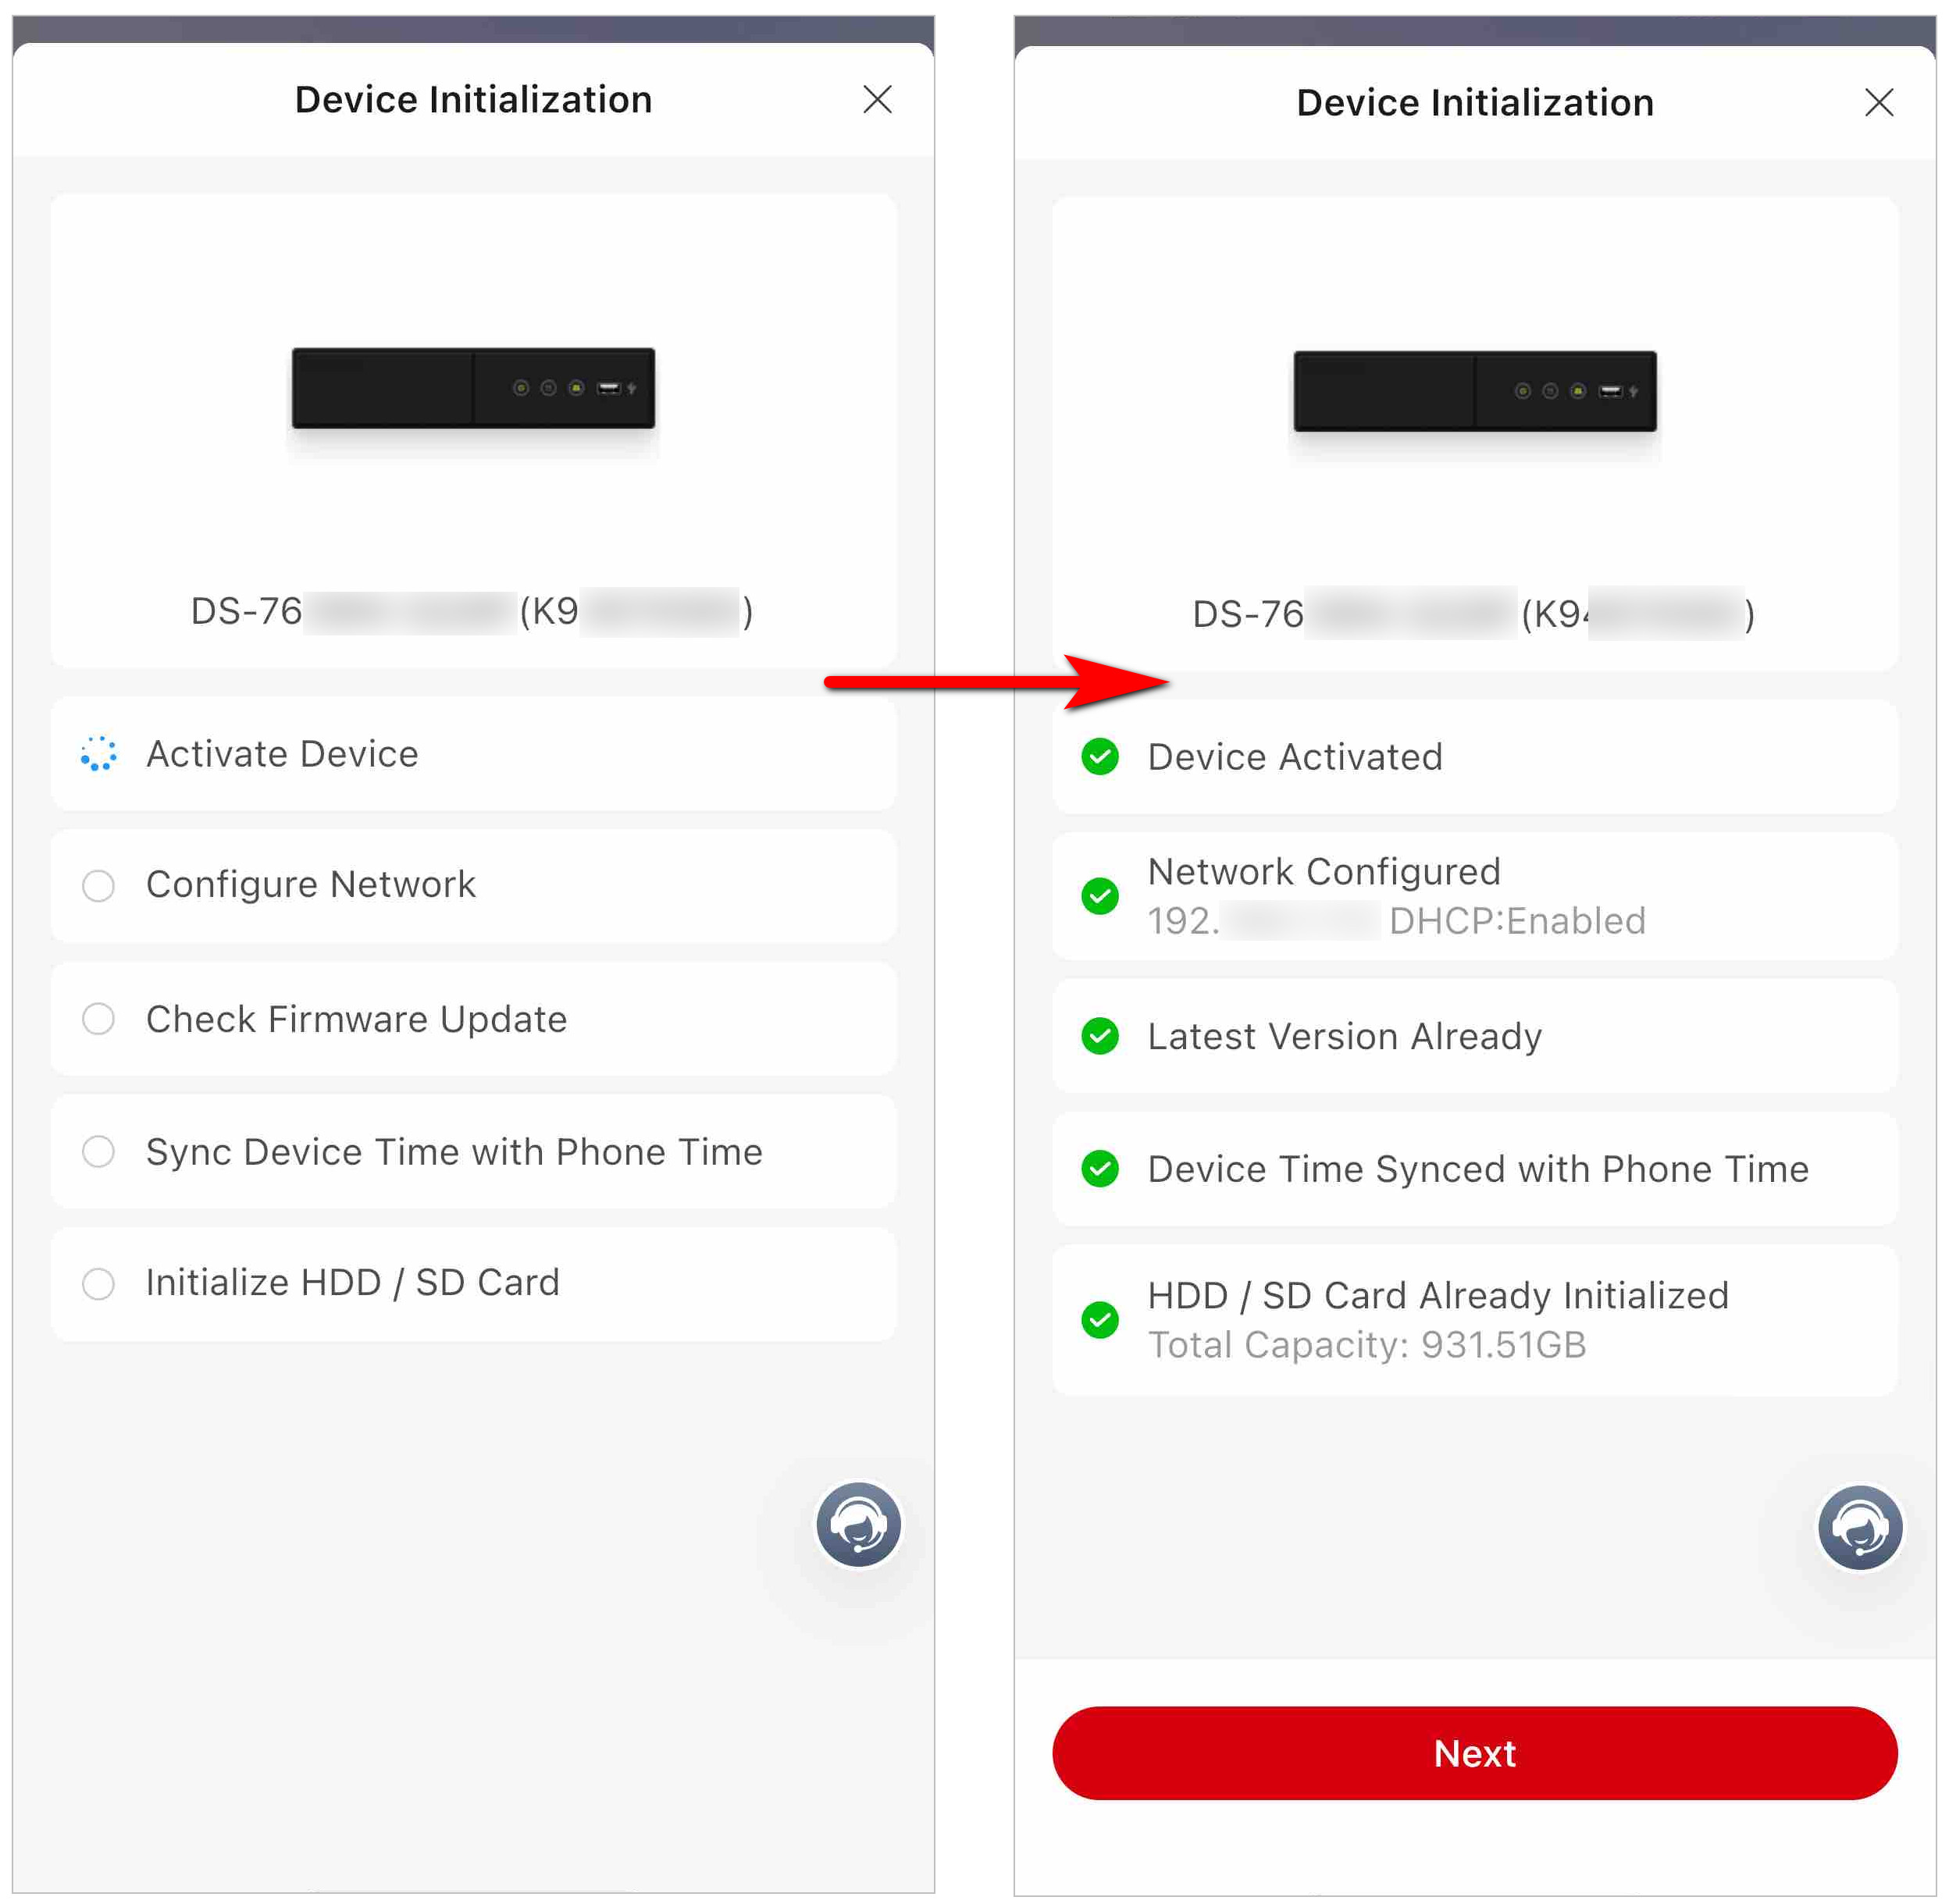
-
After the initialization completes, it will enter the channel-adding process, the channel-sorting process, and then the device-adding process. (If the device is a PoE NVR and the PoE channels are enabled by default, it will directly enter the device adding process.)
Refer to Add Channels to Activated NVR, Sort NVR Channels, Add Devices on LAN (via SADP Tool), and Add Devices to Hik-Connect.
Initialize Device on LAN (Except for NVR)
Besides NVRs, you can use the SADP tool to initialize network cameras (including PTZ cameras and thermal cameras), DVRs, access control devices, video intercom devices, Hik-ProConnect boxes, and network switches.
To initialize NVRs via the SADP tool, refer to Initialize NVR on LAN.
-
The Device Initialization page shows the whole process of the automatic
initialization, which includes the following automatic configurations:
-
Activate the device.
The SADP tool checks for device batch issues during the activation, and the activation can be completed only if there is no batch issue. (The check starts right away once the tool detects the device.)
-
Configure the device network based on your phone's network settings.
-
For network switches (except for EI-series switches) and all DVRs, DHCP is enabled automatically.
For network cameras, DHCP is disabled automatically, in case IP address changes lead to the device going offline.
For other devices, DHCP status will be synchronized from the default device settings.
-
After the IP address is set automatically, the tool performs ping tests to ensure accurate network settings for stable communication between your phone and the device
-
-
Check the firmware update.
-
Synchronize the phone time and time format to the device.
-
Initialize the HDD / SD card.
The HDDs or SD cards will be initialized automatically if they are new and not initialized. If there are data stored on the HDDs and SD cards, they will not be initialized.
-
The Hik-Connect service will be automatically enabled if it is supported by the device.
-
If the device is a network camera, the following configurations will be done automatically:
-
Enable Motion Detection 2.0 automatically. All the area is set as the detection area, and Notify Surveillance Center is enabled.
-
Set the encoding format. If the device supports the Smart H.265+ encoding and the current format is the Smart H.264+ encoding, then the Smart H.265+ encoding is enabled automatically.
-
Figure 4 Automatic Initialization Process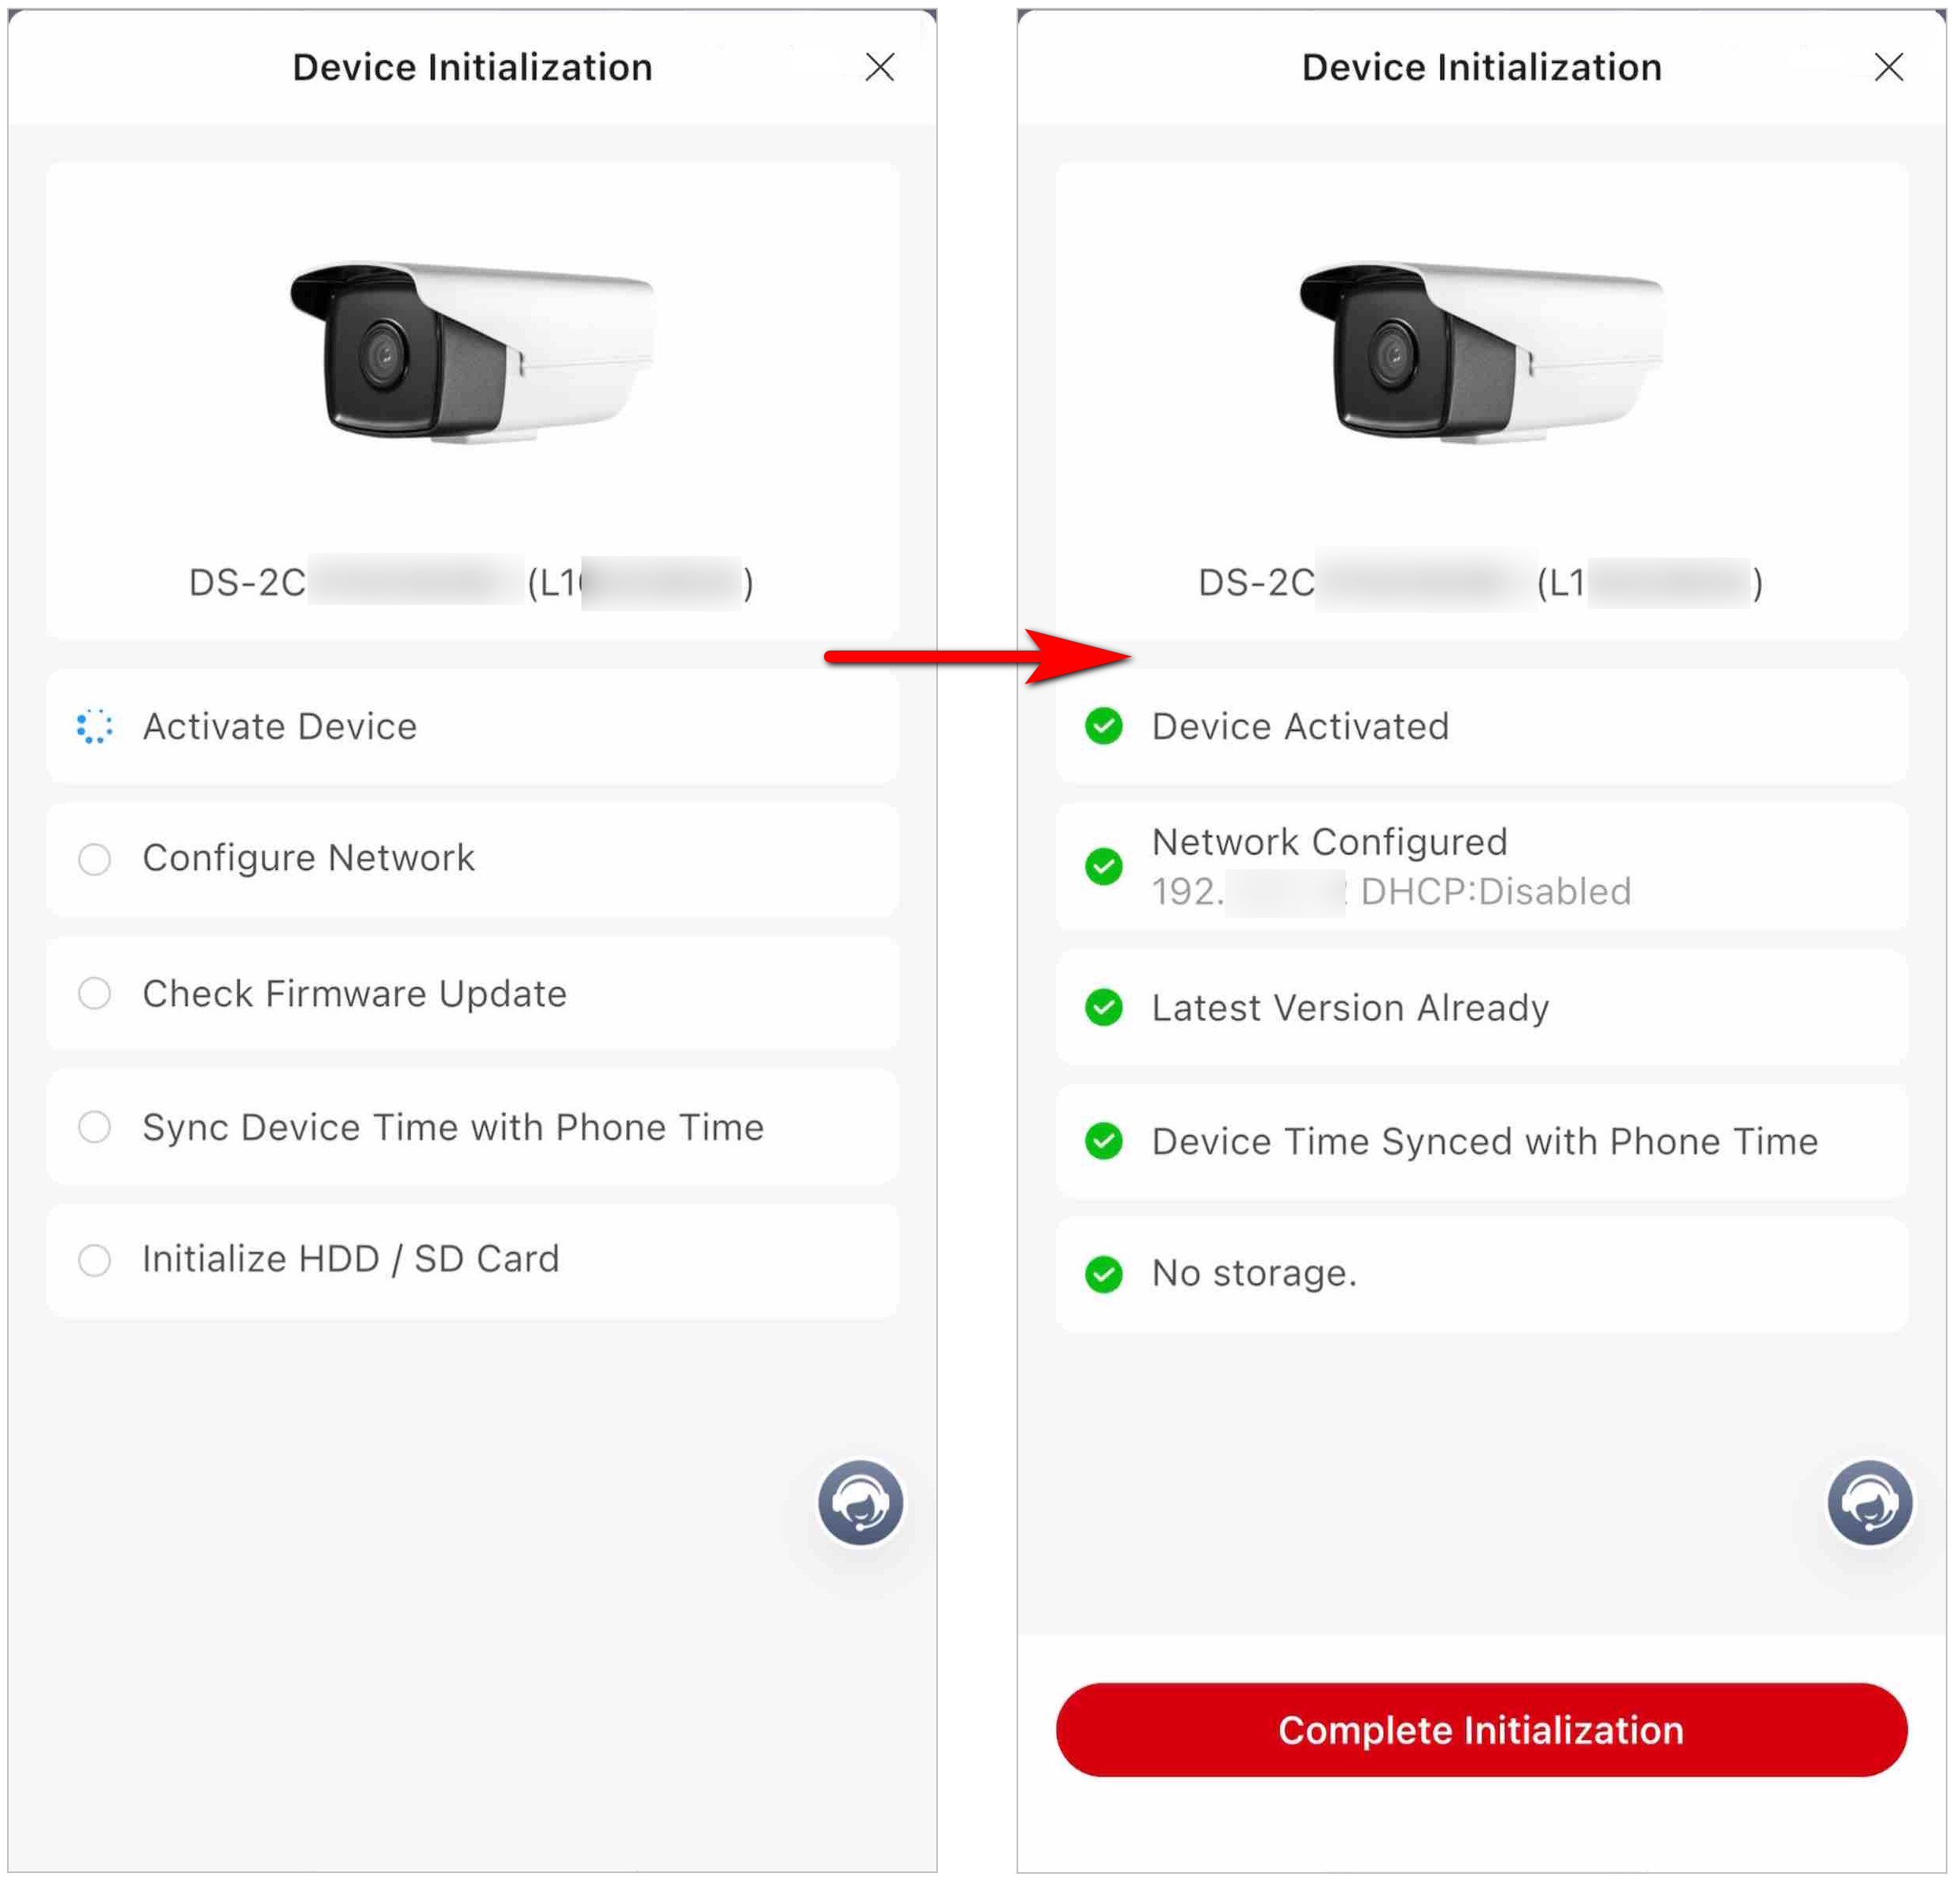
-
Batch Activate Devices
Using the SADP tool, you can automatically batch activate multiple devices. The configuration details are different according to different combinations of devices.
This article contains the following sections.
Batch Activate One NVR Together with One or More Network Cameras
-
Tap
 > Batch Activate on the SADP page, select devices to activate, and tap
Next. Or tap Activate on
the pop-up window of the unactivated devices.
> Batch Activate on the SADP page, select devices to activate, and tap
Next. Or tap Activate on
the pop-up window of the unactivated devices.
-
After the initialization completes, tap Next.
If you select Yes in Step 4 to add the activated channels automatically, the page for automatic adding channels will be displayed.
Figure 5 Add Channel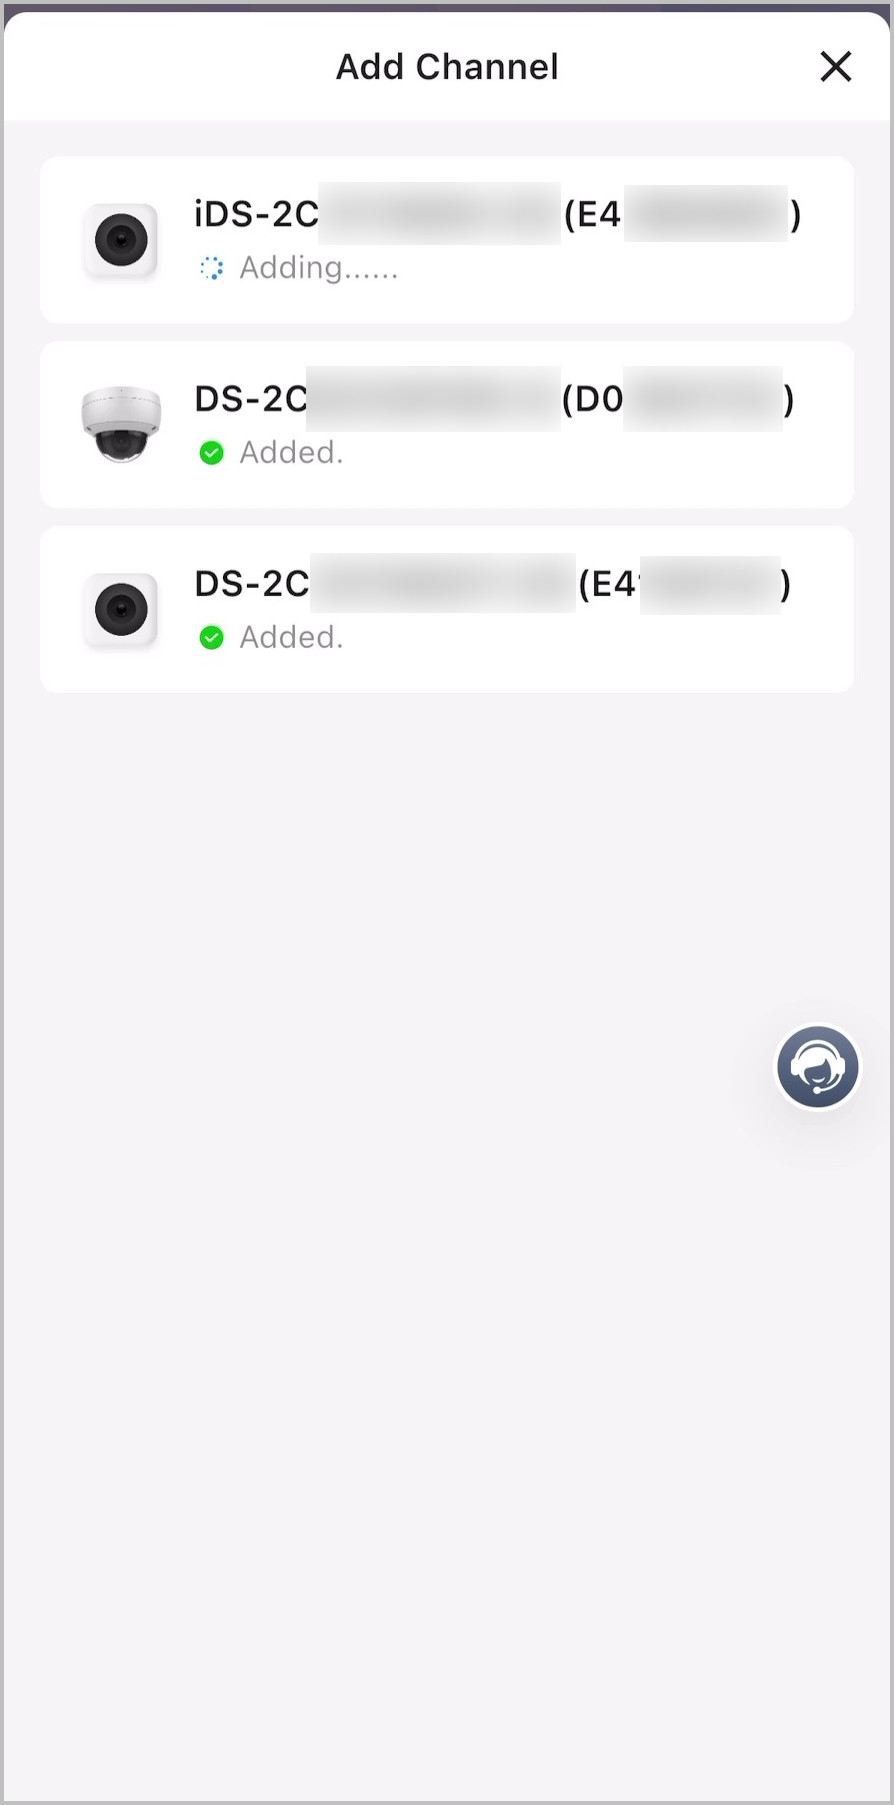
Batch Activate Other Combinations of Devices
-
Tap > Batch Activate on the SADP page, select devices to activate, and tap
Next. Or tap Activate on
the pop-up window of the unactivated devices.
Add Channels to Activated NVR
You can automatically add unactivated cameras as NVR channels, or manually select both activated and unactivated cameras to add as channels.
This article contains the following sections.
Automatically Add Channels to NVR
Only unactivated cameras will be automatically activated and added to the NVR in this method.
-
Tap
 > Auto Add or
  >
>  Add
Channel > Auto Add on the device card of the SADP page, or tap Auto
Add on the pop-up window named Add Chanel after the NVR
initialization.
Add
Channel > Auto Add on the device card of the SADP page, or tap Auto
Add on the pop-up window named Add Chanel after the NVR
initialization.
Manually Select Channels to Add to NVR
You can select both unactivated and activated cameras to add them to the NVR, and the unactivated cameras will be automatically activated.
-
Tap > Manually Select or > Add
Channel > Manually Select on the device card of the SADP page, or tap
Manually Select on the pop-up window named Add
Chanel after the NVR initialization.
Sort NVR Channels
After you add channels to an NVR, you can sort the channels.
Channel sorting is supported only by some NVR models.
-
Enter the Sort Channels page.
-
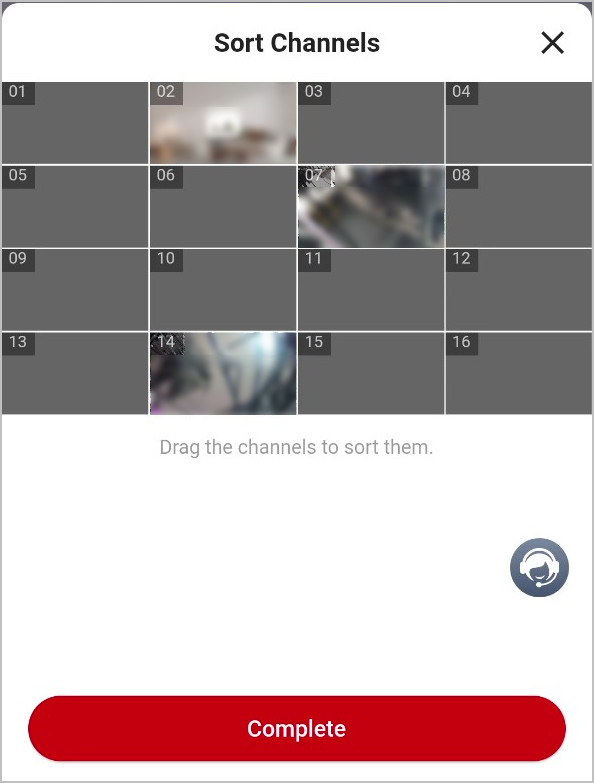
After you add channels to an NVR, and if the total number of channels of the NVR is more than 1, you will enter the Sort Channels page automatically.
-
If the total number of channels of an NVR is more than 1, and you have not sorted the channels, you will be prompted to sort channels in the device card view. Tap the prompt to enter the Sort Channels page.
Figure 6 Channel Sorting Prompt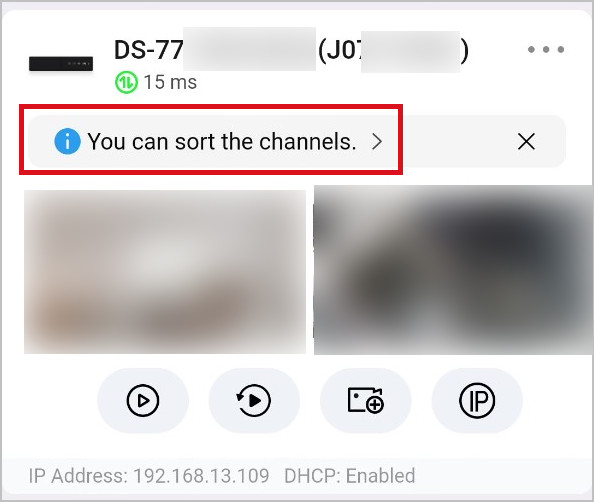
-
-
Drag and drop the channels to sort them.
Figure 7 Sort Channels
Set Verification Method for Password Reset
After the device is activated or initialized, you are recommended to set the verification method for password reset.
-
Tap > Settings on the SADP page.
Note:
Setting the verification method is available only when the device is not added to Hik-Partner Pro and no verification method is set for the device.
Figure 8 Set Verification Method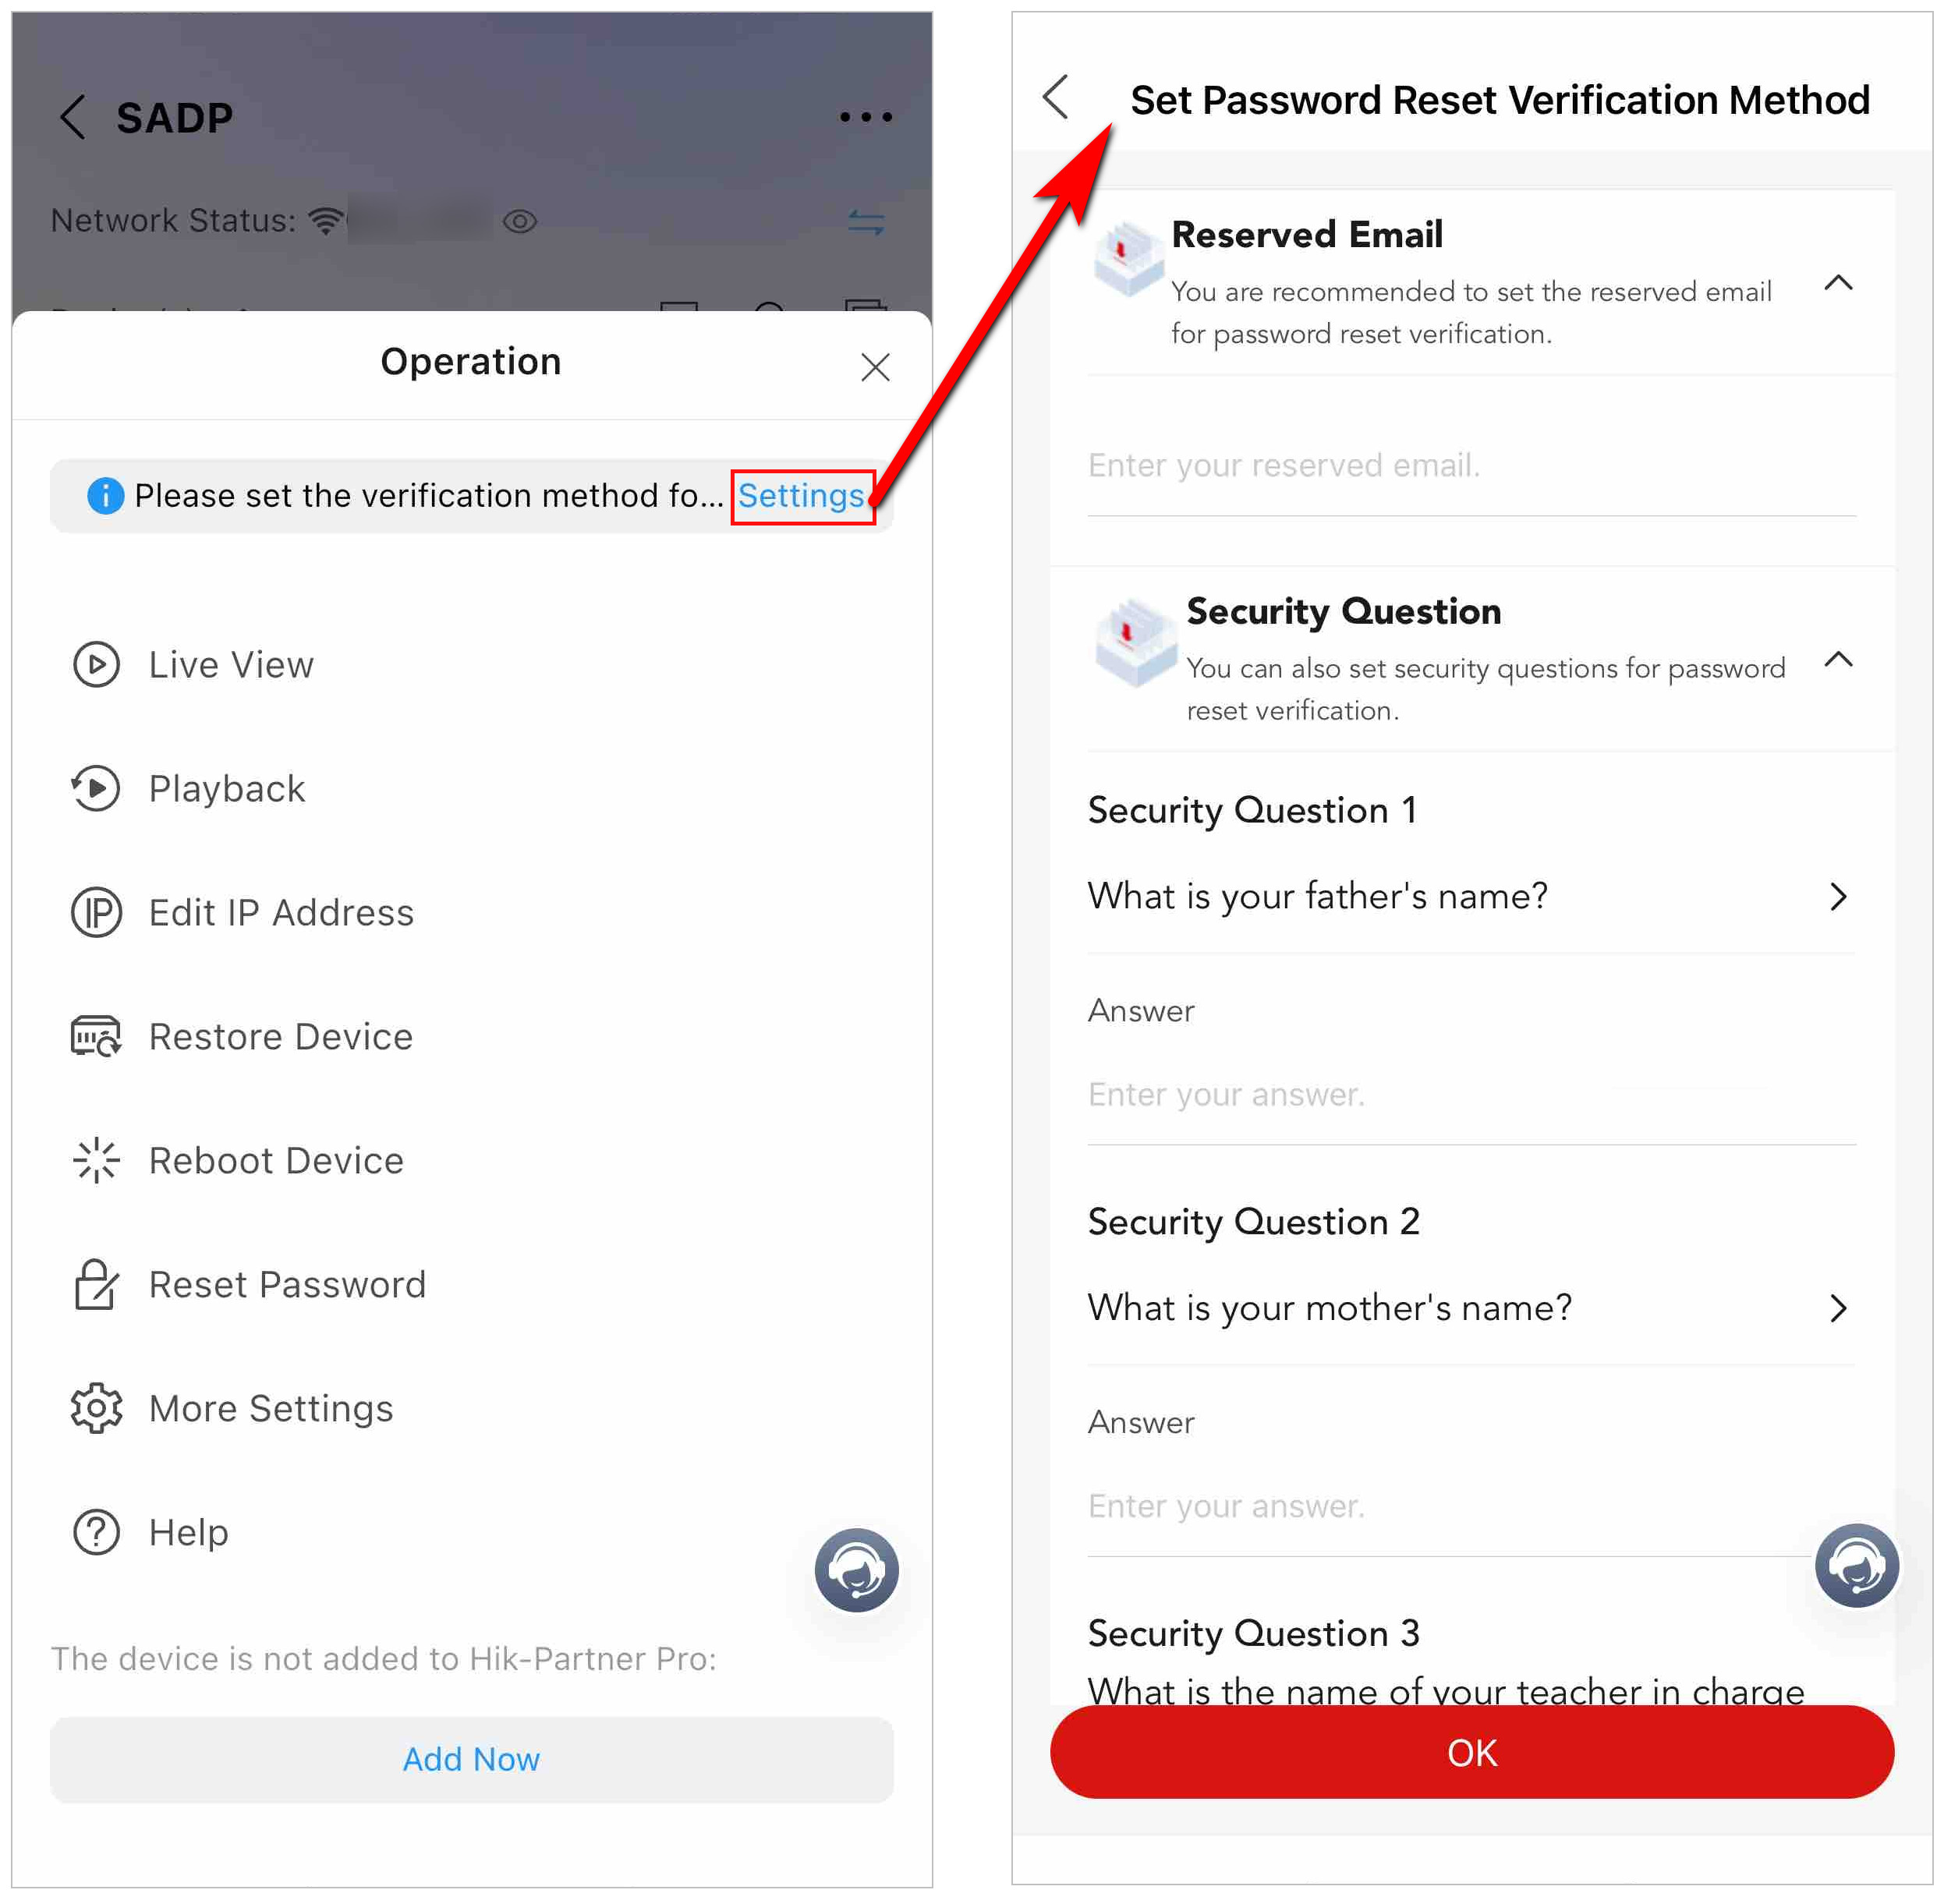
After the verification method is set successfully, you can reset the device password via the reserved email or the security questions. Refer to Reset Device Password via SADP Tool.
Add Devices on LAN (via SADP Tool)
-
Enter the device adding page.
-
Tap Add in the Site & Device area on the Home page.
-
Tap Site on the bottom, and then tap Add Device above the site list.
-
Tap Site on the bottom, tap a site to enter its details page, and tap Add Device or
 > Add Device.
 -
Tap
 in the upper-left corner
on the Home page.
in the upper-left corner
on the Home page.
-
- Tap SADP.
- Optional: Tap Activate to activate and initialize the devices to be added if they are not activated. Refer to Initialize NVR on LAN, Initialize Device on LAN (Except for NVR), and Batch Activate Devices for details.
- Tap Complete to enter the Add to Hik-Partner Pro page.
- Optional: If you do not select a site in Step 1, you can tap Existing Site to select an existing site to add the devices to, otherwise, the devices will be added to an automatically-created new site.
- Select the devices to be added and tap OK.
- Optional: Tap Complete and the added devices are displayed on the page of the site.
Reset Device Password via SADP Tool
The SADP tool offers various ways of password reset, and there is always one way to suit your situation, regardless of whether you have forgot the password or not, whether you have set the verification method for password reset or not, and whether submitting support cases is supported in your country/region or not.
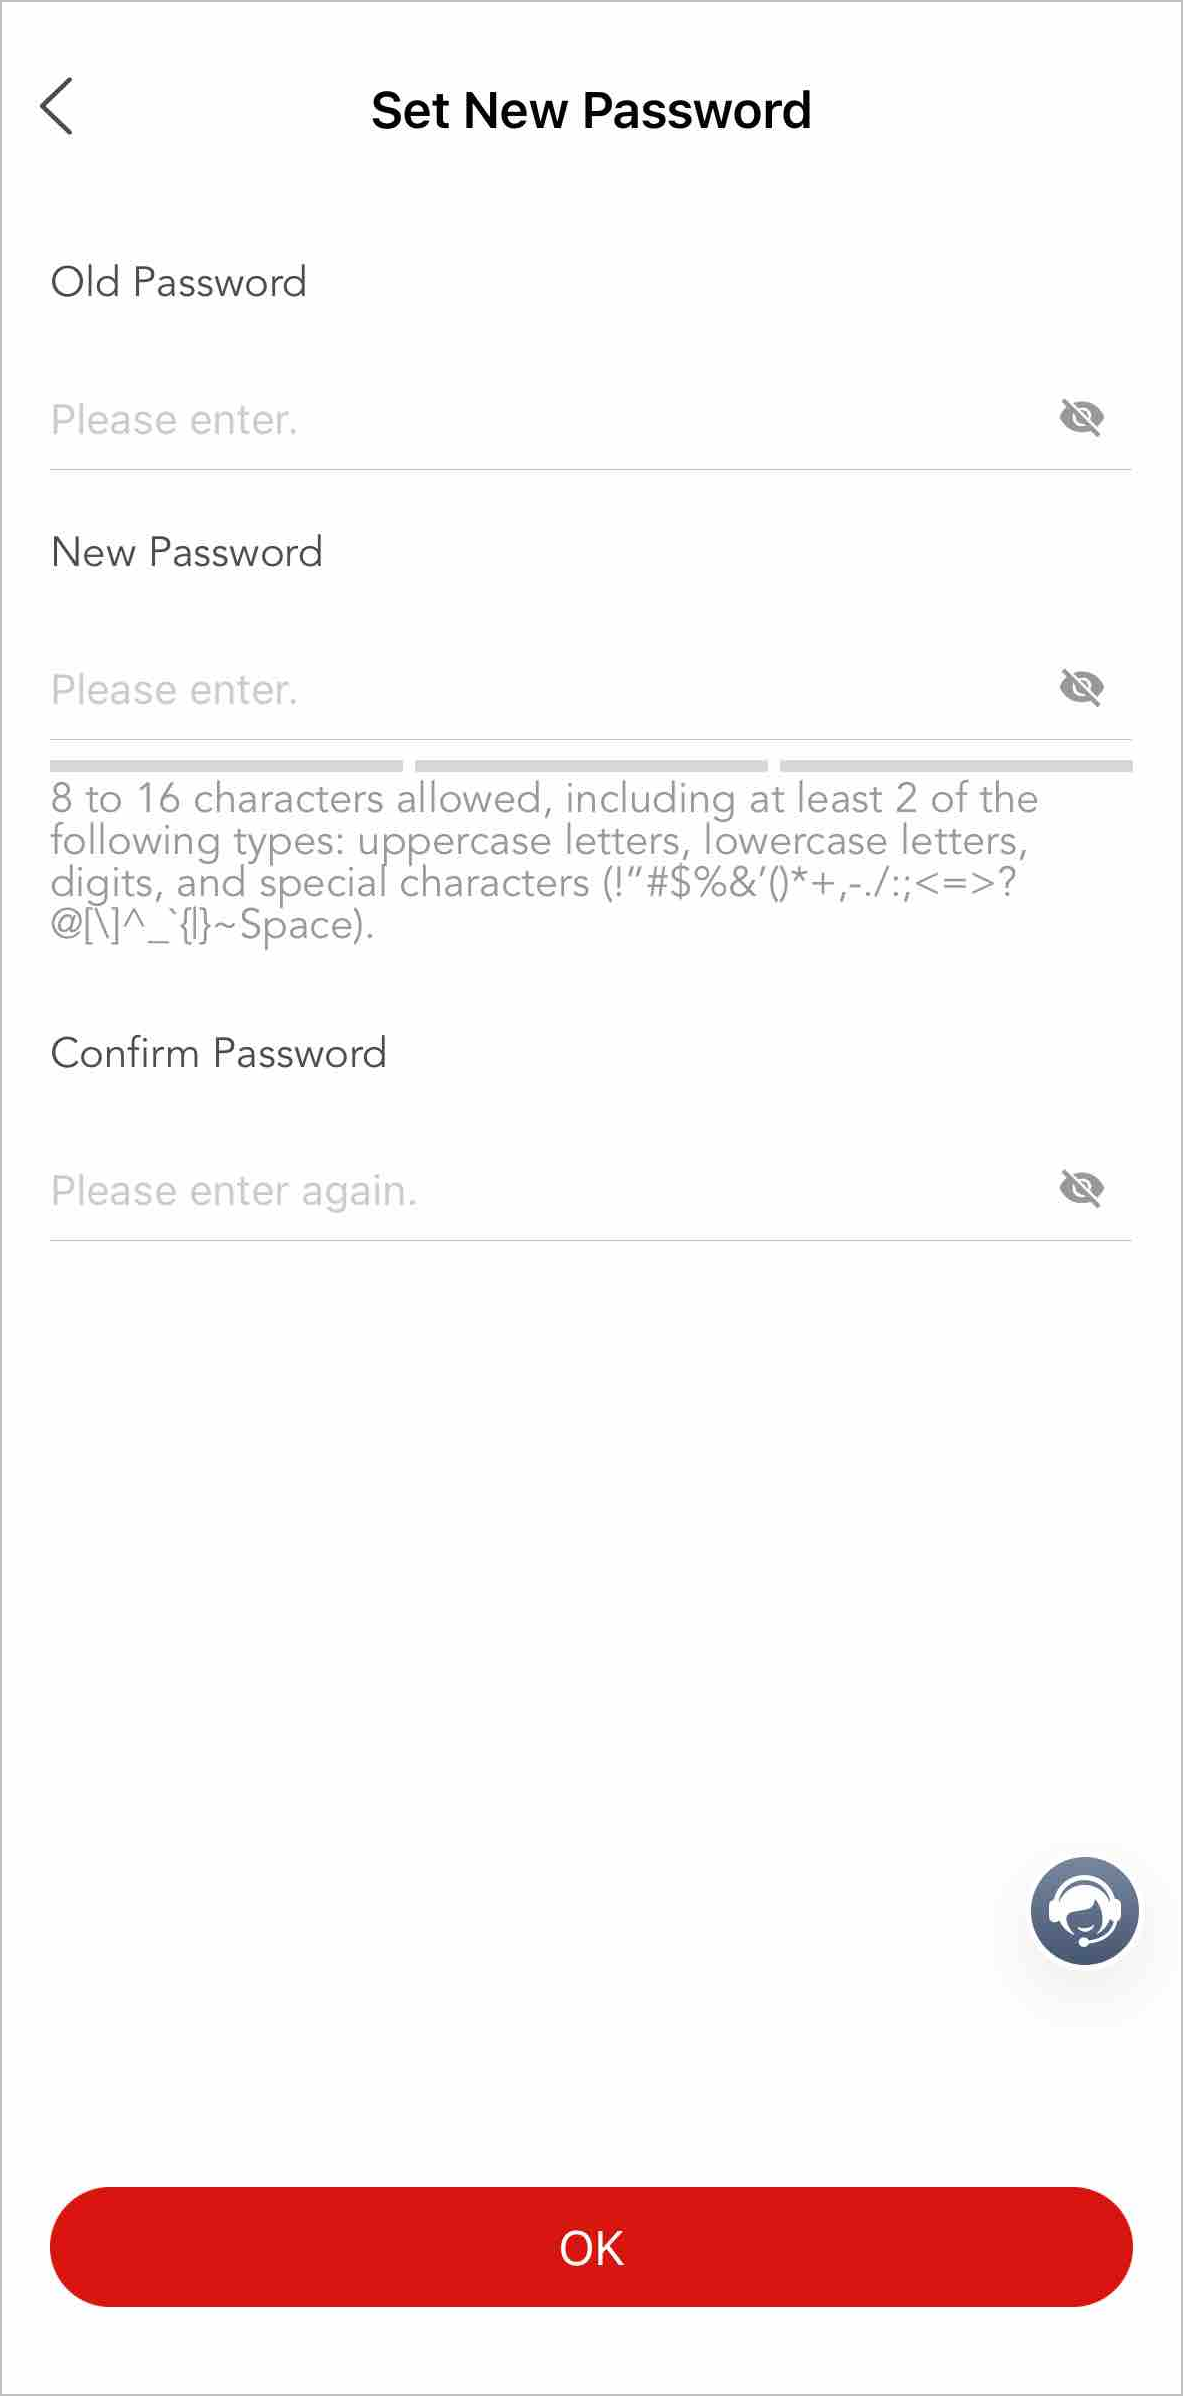
Reset Password by Entering Old Password
If you do not forget the password, you can reset it by entering the old password.
-
Tap >
 Reset
Password on the SADP page.
Reset
Password on the SADP page.
-
Select Know Password if you know the old
password.
Figure 9 Reset Password via Old Password
Reset Password via Reserved Email
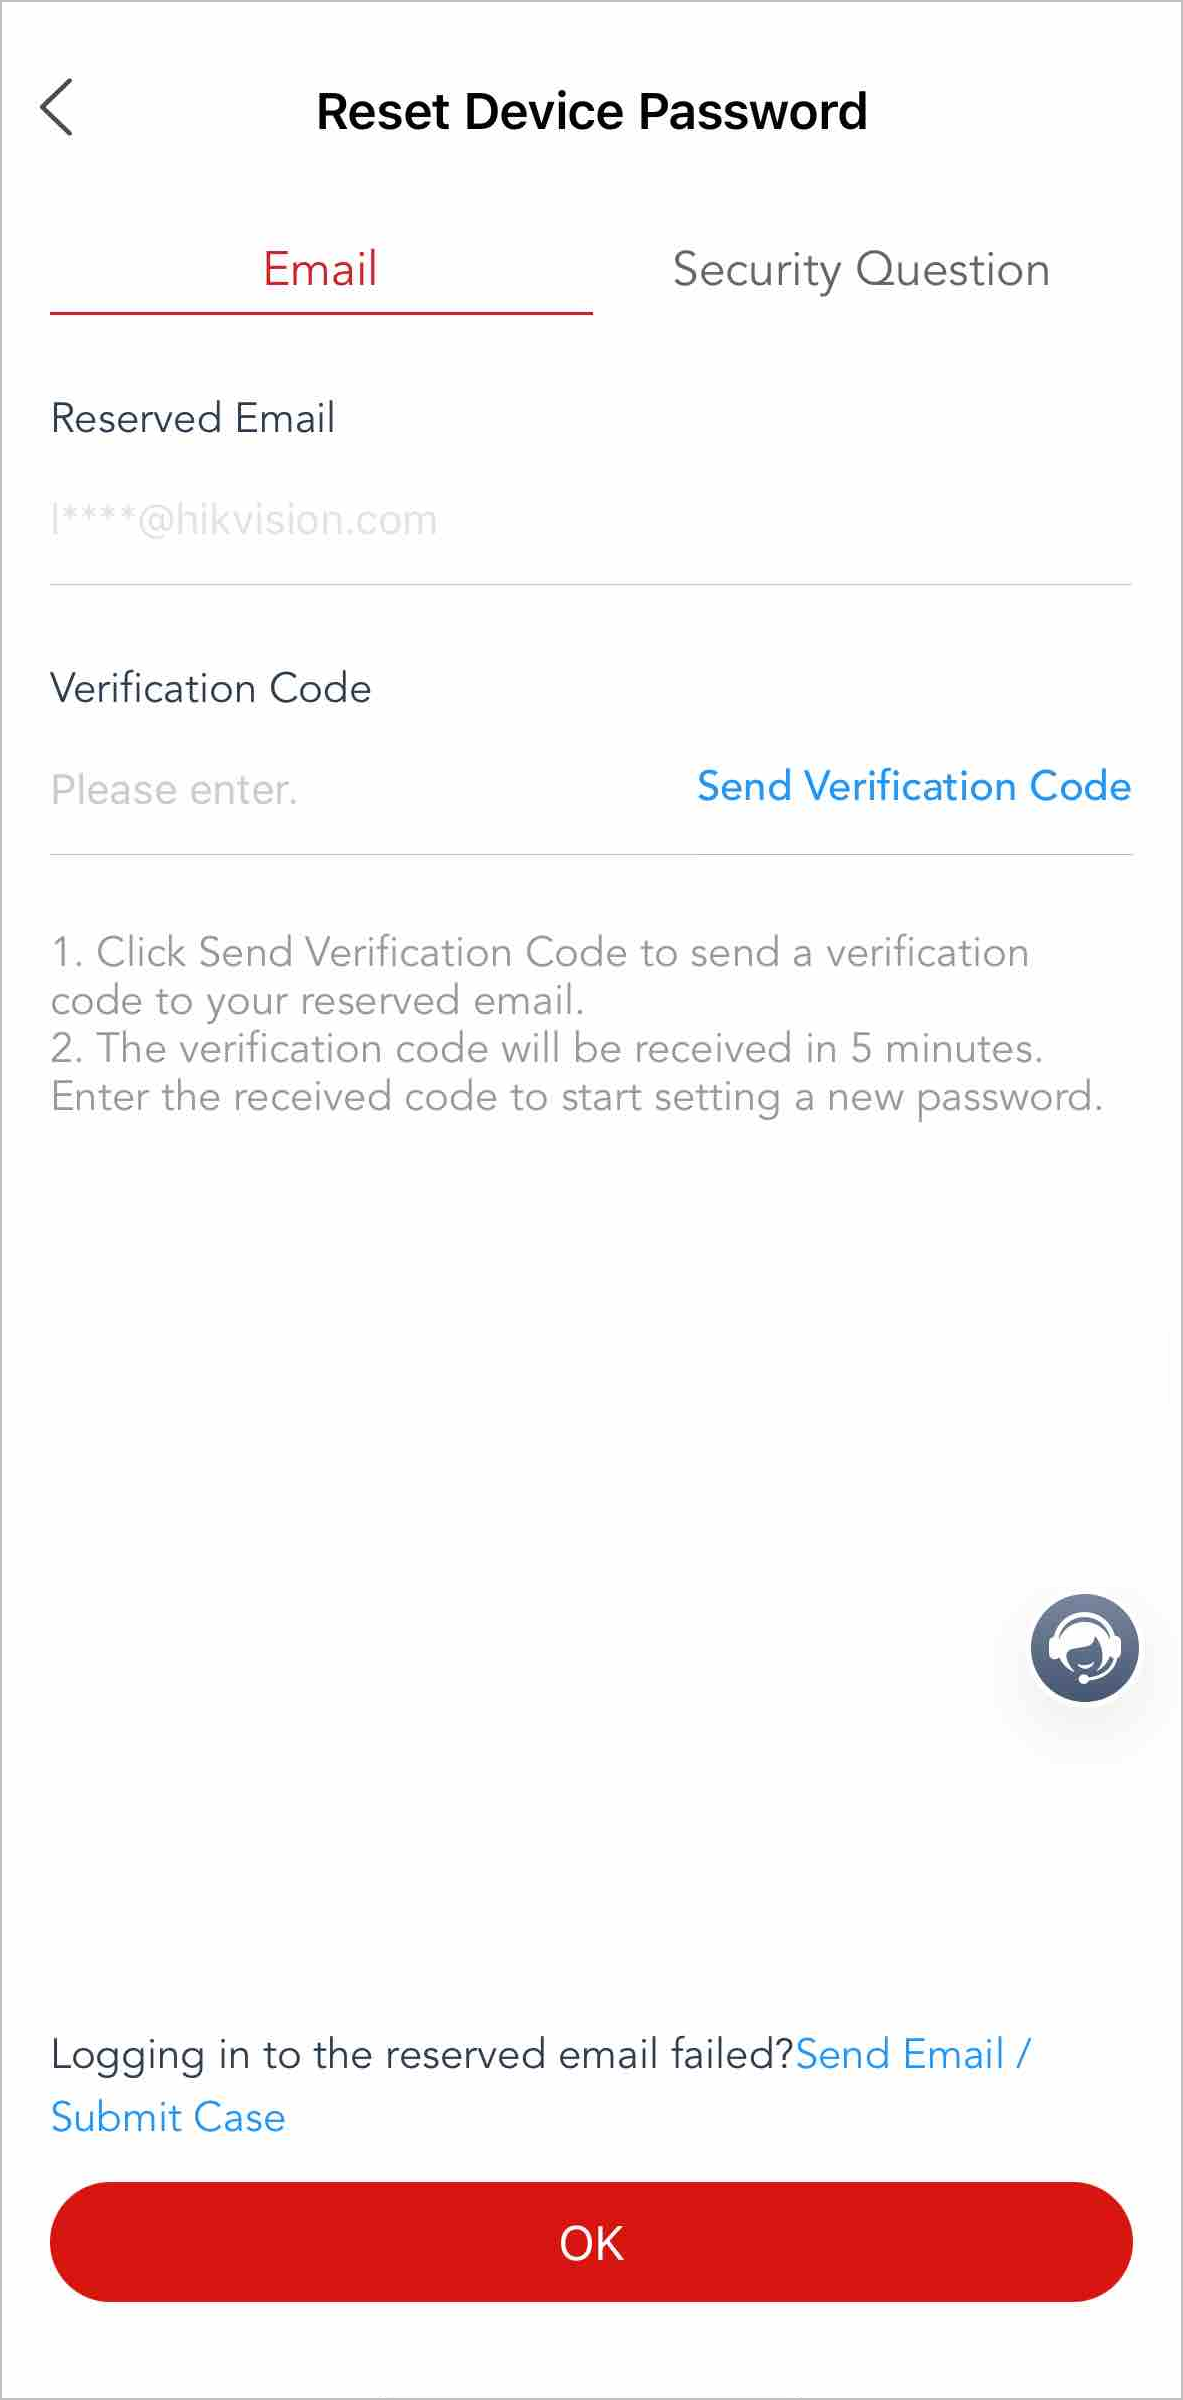
If you forgot the password, and if you have set a reserved email, you can reset the password via reserved email.
-
Tap > Reset
Password > Forgot Password on the SADP page.
-
Select Forgot Password.
Figure 10 Reset Password via Reserved Email
Reset Password by Answering Security Questions
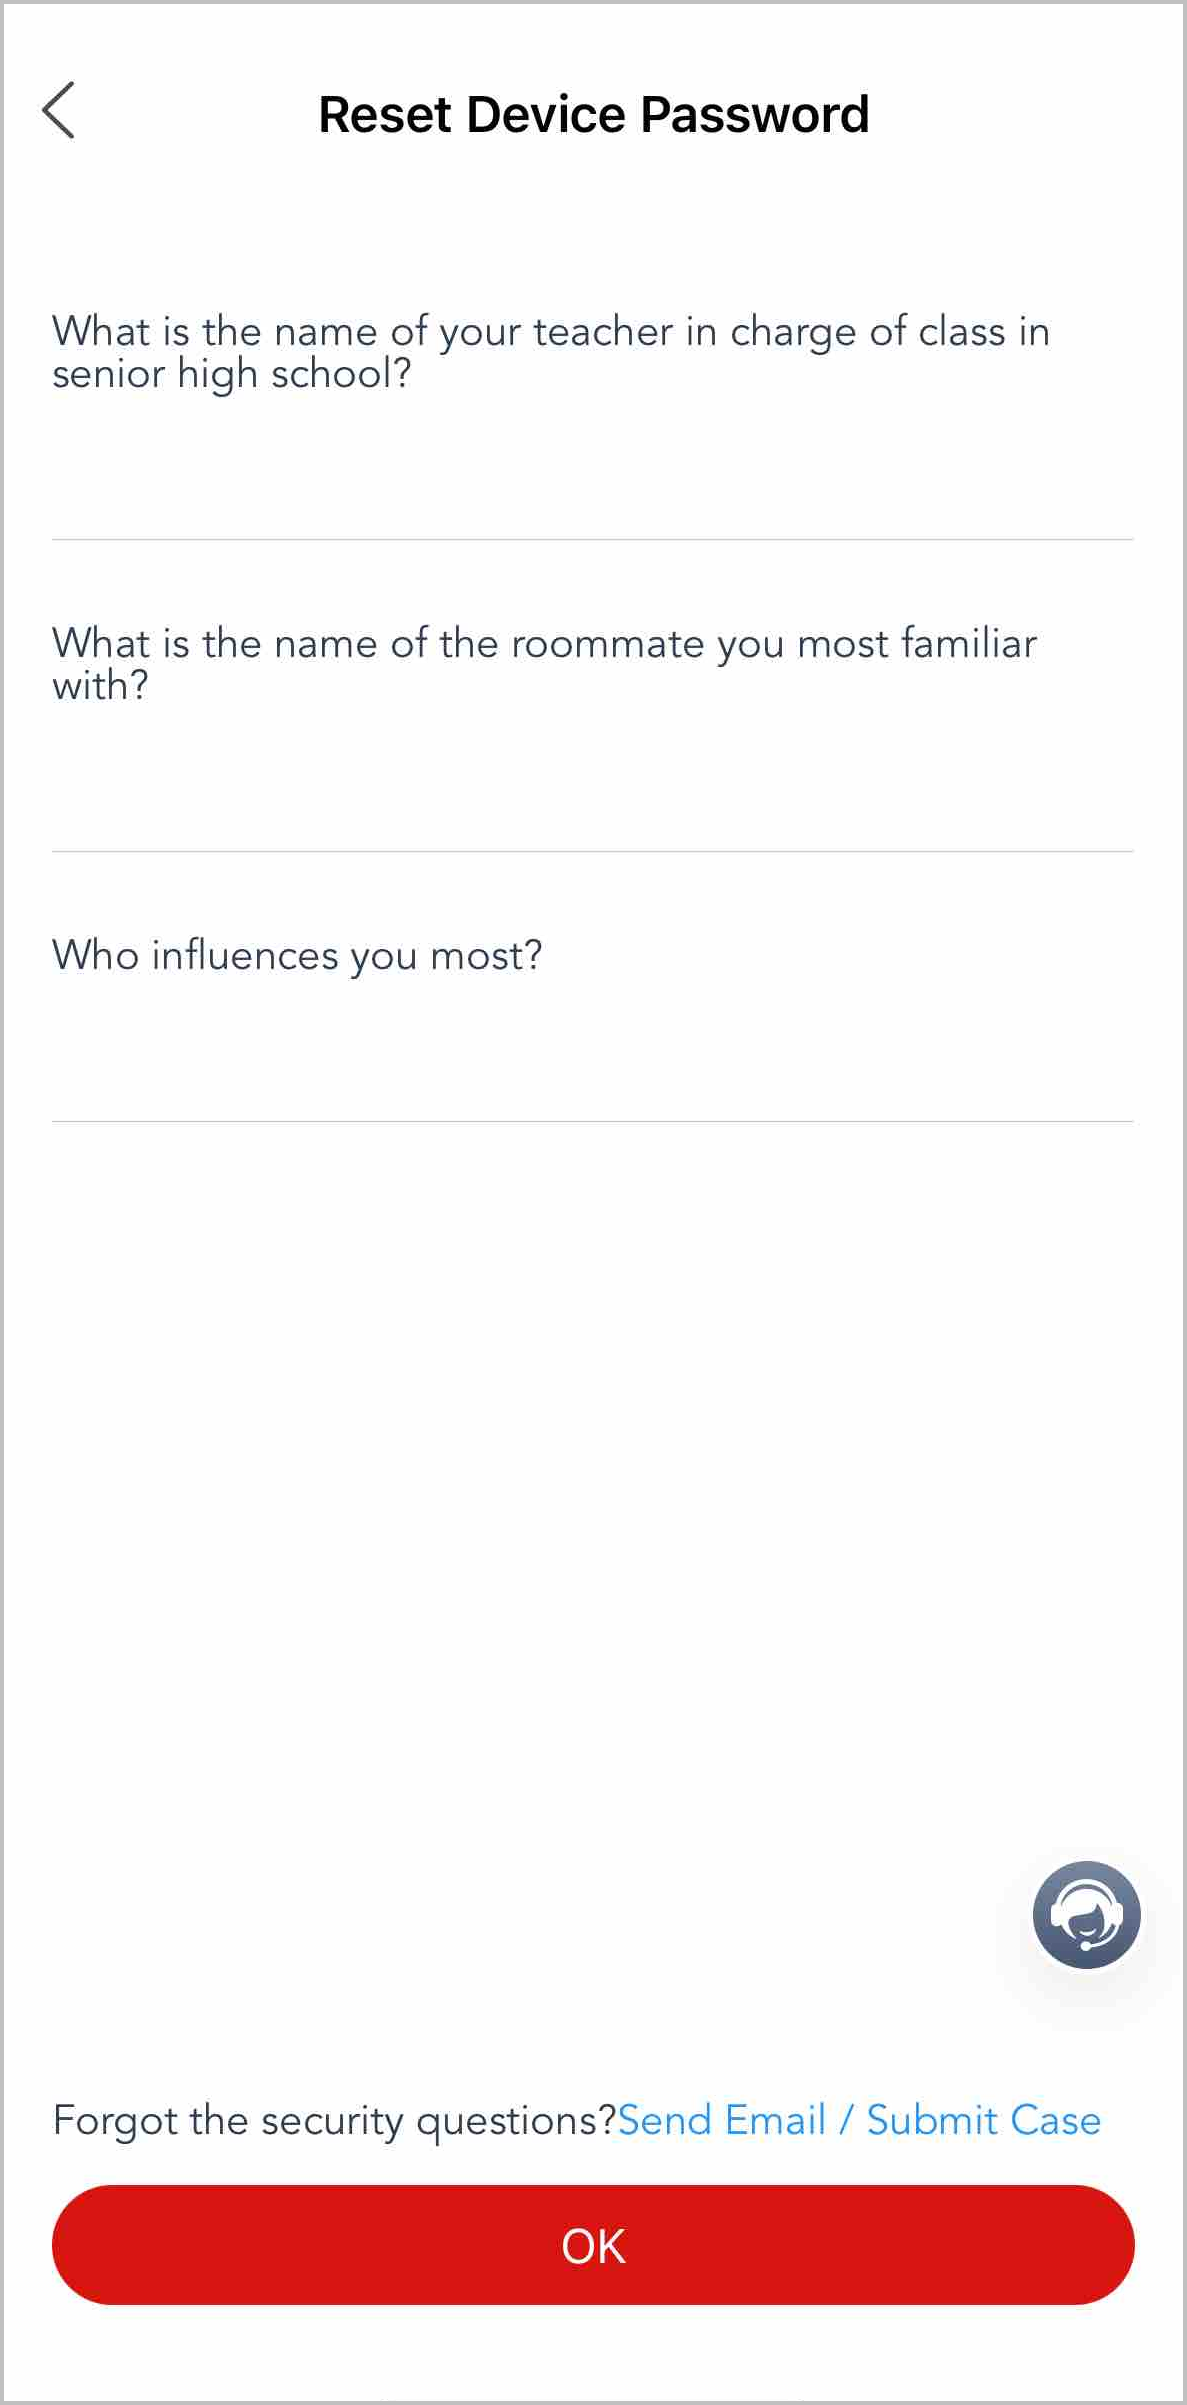
If you forgot the password, and if you have set answers to security questions, you can reset the password by answering the questions.
-
Tap > Reset
Password > Forgot Password on the SADP page.
-
Enter the answers to the 3 security questions and tap
OK.
Figure 11 Reset Password via Security Questions
Reset Password by Submitting Case
If you have not set the reserved email or security questions and have forgot the password, and the Case module is supported in your country/region, you can reset the password by submitting a device password reset case.
-
Tap > Reset
Password > Forgot Password on the SADP page.
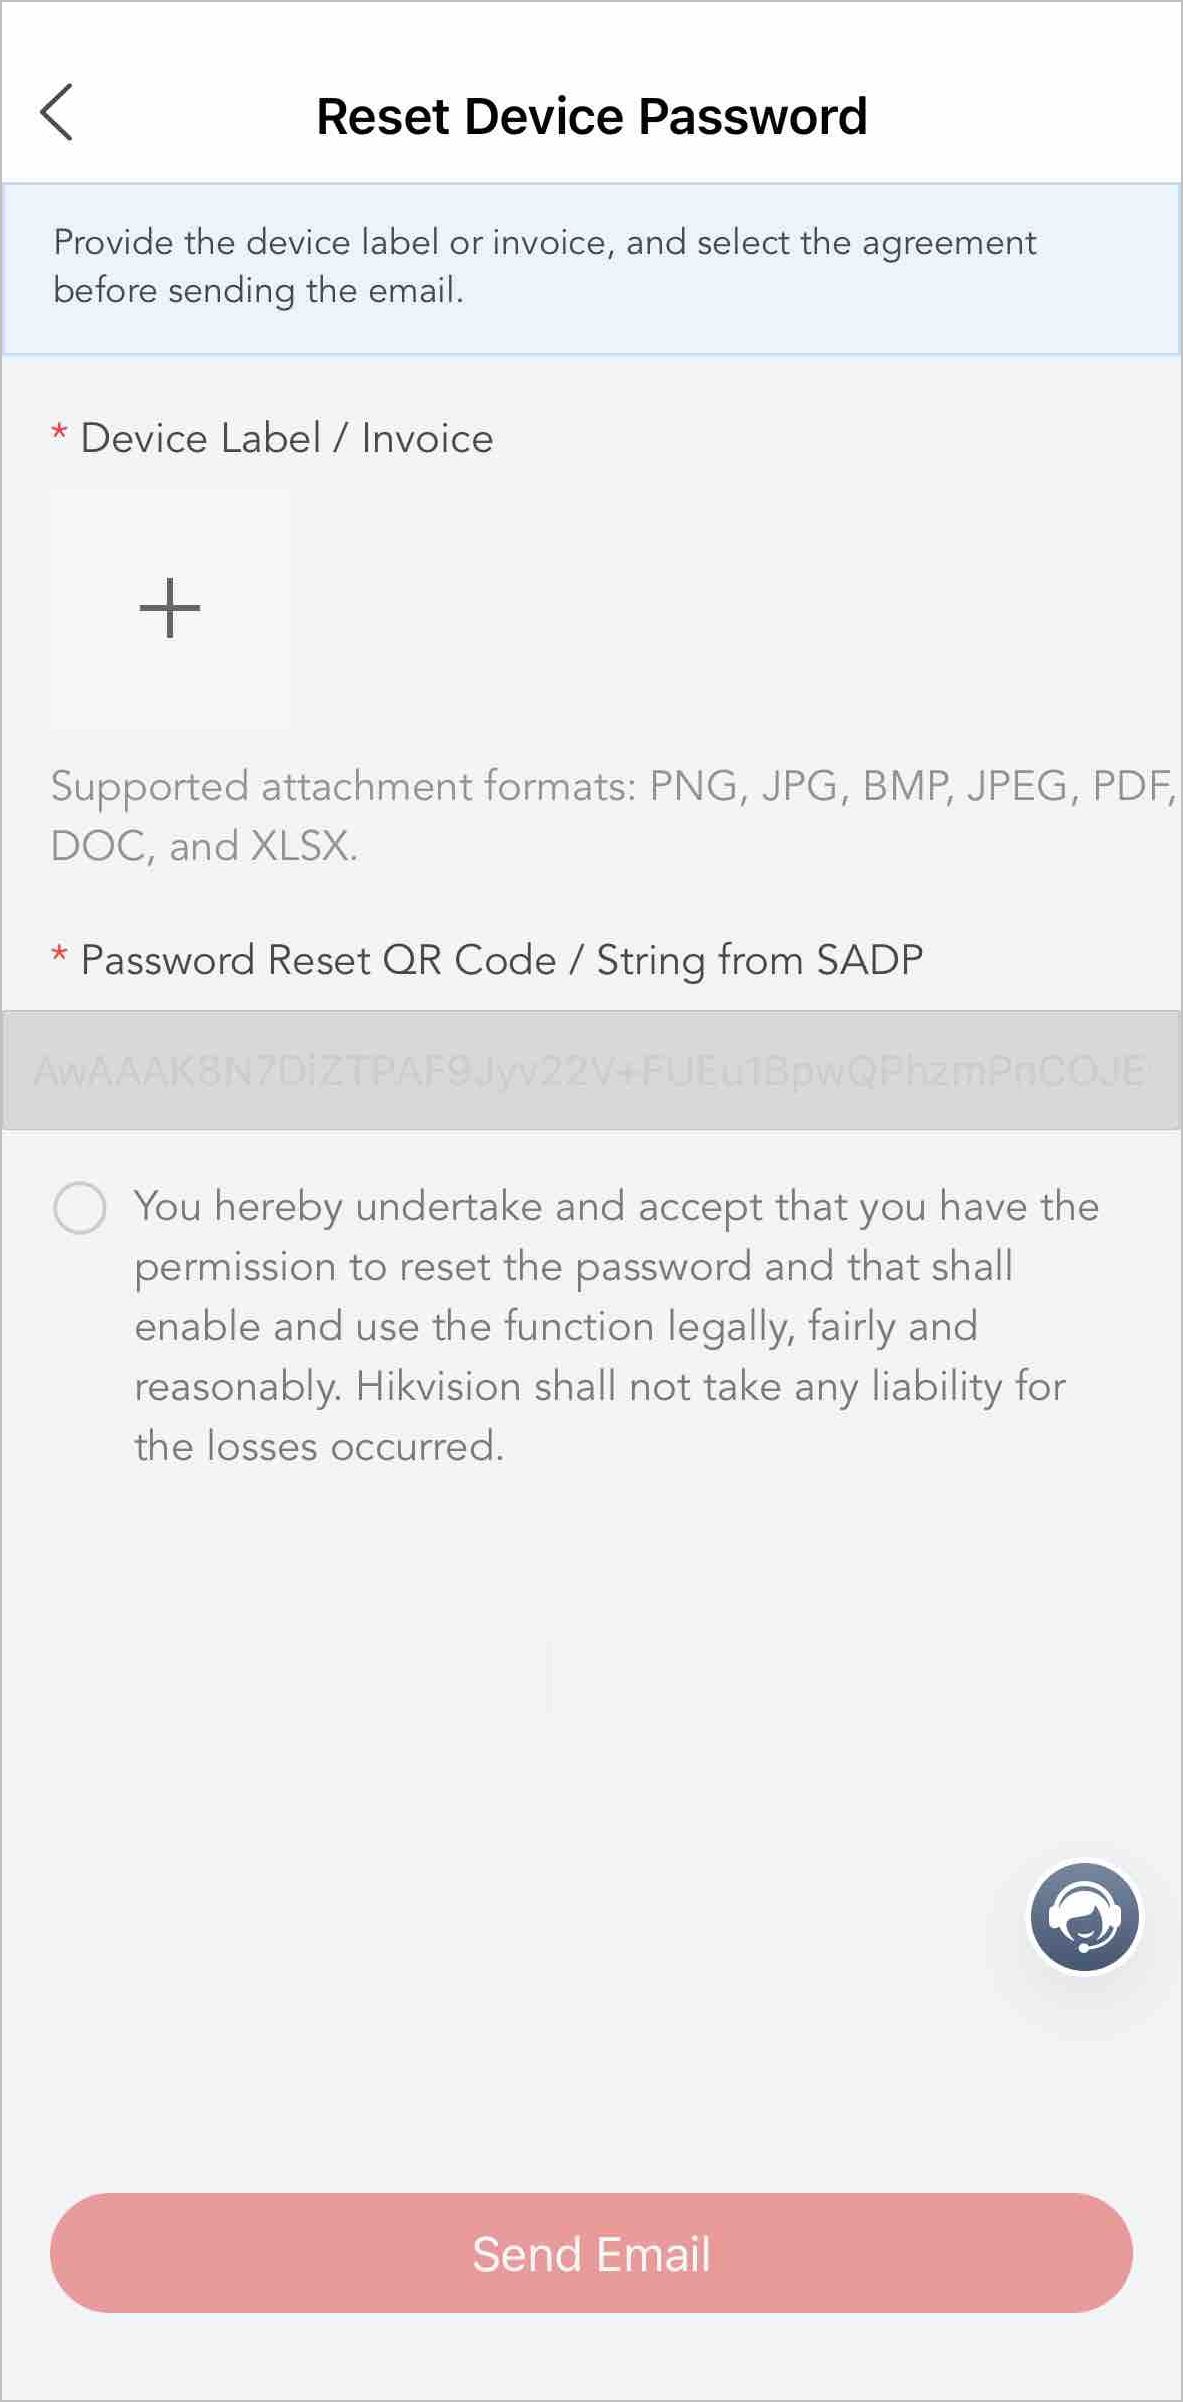
Reset Password by Sending Email to Technical Support
If you have not set the reserved email or security questions and have forgot the password, and the Case module is not supported in your country/region, you can reset the password by sending an email to technical support.
-
Tap > Reset
Password > Forgot Password on the SADP page.
Figure 12 Reset Password via Technical Support
-
After you receive the reset code/string from technical support, enter the
reset code/string on the Reset Device Password page, set the new password,
and tap OK.
Note:
If you do not receive a reply, you can tap Send Again to send the email again.
Figure 13 Set New Password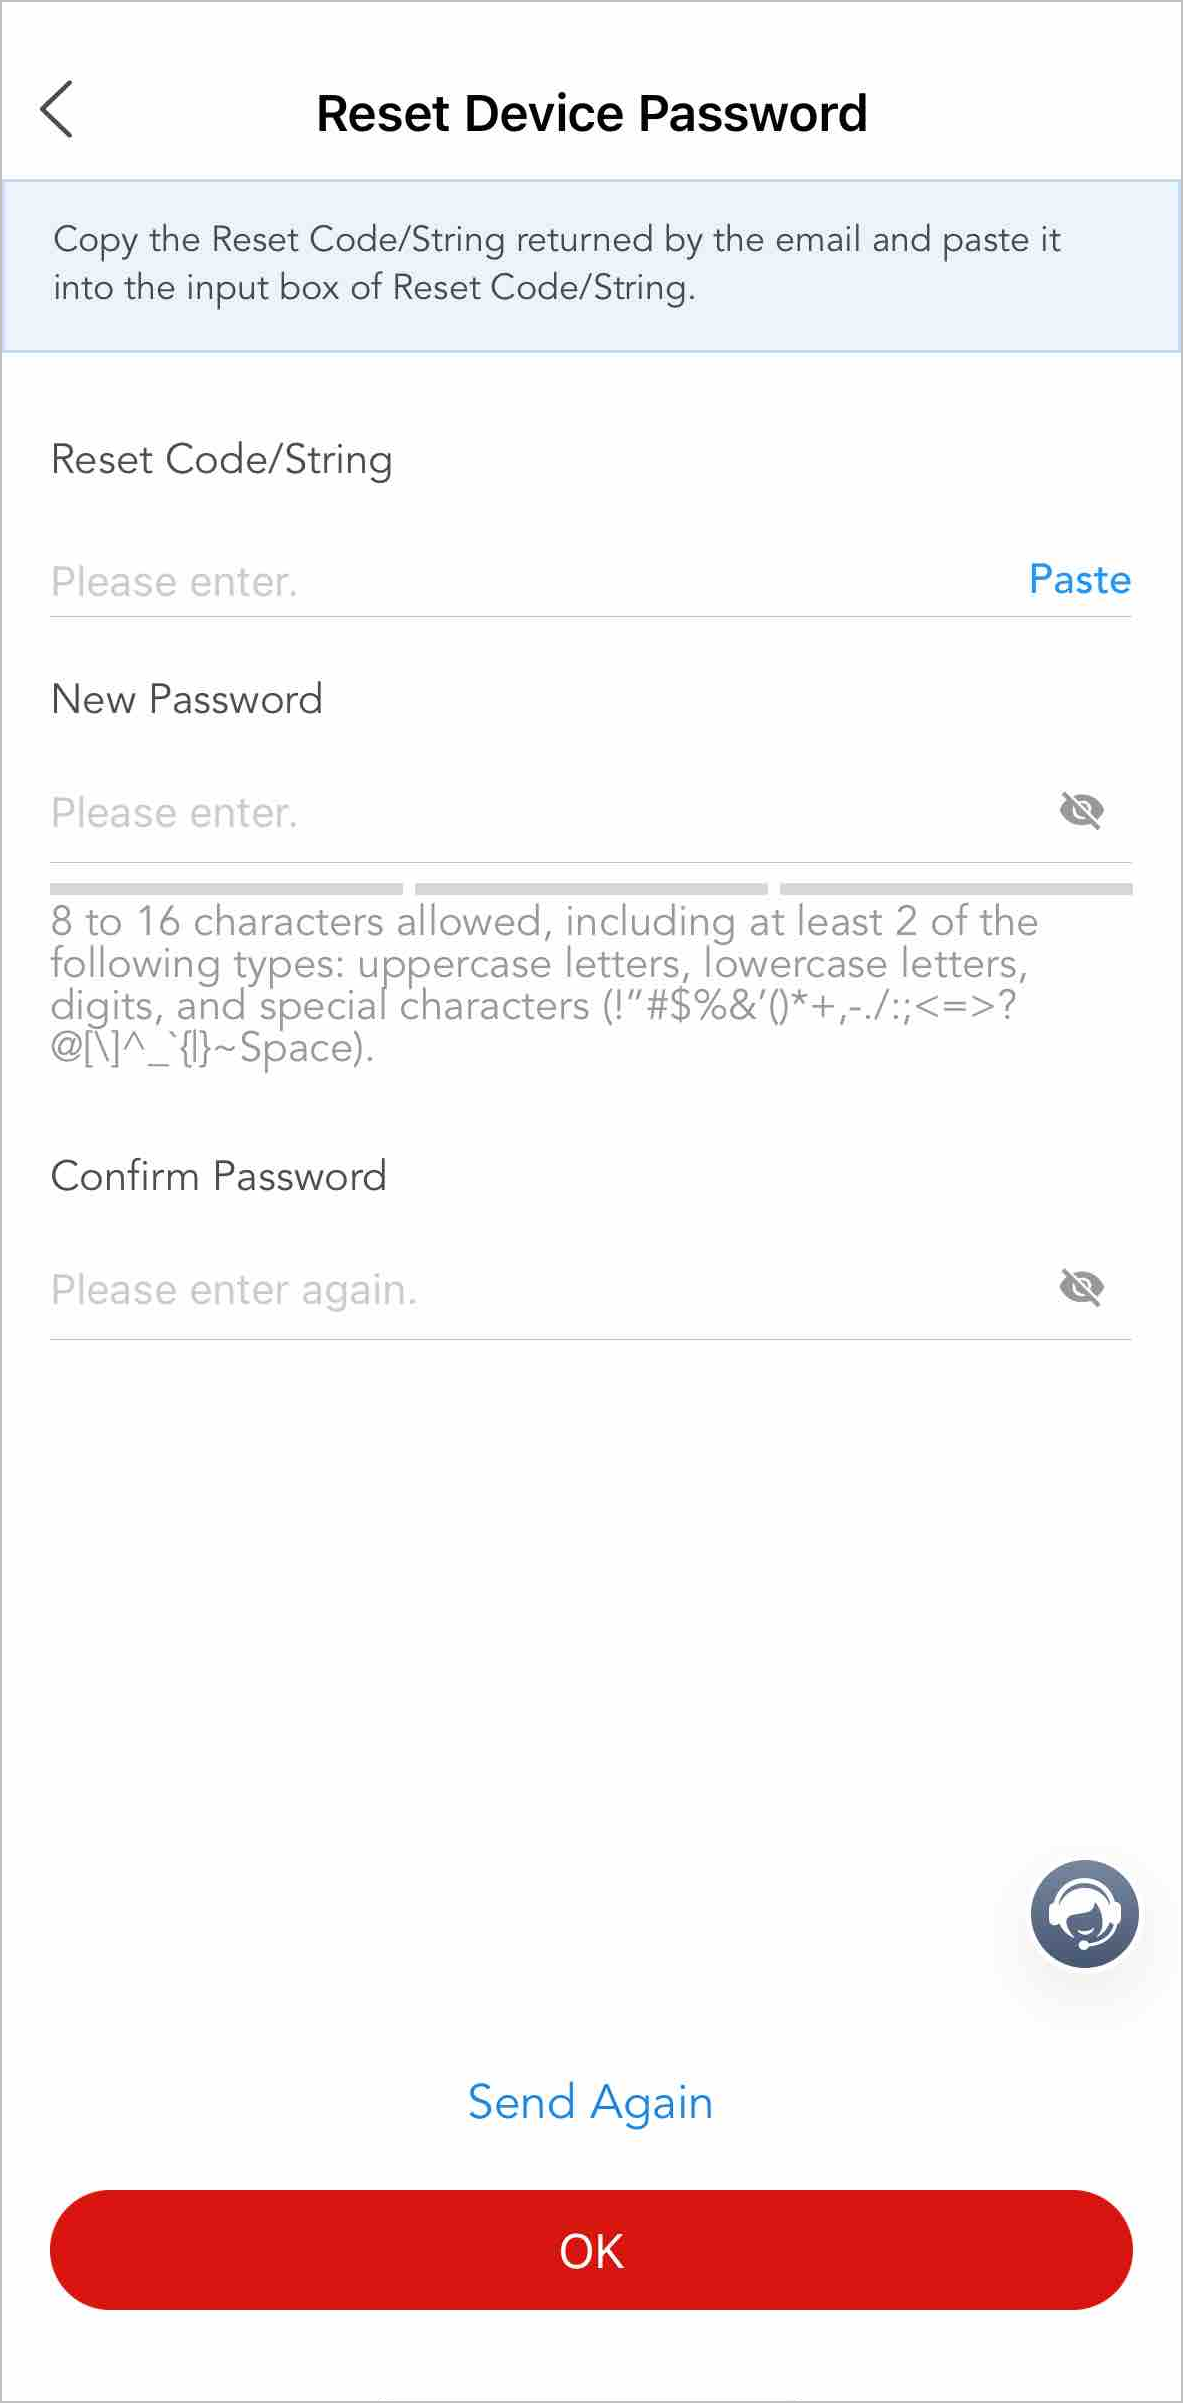
Add Devices to Hik-Connect
After devices are activated or initialized, you can choose to directly add them to your or your customer's Hik-Connect.
-
Enter the device adding page.
-
Tap Add in the Site & Device area on the Home page.
-
Tap Site on the bottom, and then tap Add Device above the site list.
-
Tap Site on the bottom, tap a site to enter its details page, and tap Add Device or
> Add Device. -
Tap
in the upper-left corner
on the Home page.
-
- Tap SADP.
- Optional: Tap Activate to activate and initialize the devices to be added if they are not activated. Refer to Initialize NVR on LAN, Initialize Device on LAN (Except for NVR), and Batch Activate Devices for details.
- Tap Complete to enter the Add to Hik-Partner Pro page.
- Tap Add to Hik-Connect to switch to the page for adding devices to Hik-Connect.
- Select the devices to be added and tap OK.
- Scan the device QR codes with your Hik-Connect Mobile Client to finish the device adding.
More Features with SADP Tool
Manage Default Device Password
On the top right of the SADP page, tap  > Manage Default Device Password to set a default device password and a default verification code.
During device initialization, the default password and verification code will be automatically filled in, but you can still edit and set a different password and verification code for the devices.
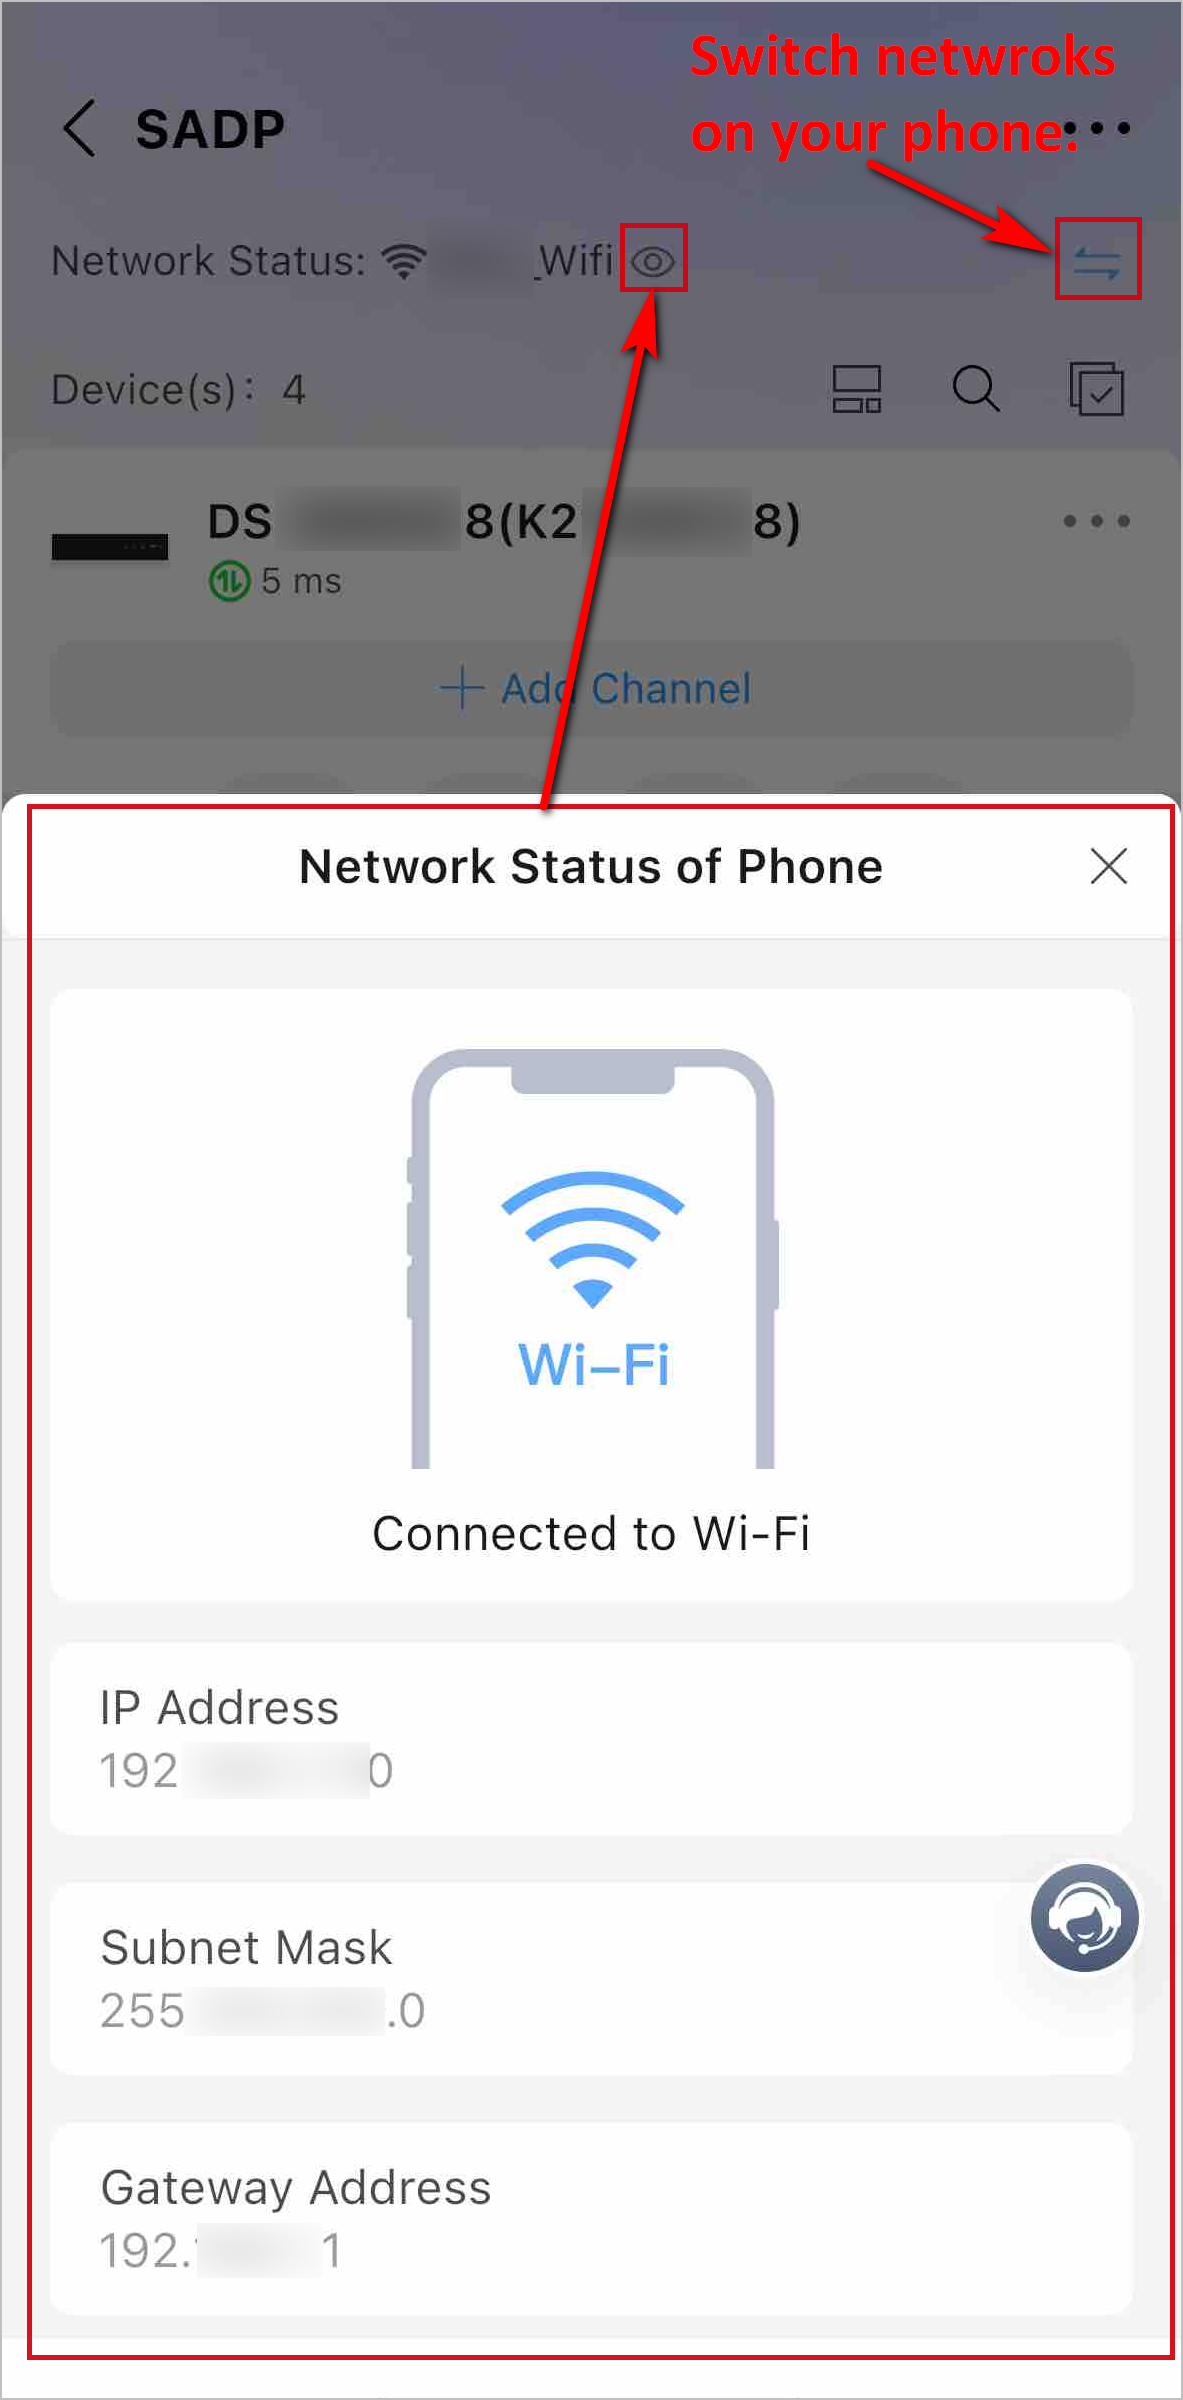
Check Network Status of Phone and Switch Networks
You can check the network connection details of your phone and switch networks on your phone as shown below.
Switch Between Device Card View and Device List View
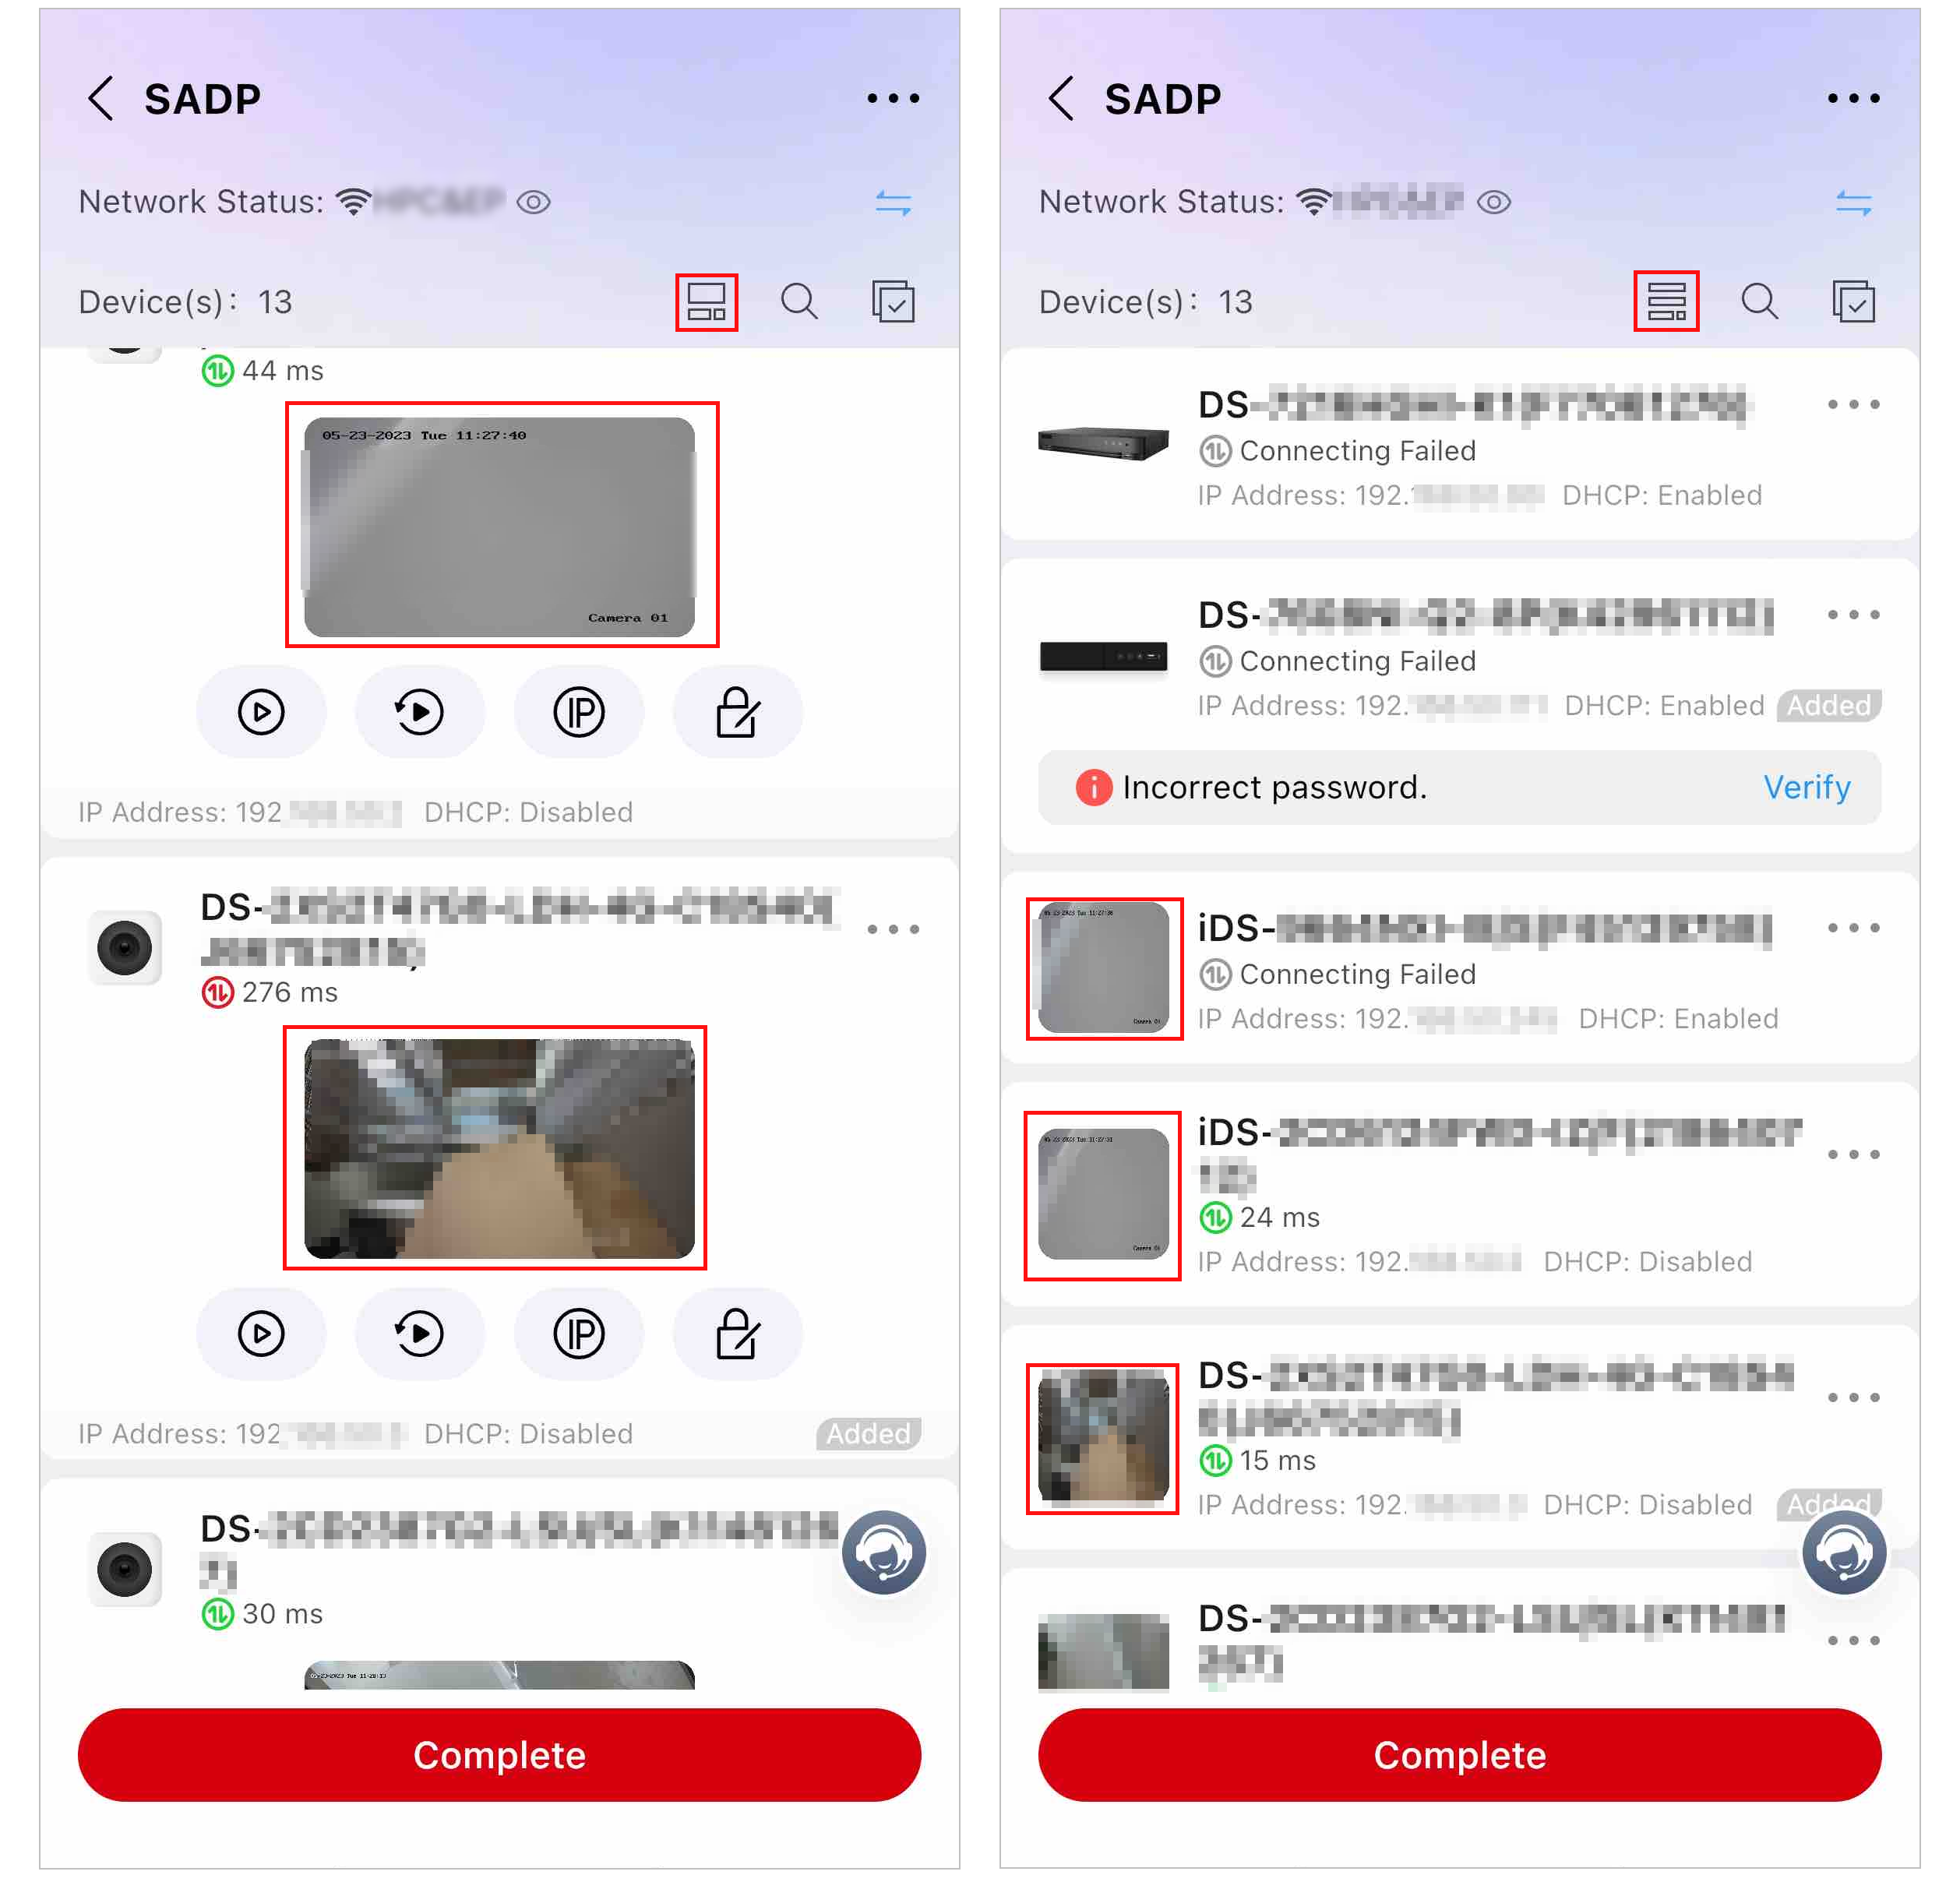
You can switch between the device card view and list view by tapping
 and
and  .
.
Both the card and list views display the thumbnail images of the channels so that you can easily recognize the devices. Moreover, in card view, the device card of an NVR/DVR displays thumbnail images of all channels, and you can swipe left and right to view all the thumbnail images.
You can check the device type icon, device name, device serial number, IP address, whether DHCP is enabled, thumbnail images of channels (for encoding devices), whether the device is added to Hik-Partner Pro, real-time ping, and device exceptions.
Search for Devices
Tap  and enter keywords of the device
model and serial number to search for devices.
and enter keywords of the device
model and serial number to search for devices.
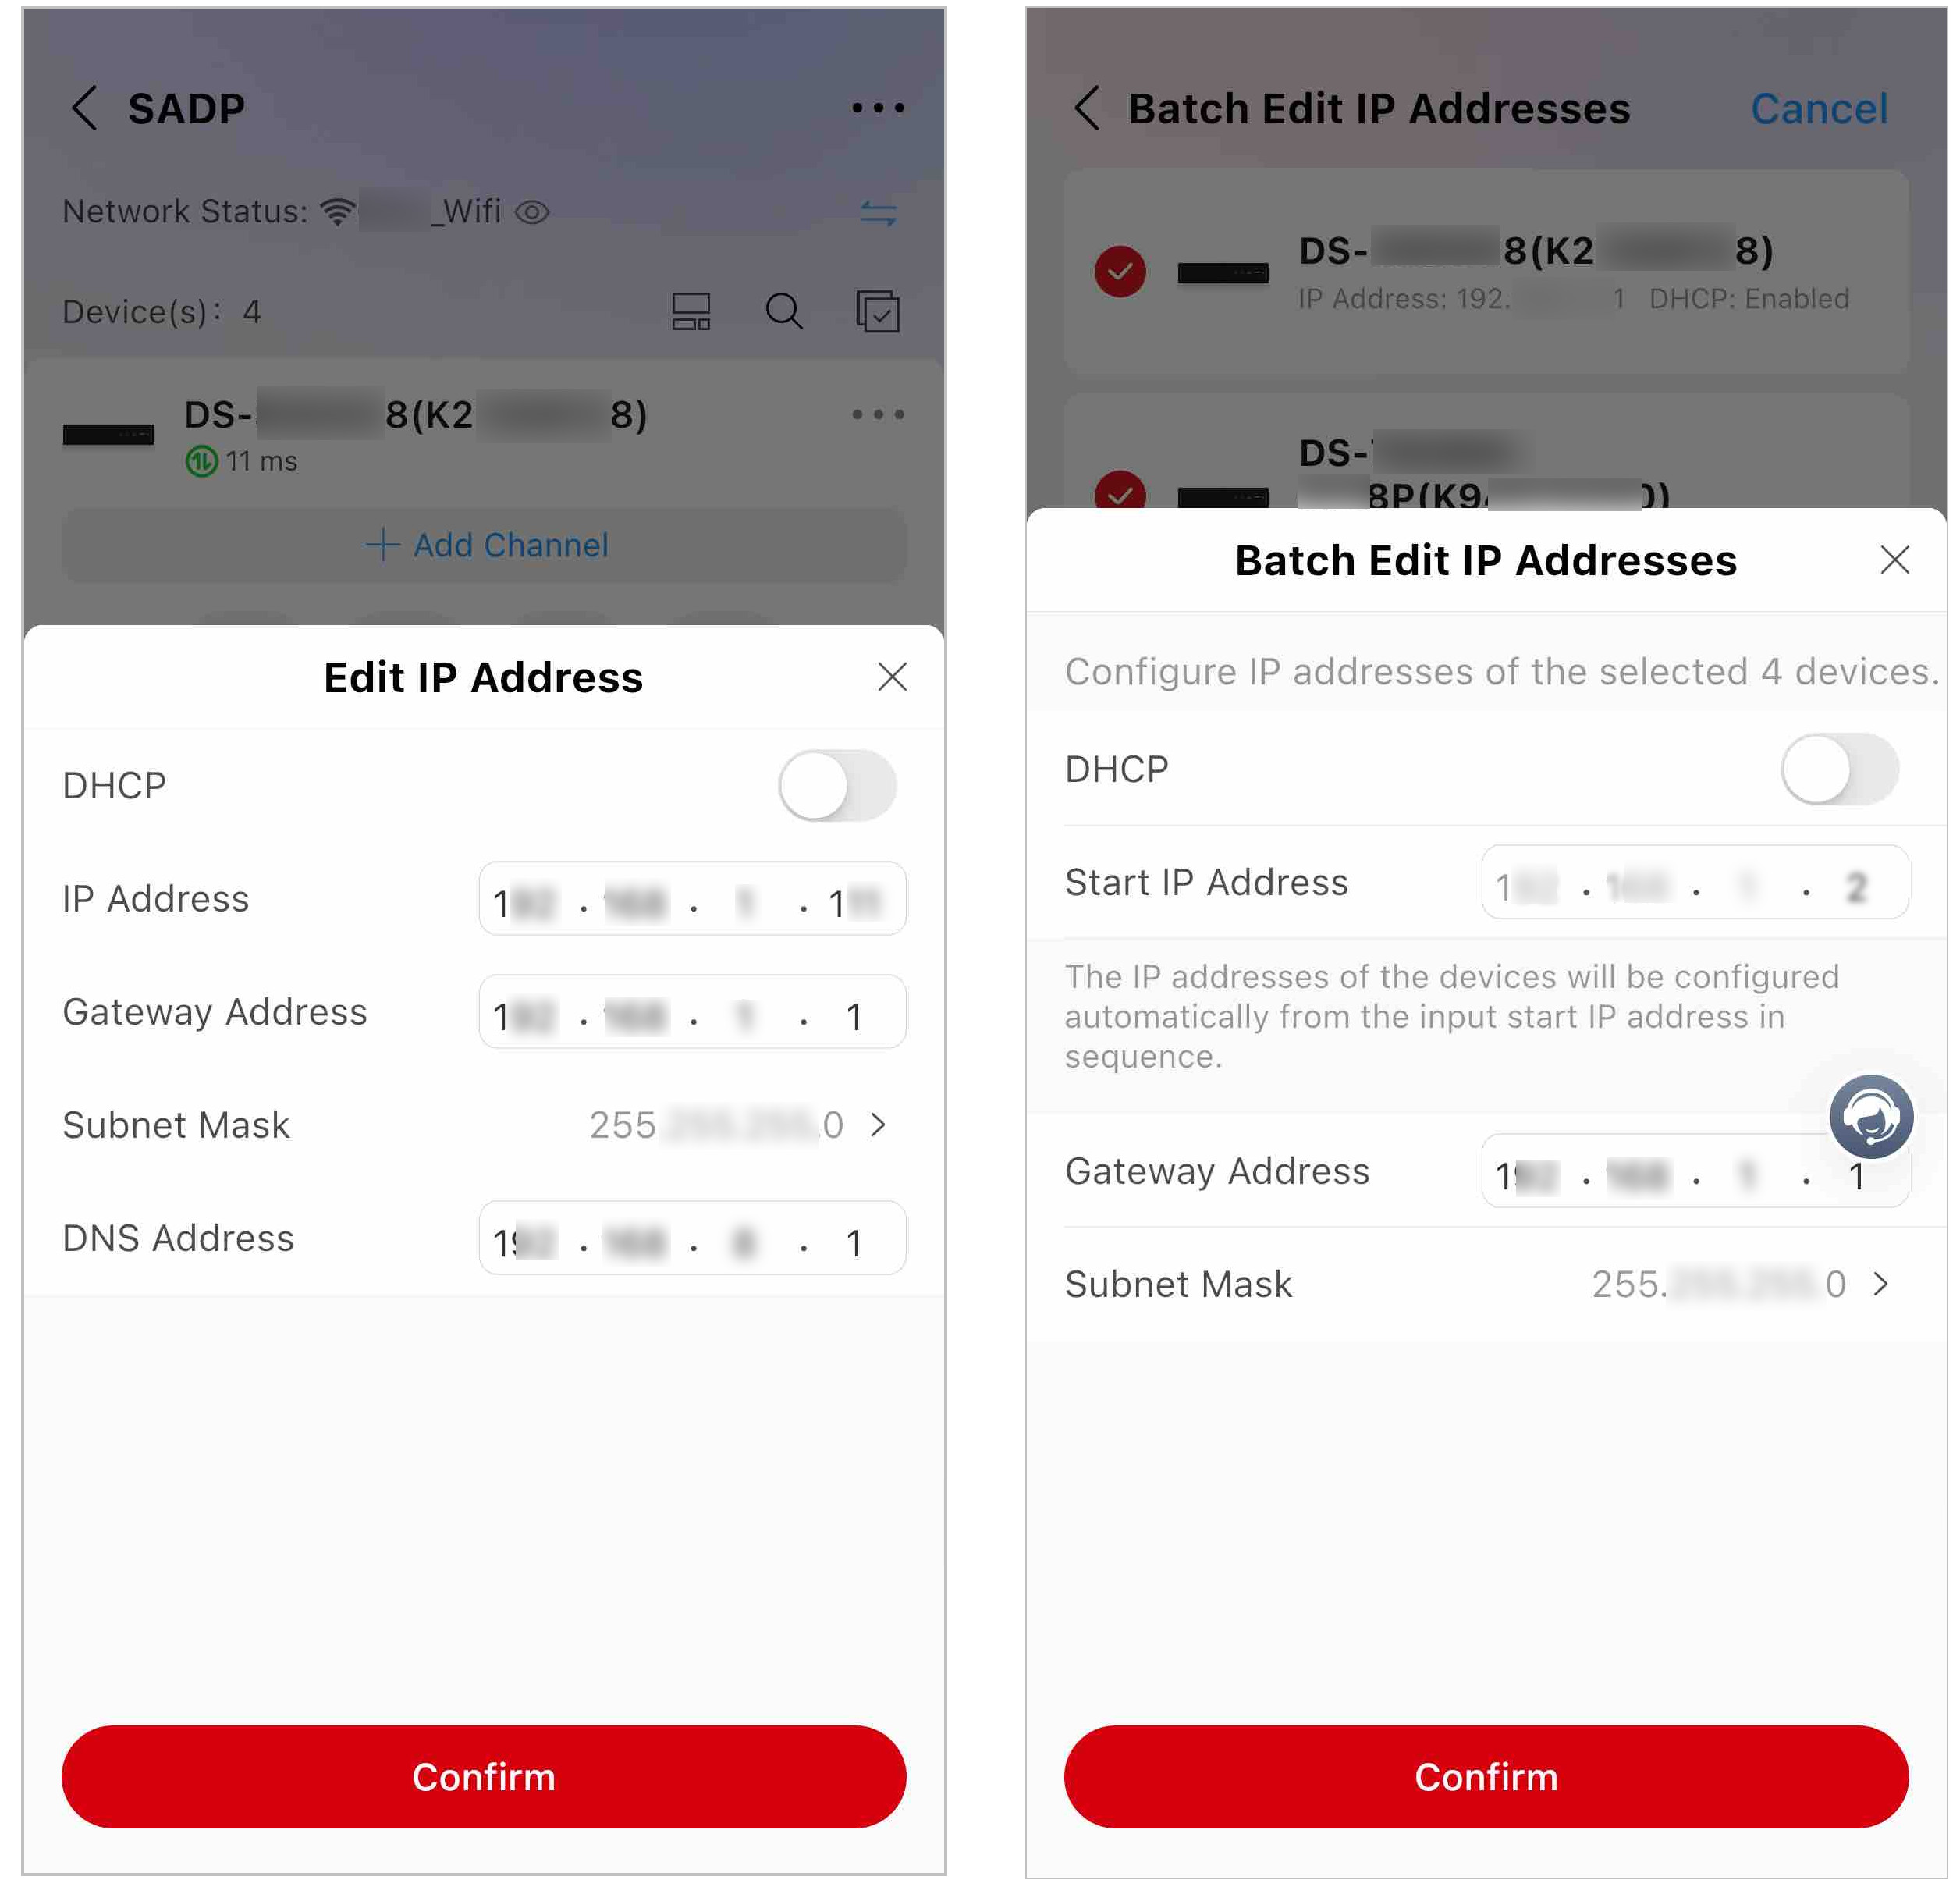
Edit IP Addresses
Tap >  Edit IP Address on a device card to edit the IP address of a single device, or tap
  > Batch Edit IP Addresses to batch edit the IP addresses of multiple devices.
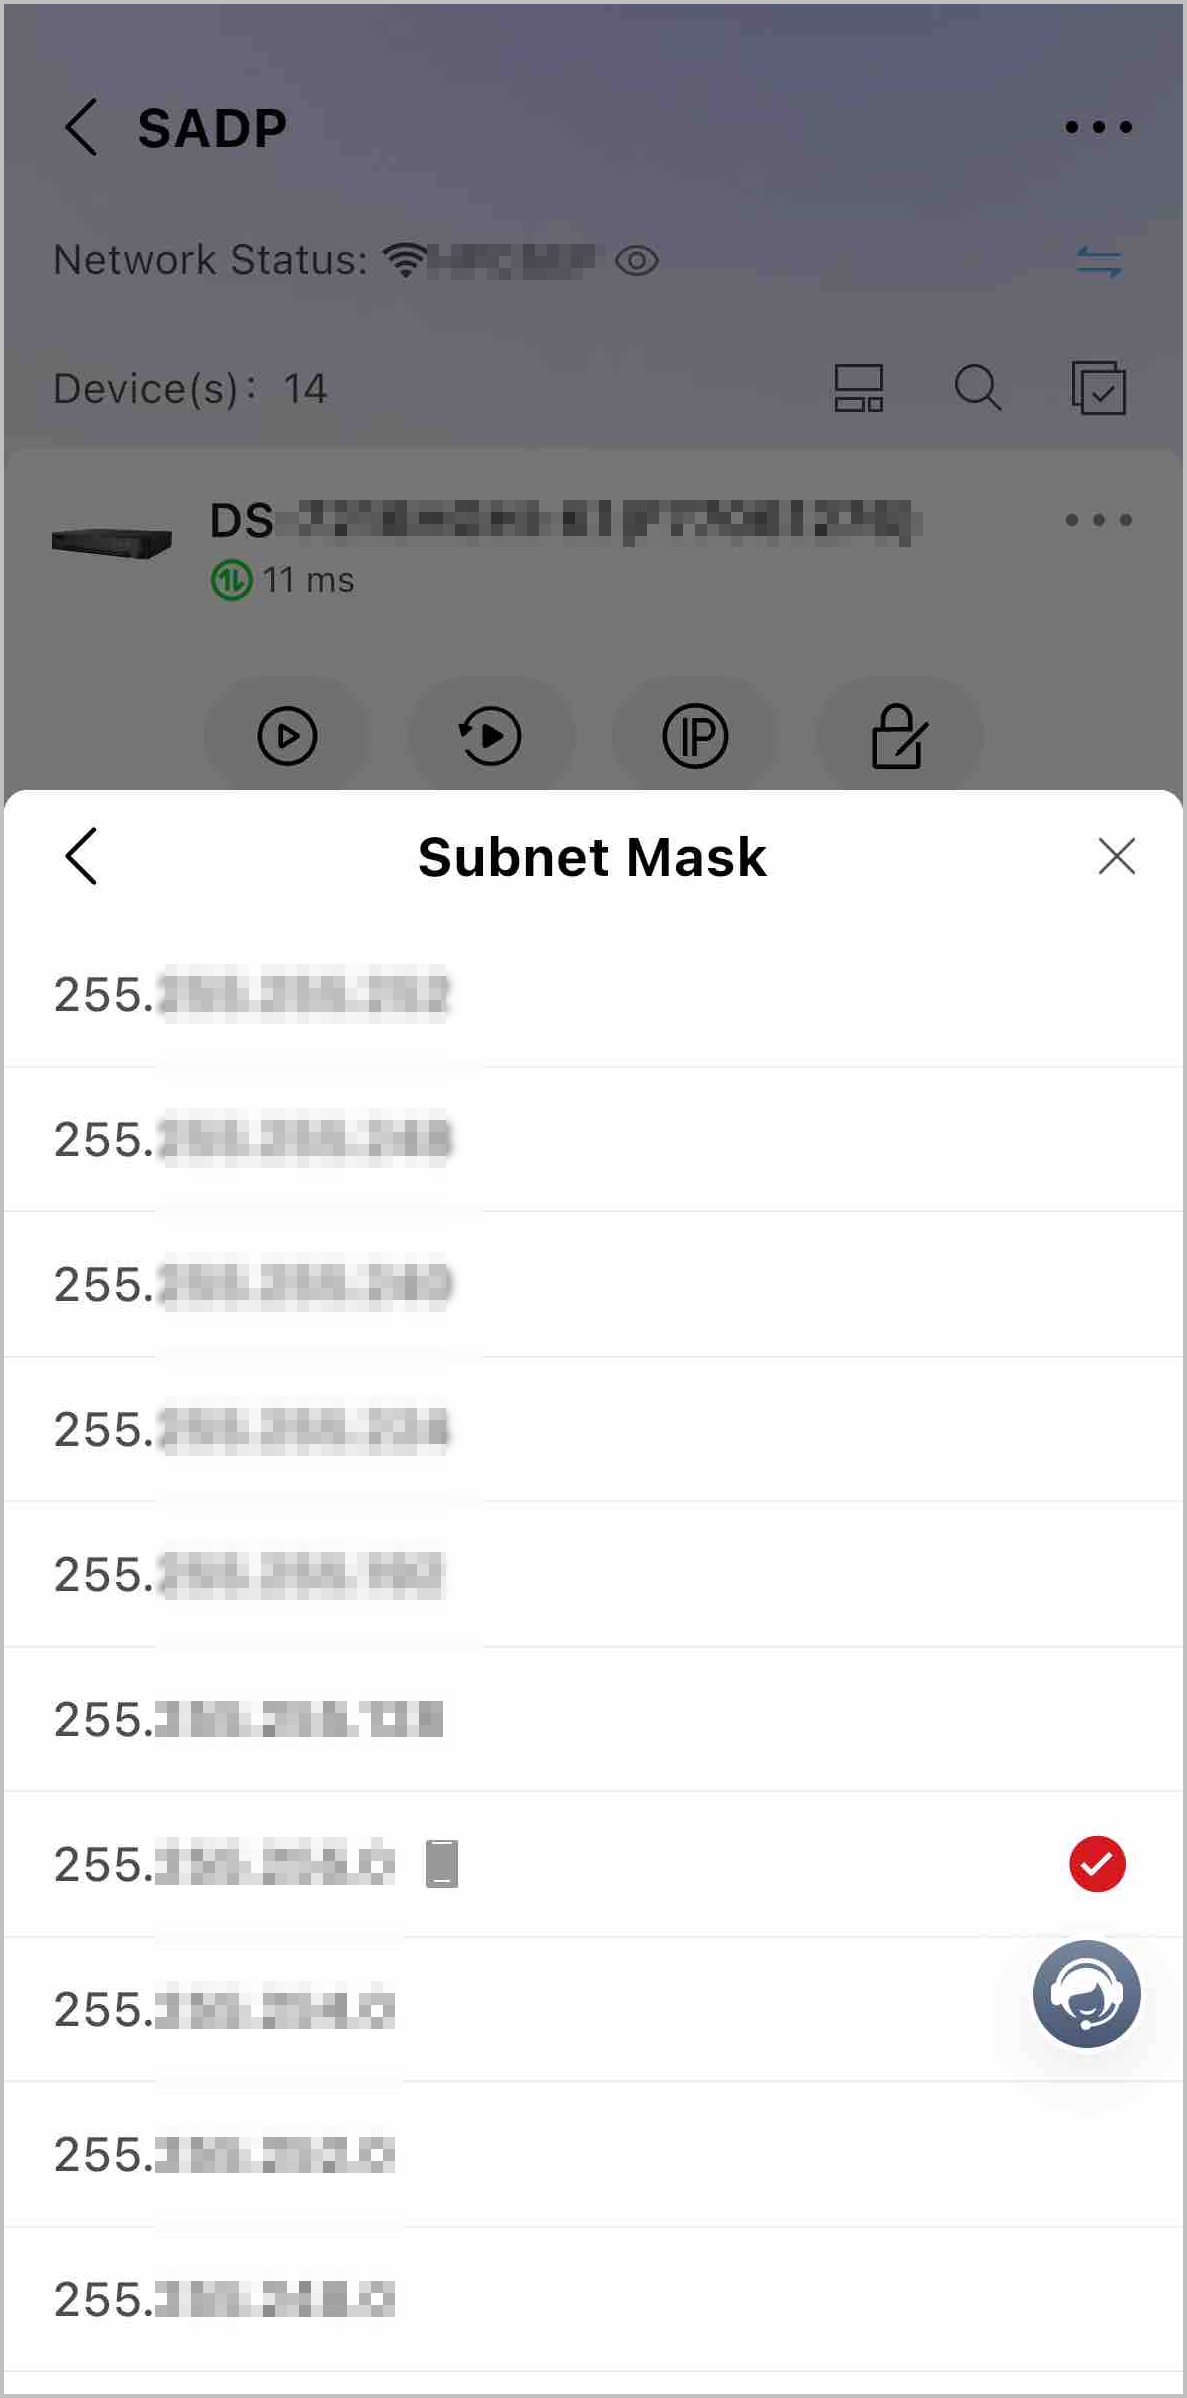
You can enable DHCP to automatically assign the IP address, gateway address, subnet mask, and DNS address, or disable DHCP to set them manually.
When you set the subnet mask manually, you can select from a list of recommended subnet masks, thus avoiding any invalid values you may enter.
Restore and Reboot Devices
To restore devices, tap  or >
or >  Restore Device on a device card to restore a single device, or tap > Batch Restore to batch restore multiple devices.
To reboot devices, tap >  Reboot Device on a device card to reboot a single device, or tap > Batch Reboot to batch reboot multiple devices.
Live View and Playback
For live view, tap  or >
or >  Live View on a device card to view the live video.
For playback, tap  or >
or >  Playback on a device card to play back videos.
Refer to View Live Video and Play Back Video Footage for more details.
More Settings
Tap >  More Settings to set more parameters of the corresponding device.
For more details, check the user manuals of the devices.
Help
Tap >  Help to get more instructions about the device, including the device
description, parameters, documents, etc.
Help to get more instructions about the device, including the device
description, parameters, documents, etc.