Configure Anti-Passback Rules
The anti-passback feature is designed to minimizes the misuse or fraudulent use of access credentials such as passing back card to an unauthorized person, or tailed access. The anti-passback function establishes a specific sequence in which cards must be used in order to grant access. The person should exit via the door in the anti-passback group if he/she enters via the door in the anti-passback group.
Add the access points into different areas first. For details, refer to Add Element to Area.
- Click Logical View on the home page.
-
Choose one of the following methods to enter the area's resource group
page.
-
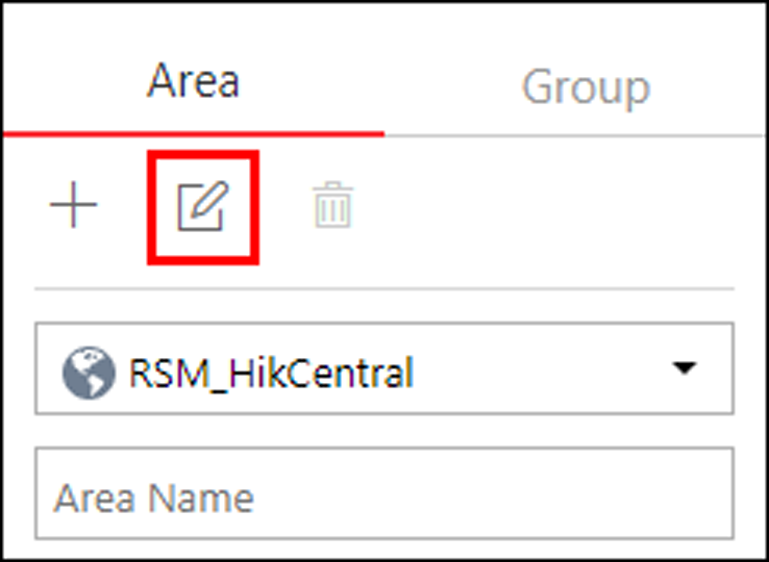
Select one area and click
 to enter the editing
area page.Figure 1. Enter Area Editing Page
-
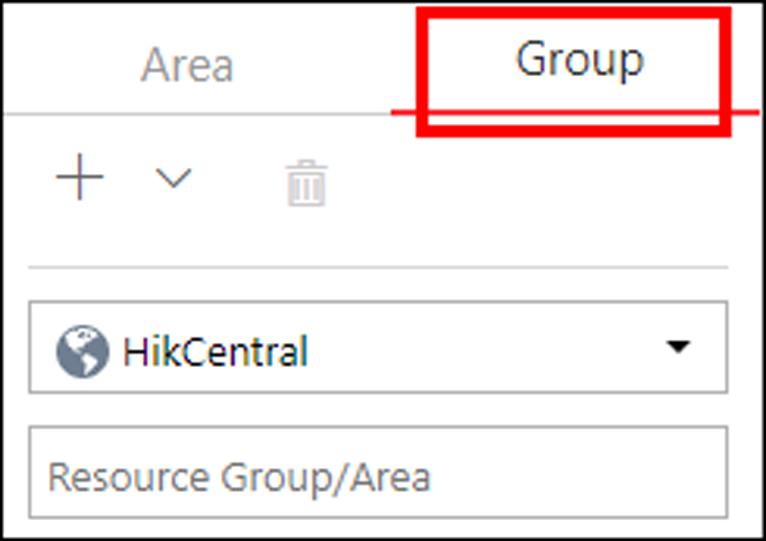
Select Group tab on the left to display all the resource groups of different areas.
Figure 2. Enter Resource Group Page
-
-
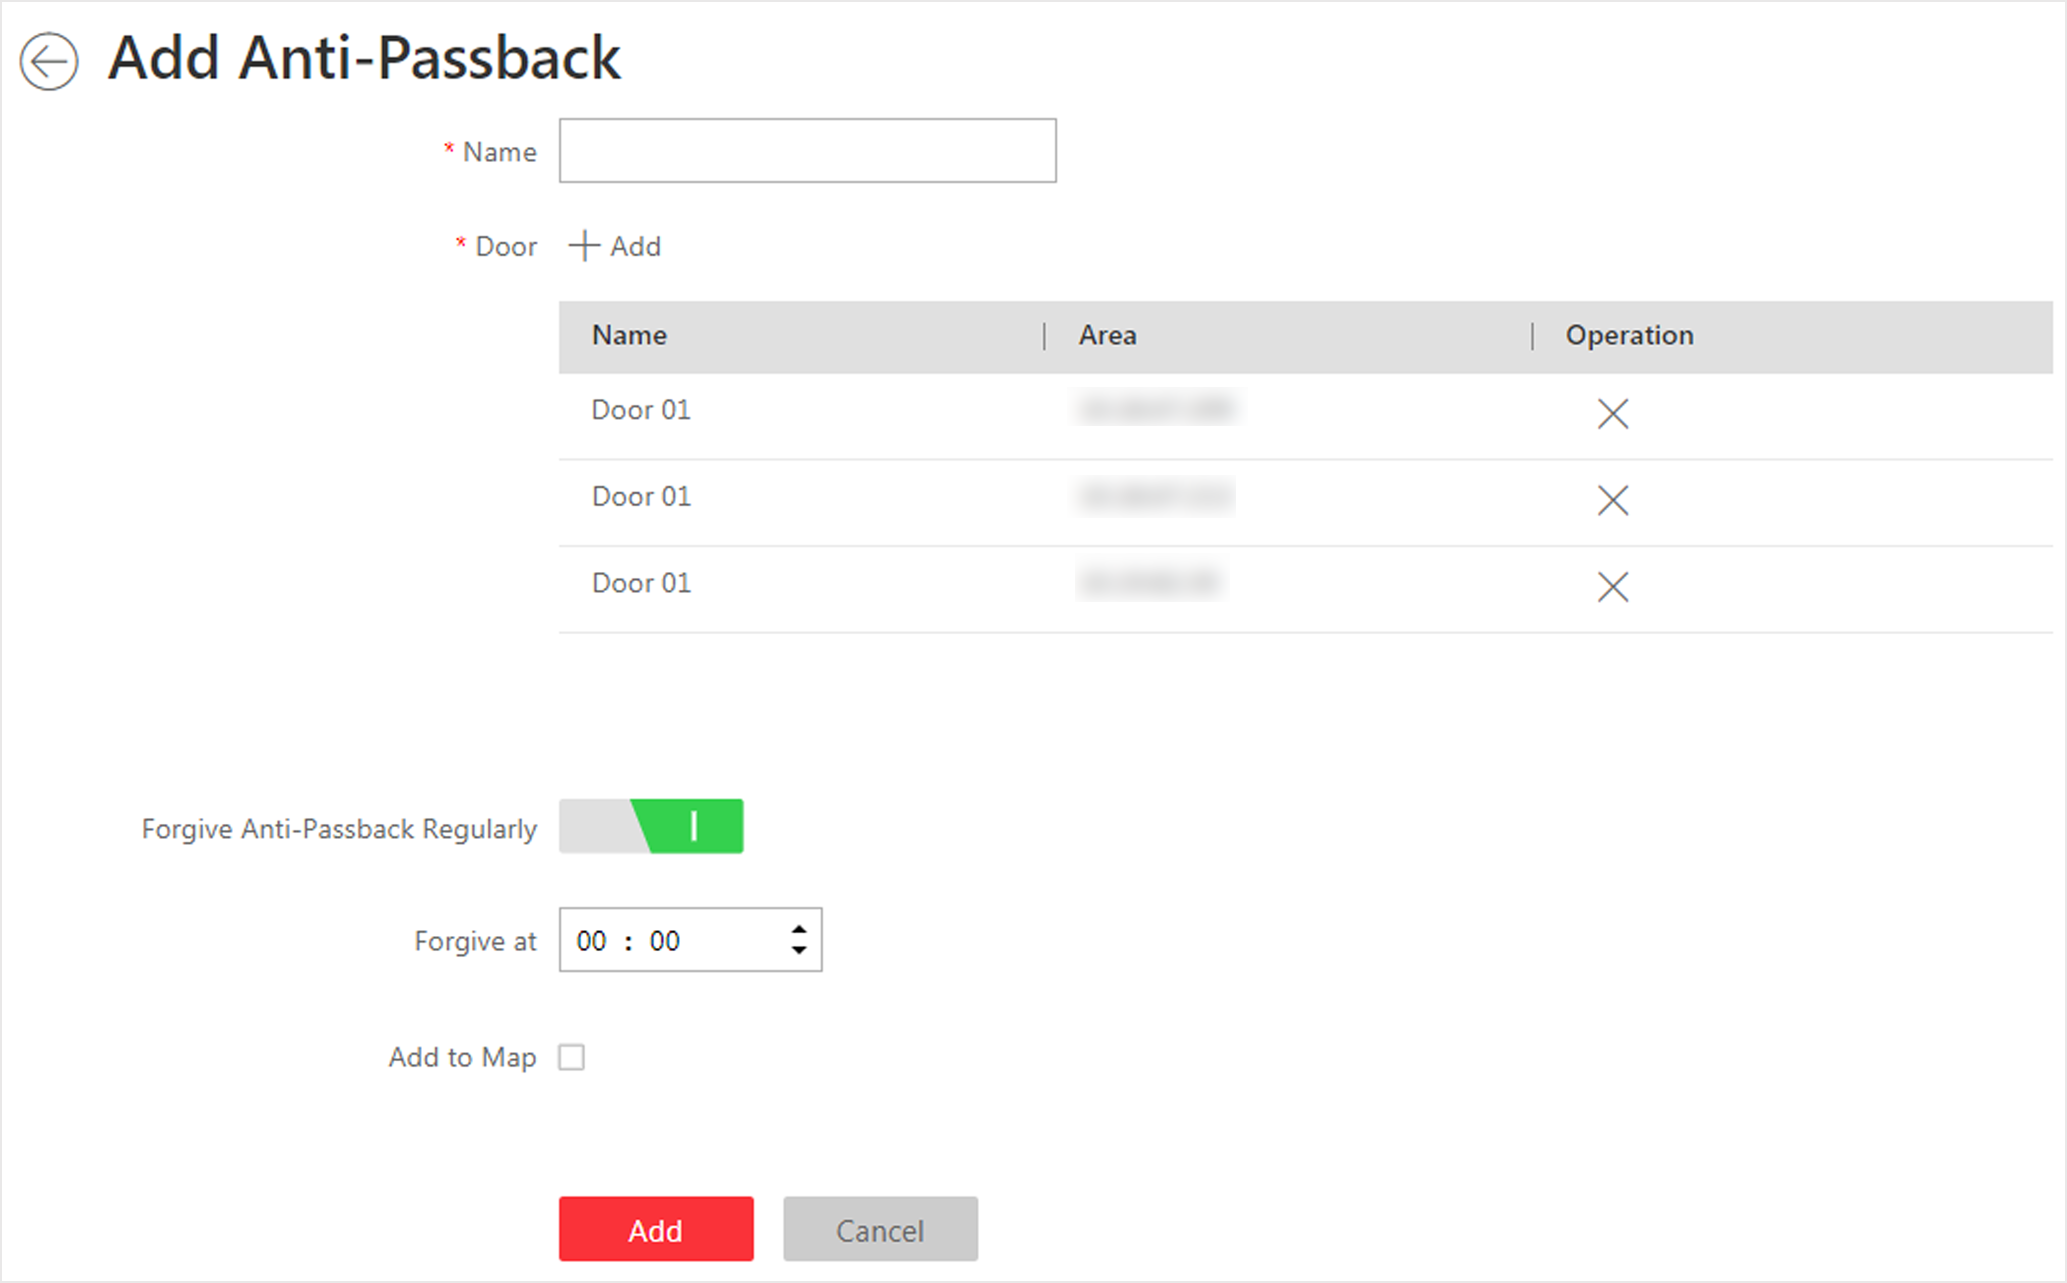
In the Anti-Passback field, click + or
Add to add an anti-passback group.
Figure 3. Add Anti-Passback Group

- Create a name for the group.
- Click Add to select the doors to add them to the group.
- Optional:
Enable Forgive Anti-Passback Regularly to set a fixed
time so that the platform can forgive the anti-passback violations occurred in
this group automatically everyday.
- Anti-Passback Violation
-
When a person attempts to use a card out of anti-passback rule's sequence, the access will be denied. This is called "Anti-Passback Violation". When anti-passback violation occurs, no entry is allowed unless the anti-passback violation event is forgiven.
Note:You cannot set forgiving anti-passback violations regularly when there is only one door in the anti-passback group.
- Optional:
You can locate the anti-passback group on the map by setting the locations of
the doors in the group and setting the border of the region for detection.
-
Check Add to Map.
The region as well as the doors in the group will be added to the map of the area on the right.
- Drag to draw the region according to the actual needs.
- Drag the icons of the doors to set the their locations on the map.
-
Right click to finish.
Figure 4. Draw Anti-Passback Group on Map

After adding the anti-passback group on the map, when an anti-passback alarm is triggered by the doors in the group, the client will notify the user by highlighting the region on the map and you can view the real-time alarms triggered in the region in the Monitoring module on the Control Client.
-
Check Add to Map.
-
Click Add.
The anti-passback group is added in the table and you can view the doors in the group.
Figure 5. Anti-Passback Rule
- Optional:
Perform one or more of the following operations after adding the anti-passback
group to the area.
Option Description Edit Anti-Passback Group
Click
 to edit
the anti-passback group settings.
 You can edit the name of the group, add or delete doors in the group, change the forgiving anti-passback violation regularly settings, and edit the locations of the group and doors on the map.
Set/Cancel Forgiving Anti-Passback Regularly to All
When a person attempts to use a card out of anti-passback rule's sequence, the access will be denied. This is called "Anti-Passback Violation". When anti-passback violation occurs, no entry is allowed unless the anti-passback violation event is forgiven.
Click Set Forgiving Anti-Passback Regularly to All and specify a fixed time so that the platform can automatically forgive the anti-passback violations occurred in all the anti-passback groups at that time everyday.
Delete Anti-Passback Group
Click  to delete
the added anti-passback group.
- Legal Information
- Symbol Conventions
- About Web Client
- Login
- Download Mobile Client
- Web Control
- Manage License
- Manage Resource
- Create Password for Inactive Device(s)
- Edit Online Device's Network Information
- Manage Encoding Device
- Add Detected Online Device
- Add Encoding Device by IP Address or Domain Name
- Add Encoding Devices by IP Segment
- Add Encoding Devices by Port Segment
- Add Encoding Device by Hik-Connect DDNS
- Add Encoding Device by Device ID
- Add Encoding Devices by Device ID Segment
- Add Encoding Devices in a Batch
- Limit Bandwidth for Video Downloading
- Set N+1 Hot Spare for NVR
- Network Transmission Device Management
- Upgrade Device Firmware
- Restore/Reset Device Password
- Manage Remote Site
- Manage Application Data Server
- Manage Recording Server
- Manage Streaming Server
- Manage DeepinMind Server
- Add Security Audit Server
- Manage Smart Wall
- Manage Area
- Add Area
- Add Element to Area
- Edit Element in Area
- Edit Camera for Current Site
- Configure Visual Tracking
- Configure Smart Linkage
- Edit Door for Current Site
- Edit Elevator for Current Site
- Edit Radar for Current Site
- Edit Alarm Input for Current Site
- Edit Alarm Output for Current Site
- Edit Under Vehicle Surveillance System for Current Site
- Edit Third-Party Integrated Resource for Current Site
- Edit Element for Remote Site
- Remove Element from Area
- Manage Resource Group
- Configure Recording
- Configure Event and Alarm
- Manage Map
- Manage Person List
- Manage Visitor
- Manage Access Control and Elevator Control
- Flow Chart
- Manage Access Control Device
- Manage Elevator Control Device
- Manage Access Level
- Access Control Test
- Advanced Functions
- Manage Video Intercom
- Flow Chart
- Manage Video Intercom Device
- Batch Link Persons with Indoor Station
- Relate Doorbell with Indoor Station
- Configure Device Parameters
- Manage Time and Attendance
- Flow Chart
- Add Attendance Group
- Add Timetable
- Add Shift Schedule
- Assign Shift Schedule to Attendance Group
- Configure Attendance Parameters
- Manage Attendance Record
- Search Attendance Record
- Correct Attendance Record for Single Person
- Correct Check-In/Out for Multiple Persons
- Apply for Leave for Single Person
- Apply for Leave for Multiple Persons
- Manually Calculate Attendance Results
- Export Attendance Records
- Get Attendance Records from Device
- View Attendance Handling Records
- Configure Attendance Report
- Manage Entrance and Exit
- Manage Facial Comparison
- Dock Station
- Manage Security Control
- Manage Security Control Device
- Add Detected Online Device
- Add Security Control Device by IP Address
- Add Security Control Device by Hik-Connect DDNS
- Add Security Control Devices by IP Segment
- Add Security Control Devices by Port Segment
- Add Security Control Device by Device ID
- Add Security Control Device by Device ID Segment
- Add Security Control Devices in a Batch
- Add Security Control Partitions from Device
- Configure Defense Schedule Template
- Manage Security Control Device
- Manage Role and User
- Maintenance
- Manage System Security
- System Configuration
- Set Site Name
- Set User Preference
- Set Warning Threshold for Server Usage
- Set Printer
- Set NTP
- Set Active Directory
- Enable Receiving Generic Event
- Allow for Remote Site Registration
- Register to Central System
- Device Access Protocol
- Set WAN Access
- Set Network Timeout
- Set Device Access Mode
- Set IP Address for Receiving Device Information
- Set Data Retention Period
- Set Holiday
- Set Email Template
- Send Report Regularly
- Enable Evidence Collection
- Set Transfer Protocol
- Set Camera ID
- Export Service Component Certificate
- Set Database Password
- Set Health Check Frequency
- Add Fuzzy Matching Rules for License Plate Search
- Configure System Hot Spare
- Set Third-Party Integration
- Data Interchange
- Reset Device Network Information
- Set SUP Upgrade Prompt
- Monitoring
- Intelligent Analysis Report
- Skin-surface Temperature
- Important Ports
Configure Anti-Passback Rules
The anti-passback feature is designed to minimizes the misuse or fraudulent use of access credentials such as passing back card to an unauthorized person, or tailed access. The anti-passback function establishes a specific sequence in which cards must be used in order to grant access. The person should exit via the door in the anti-passback group if he/she enters via the door in the anti-passback group.
Add the access points into different areas first. For details, refer to Add Element to Area.
- Click Logical View on the home page.
-
Choose one of the following methods to enter the area's resource group
page.
-
Select one area and click
 to enter the editing
area page.Figure 1. Enter Area Editing Page
-
Select Group tab on the left to display all the resource groups of different areas.
Figure 2. Enter Resource Group Page
-
-
In the Anti-Passback field, click + or
Add to add an anti-passback group.
Figure 3. Add Anti-Passback Group

- Create a name for the group.
- Click Add to select the doors to add them to the group.
- Optional:
Enable Forgive Anti-Passback Regularly to set a fixed
time so that the platform can forgive the anti-passback violations occurred in
this group automatically everyday.
- Anti-Passback Violation
-
When a person attempts to use a card out of anti-passback rule's sequence, the access will be denied. This is called "Anti-Passback Violation". When anti-passback violation occurs, no entry is allowed unless the anti-passback violation event is forgiven.
Note:You cannot set forgiving anti-passback violations regularly when there is only one door in the anti-passback group.
- Optional:
You can locate the anti-passback group on the map by setting the locations of
the doors in the group and setting the border of the region for detection.
-
Check Add to Map.
The region as well as the doors in the group will be added to the map of the area on the right.
- Drag to draw the region according to the actual needs.
- Drag the icons of the doors to set the their locations on the map.
-
Right click to finish.
Figure 4. Draw Anti-Passback Group on Map

After adding the anti-passback group on the map, when an anti-passback alarm is triggered by the doors in the group, the client will notify the user by highlighting the region on the map and you can view the real-time alarms triggered in the region in the Monitoring module on the Control Client.
-
Check Add to Map.
-
Click Add.
The anti-passback group is added in the table and you can view the doors in the group.
Figure 5. Anti-Passback Rule
- Optional:
Perform one or more of the following operations after adding the anti-passback
group to the area.
Option Description Edit Anti-Passback Group
Click
 to edit
the anti-passback group settings.
 You can edit the name of the group, add or delete doors in the group, change the forgiving anti-passback violation regularly settings, and edit the locations of the group and doors on the map.
Set/Cancel Forgiving Anti-Passback Regularly to All
When a person attempts to use a card out of anti-passback rule's sequence, the access will be denied. This is called "Anti-Passback Violation". When anti-passback violation occurs, no entry is allowed unless the anti-passback violation event is forgiven.
Click Set Forgiving Anti-Passback Regularly to All and specify a fixed time so that the platform can automatically forgive the anti-passback violations occurred in all the anti-passback groups at that time everyday.
Delete Anti-Passback Group
Click  to delete
the added anti-passback group.