Flow Chart
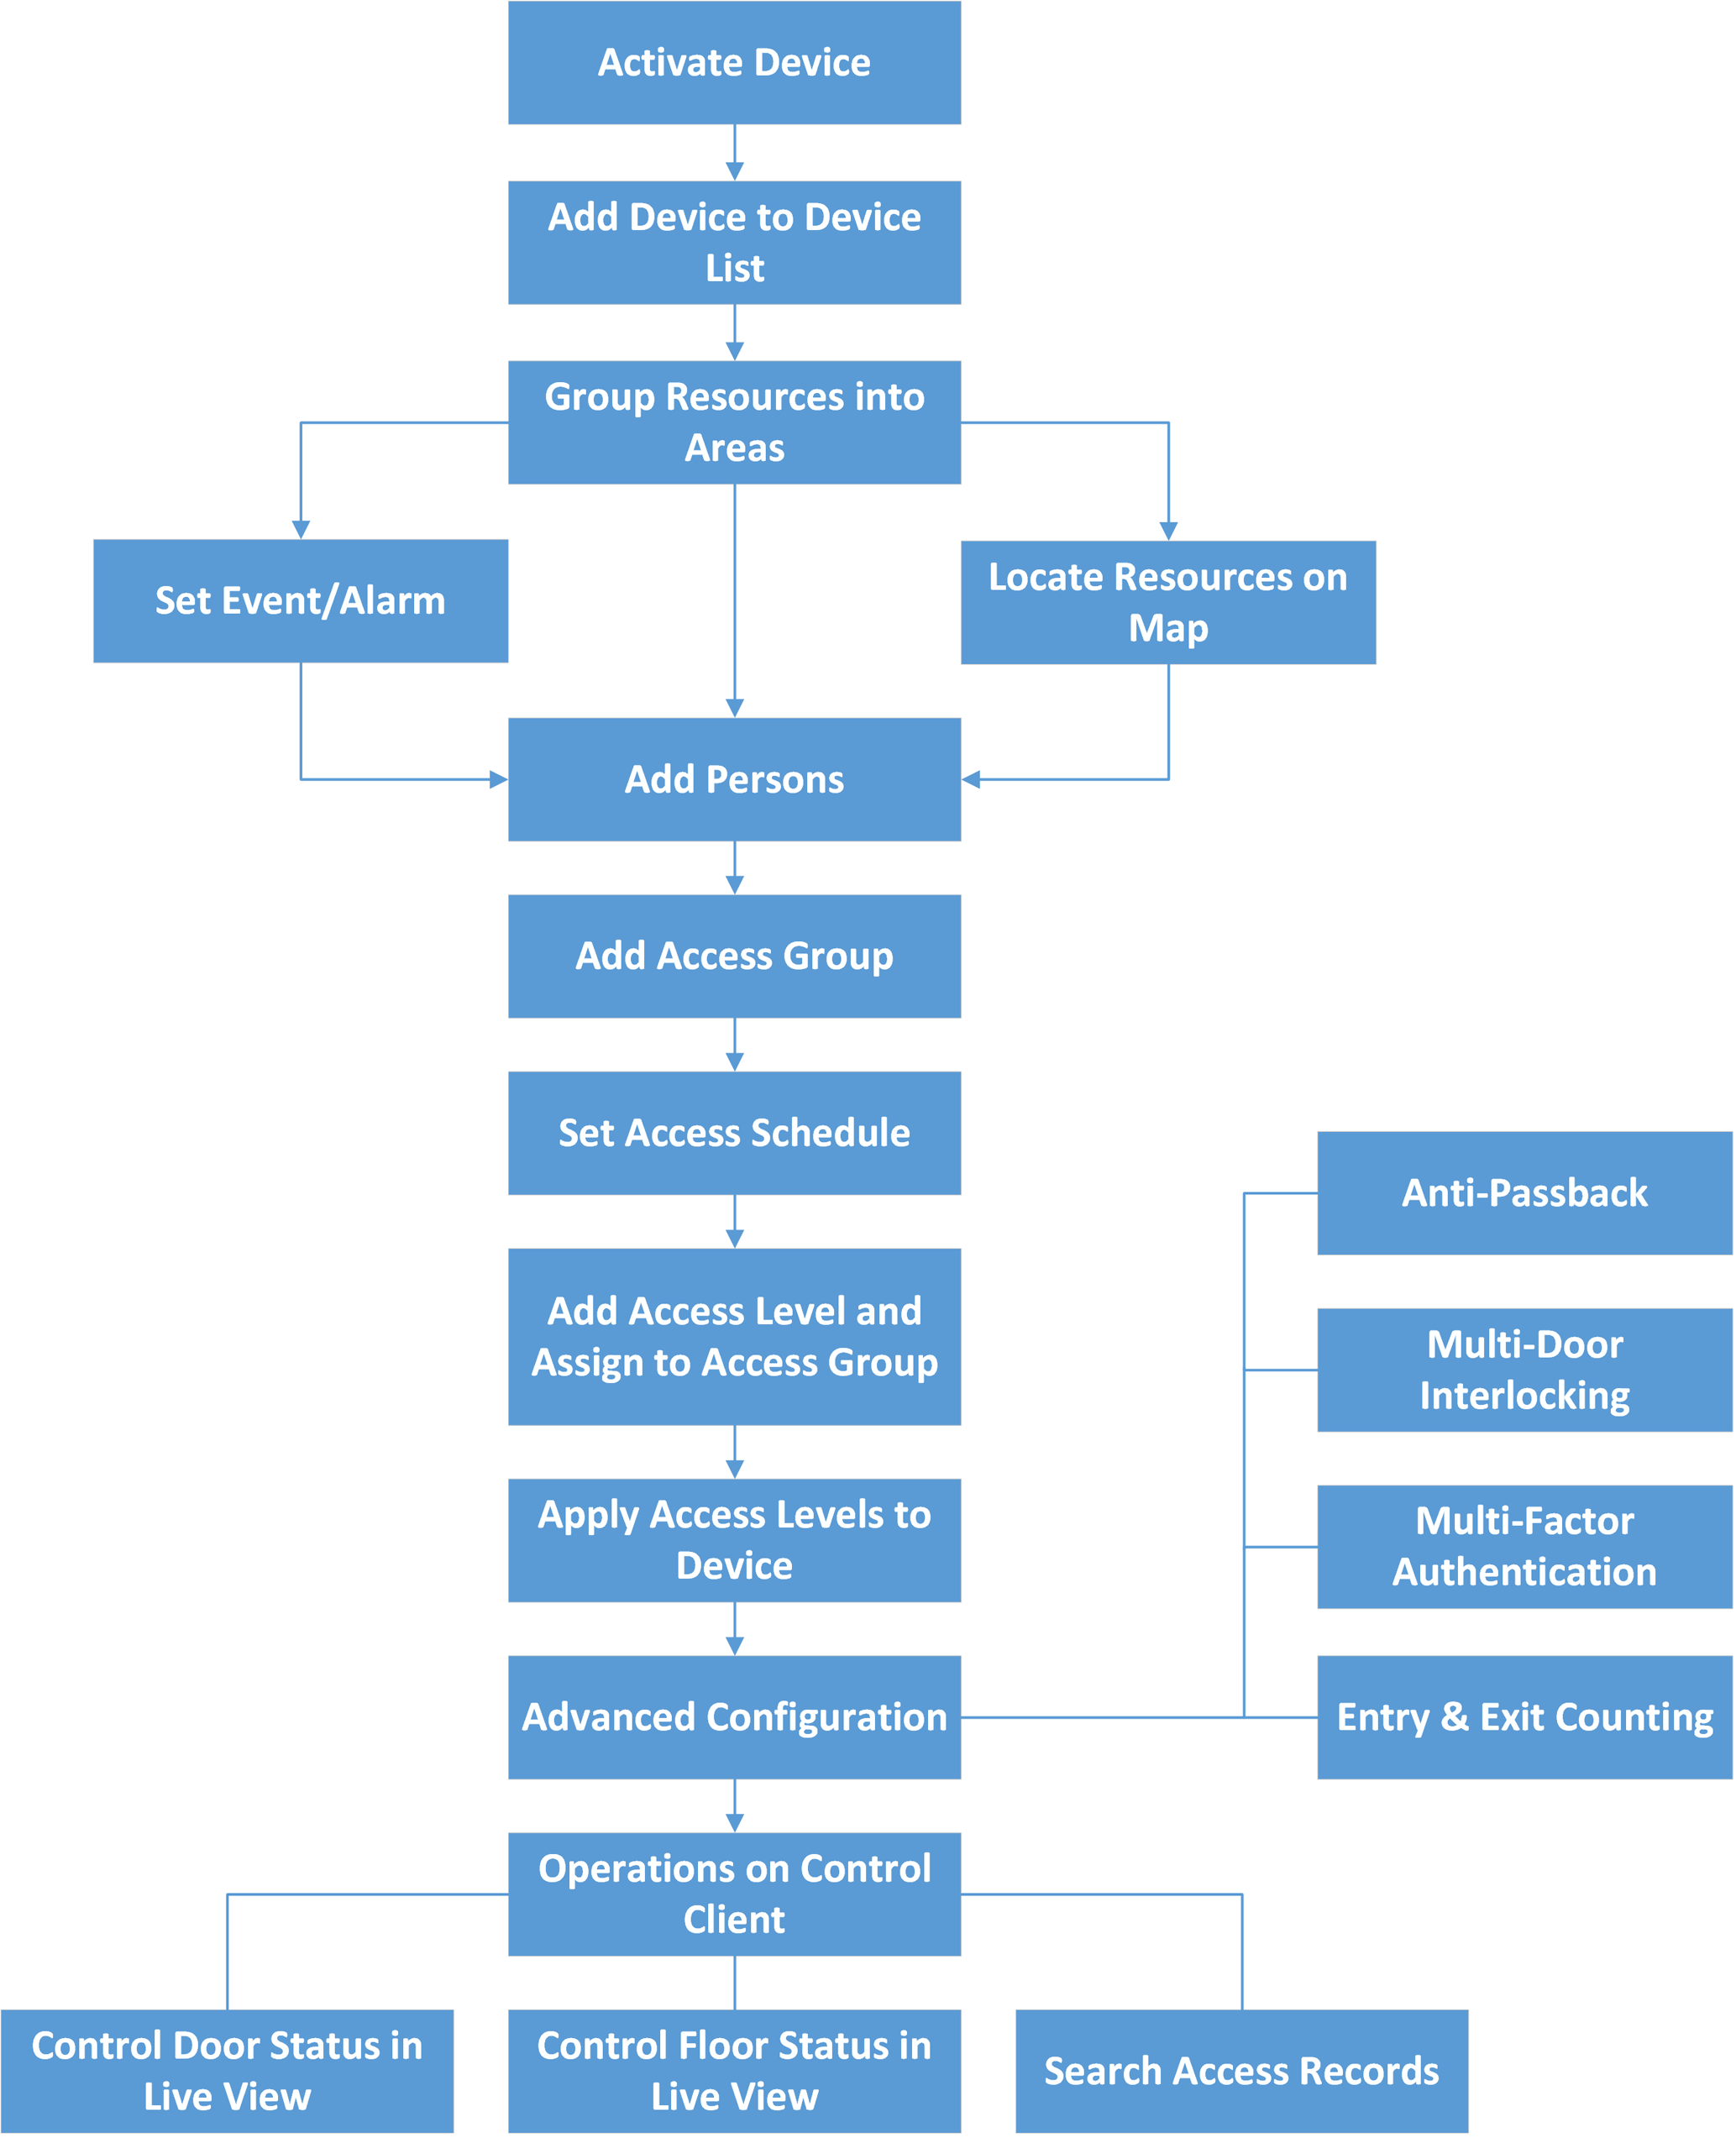
The following flow chart shows the process of the configurations and operations of access control and elevator control. For access control, you can also enter the Access Control Quick Start module on the Home page of the Web Client to go through the basic configuration.
-
Activate Device: For the first time using the access control devices or elevator control devices, the devices are inactive. You need to activate them and create passwords for them for security purpose. For details, refer to Create Password for Inactive Device(s).
-
Add Device to Device List: You need to add the access control devices and elevator control devices to the system. The system provides multiple methods for adding them. For details, refer to Manage Access Control Device and Manage Elevator Control Device.
-
Group Resources into Areas: After adding the devices to the system, you need to group the devices' resources (such as doors, elevators, alarm inputs, alarm outputs, etc.) into different areas according to the resources' locations. For details, refer to Manage Area.
-
Set Event/Alarm: You need to pre-define the events and alarms, such as the access events occurred at the doors. The detailed event and alarm information can be received and checked via the Control Client and Mobile Client. For details, refer to Configure Event and Alarm.
-
Locate Resources on Map: For visualization monitoring, you can locate the resources (such as doors, elevators, alarm inputs, alarm outputs, etc.) on the map. For details, refer to Manage Map.
-
Add Persons: Add person information and set person's credentials (such as PIN, issuing a card, fingerprint, etc.). For details, refer to Manage Person List.
-
Add Access Group: Access group is a group of persons who have the same access level. The persons in the access group can access the same doors and floors during the same authorized time period. For details, refer to Add Access Group.
-
Set Access Schedule: The access schedule defines when the person can open the access point with credentials. For details, refer to Set Access Schedule Template.
-
Add Access Level and Assign to Access Group: Access level is a group of doors and floors. After assigning the access level to certain access groups, it defines the access permission that which persons can get access to which doors and floors during the authorized time period. For details, refer to Manage Access Level.
-
Apply Access Levels to Device: After setting the linkage between access group and access level, you need to apply the person's access level settings to the access control device or elevator control device of the doors/floors linked to the access level to take effect. After that, the persons in the access group can access these doors/floors during the authorized time period defined by the related access level. For details, refer to Apply Persons' Access Levels to Device.
-
Advanced Configuration: The system provides some advanced configurations such as anti-passback, multi-door interlocking, multi-factor authentication, and entry & exit counting. For details about these configurations, refer to Configure Anti-Passback Rules, Configure Multi-Door Interlocking, Configure Multi-Factor Authentication Rules, and Add Entry and Exit Counting Group.
-
Operations on Control Client: After the above configurations on the Web Client, you can control the door/floor's status during live view, view real-time access events, search history access records, etc. For details, refer to the User Manual of HikCentral Professional Control Client.
Flow Chart
The following flow chart shows the process of the configurations and operations of access control and elevator control. For access control, you can also enter the Access Control Quick Start module on the Home page of the Web Client to go through the basic configuration.
-
Activate Device: For the first time using the access control devices or elevator control devices, the devices are inactive. You need to activate them and create passwords for them for security purpose. For details, refer to Create Password for Inactive Device(s).
-
Add Device to Device List: You need to add the access control devices and elevator control devices to the system. The system provides multiple methods for adding them. For details, refer to Manage Access Control Device and Manage Elevator Control Device.
-
Group Resources into Areas: After adding the devices to the system, you need to group the devices' resources (such as doors, elevators, alarm inputs, alarm outputs, etc.) into different areas according to the resources' locations. For details, refer to Manage Area.
-
Set Event/Alarm: You need to pre-define the events and alarms, such as the access events occurred at the doors. The detailed event and alarm information can be received and checked via the Control Client and Mobile Client. For details, refer to Configure Event and Alarm.
-
Locate Resources on Map: For visualization monitoring, you can locate the resources (such as doors, elevators, alarm inputs, alarm outputs, etc.) on the map. For details, refer to Manage Map.
-
Add Persons: Add person information and set person's credentials (such as PIN, issuing a card, fingerprint, etc.). For details, refer to Manage Person List.
-
Add Access Group: Access group is a group of persons who have the same access level. The persons in the access group can access the same doors and floors during the same authorized time period. For details, refer to Add Access Group.
-
Set Access Schedule: The access schedule defines when the person can open the access point with credentials. For details, refer to Set Access Schedule Template.
-
Add Access Level and Assign to Access Group: Access level is a group of doors and floors. After assigning the access level to certain access groups, it defines the access permission that which persons can get access to which doors and floors during the authorized time period. For details, refer to Manage Access Level.
-
Apply Access Levels to Device: After setting the linkage between access group and access level, you need to apply the person's access level settings to the access control device or elevator control device of the doors/floors linked to the access level to take effect. After that, the persons in the access group can access these doors/floors during the authorized time period defined by the related access level. For details, refer to Apply Persons' Access Levels to Device.
-
Advanced Configuration: The system provides some advanced configurations such as anti-passback, multi-door interlocking, multi-factor authentication, and entry & exit counting. For details about these configurations, refer to Configure Anti-Passback Rules, Configure Multi-Door Interlocking, Configure Multi-Factor Authentication Rules, and Add Entry and Exit Counting Group.
-
Operations on Control Client: After the above configurations on the Web Client, you can control the door/floor's status during live view, view real-time access events, search history access records, etc. For details, refer to the User Manual of HikCentral Professional Control Client.