Add a Single Person
You can manually add a person to the platform by setting the person's basic information, credential information, and other information such as the person's access level. The above-mentioned person information constitutes the data basis for the applications related to identity authentication of the person, such as the access control application, the elevator control application, the attendance management application, and the video intercom application.
-
On the top navigation bar, select
 > Basic Management > Person.
-
Click
 at the top of person list to
enter the Add Person page.
at the top of person list to
enter the Add Person page.
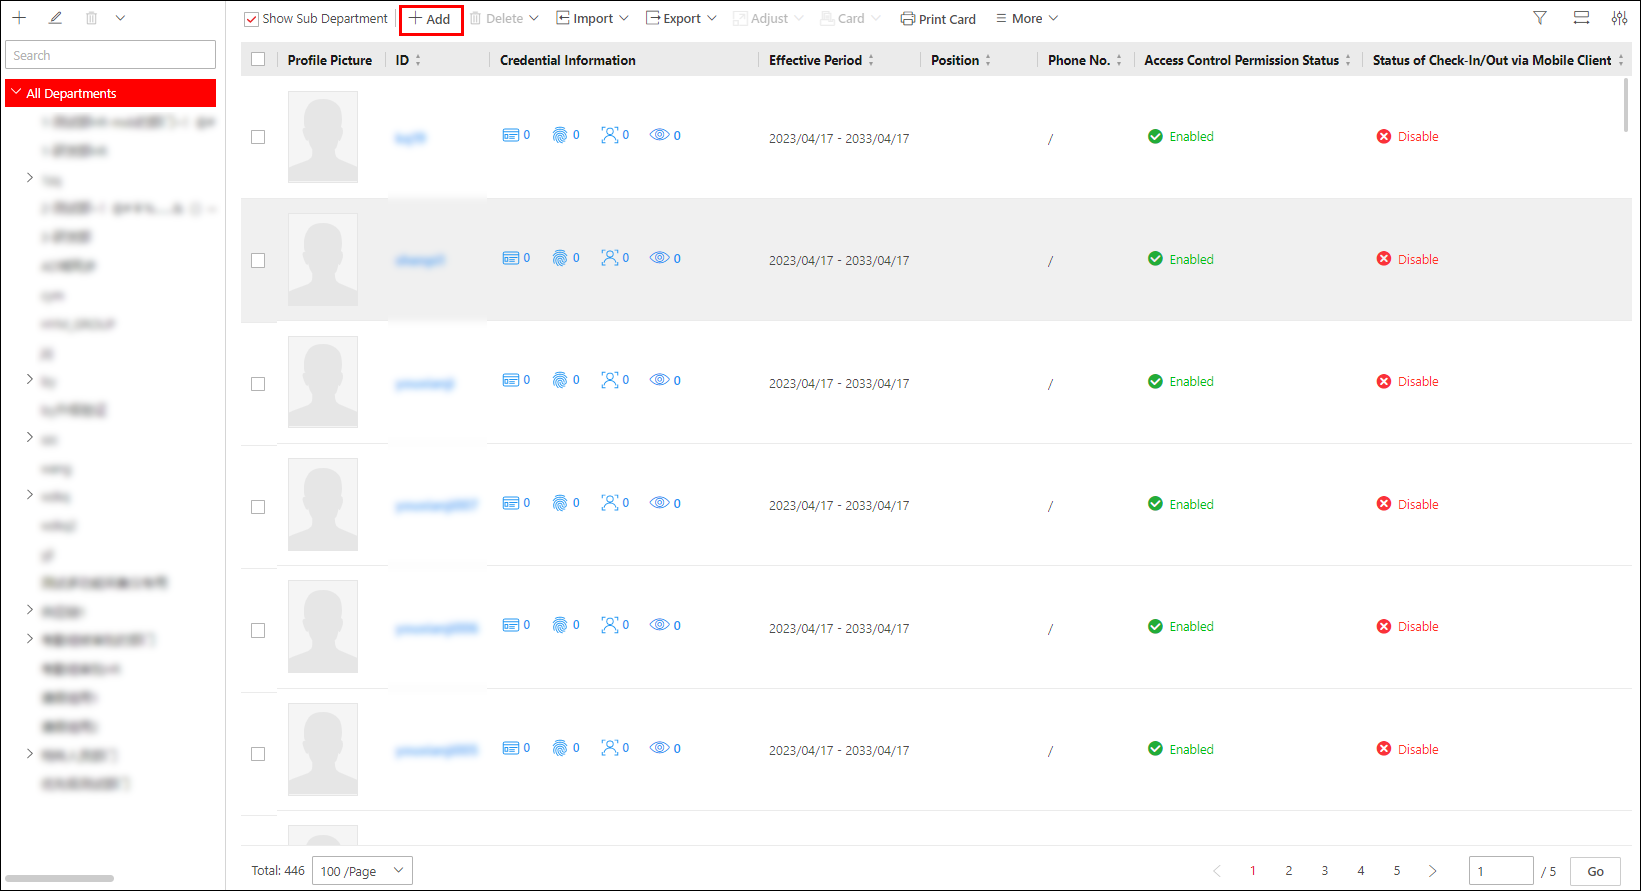 Figure 1 The Entry for Adding a
Person
Figure 1 The Entry for Adding a
Person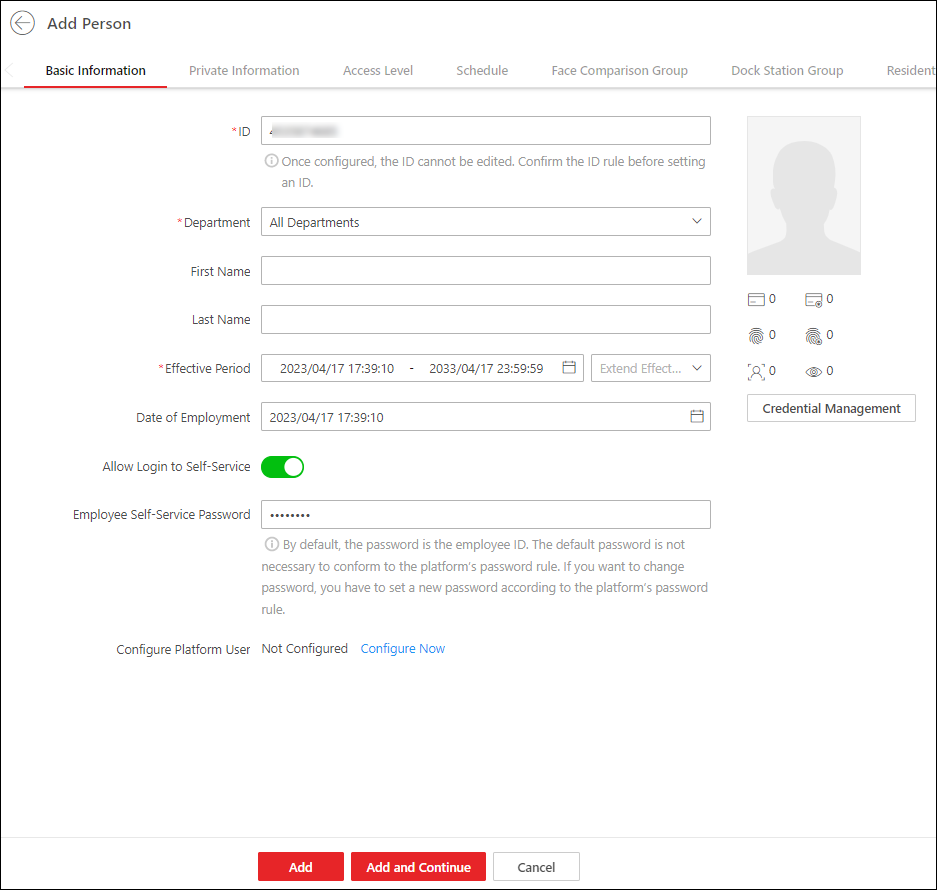 Figure 2 Add Person
Page
Figure 2 Add Person
Page -
Set the person's basic information, such as ID, department, first name, and
last name.
- ID (Required)
-
The default ID is generated by the platform. You can edit it if needed.
Note:The ID cannot be edited after finishing adding a person, so you should ensure its correctness at the beginning.
- Department (Required)
-
Select a department for the person.
Note:See Add Departments for details about how to add a department.
- Profile Picture
-
Hover the cursor onto
 , and you can
select from three modes to add a picture.
, and you can
select from three modes to add a picture.- From Device
-
You can select Access Control Device, Video Intercom Device, or Enrollment Station and set parameters (if required) to connect the device to the platform, and then collect the face picture via the device. This mode is suitable for non-face-to-face scenario when the person and the system administrator are on different locations.
Note:-
For access control devices, only specific models of face recognition terminals are supported.
-
For video intercom devices, door stations and outer door stations are supported.
-
For enrollment stations, you need to set related parameters, including access mode, access protocol, device address, port, user name, password, face anti-spoofing, and security level.
-
- Capture
-
Click Capture and then select one of the PC's webcams to take a picture.
- Upload Picture
-
Click Upload Picture to select a picture from your PC.
Note:-
It is recommended that the face in the picture be in the full-face view directly facing the camera, without a hat or head covering.
-
You can drag the picture to change its position or zoom in/out before cutting it.
-
You can switch on Check Face Picture Quality via Device and select a device to check the quality of the profile picture. Click Save to start checking. You will be informed if the picture is not qualified.
-
- Effective Period (Required)
-
Set the effective period for the person in applications such as access control application and time & attendance application, to determine the period when the person can access the specified access points with credentials.
Click Extend Effective Period to show a drop-down list and select 1 Month / 3 Months / 6 Months / 1 Year to quickly extend the effective period based on the configured end time. For example, if the period is from 2021/10/23 13:30:00 to 2022/01/20 14:10:00 and the extended time is selected as 1 Month, the end time of effective period will change to 2022/02/20 14:10:00.
- Date of Employment
-
You can set the start date of employment for the person.
- Allow Login to Self-Service
-
Switch on Allow Login to Self-Service to allow employees to log in to self-service on the platform. For details, refer to Login via Web Client (Employee).
- Employee Self-Service Password
-
After enabling Allow Login to Self-Service for the employee self-service, set the password.
Note:By default, the password is the employee ID if the password has not been set. Once the password is modified, the new password should be set according to the password verification rule.
- Configure Platform User
-
Click Configure Now to configure a platform user for the person to link the person to a platform user.Note:
No more than one person can be linked to a platform user.
- Add New User
- Create a new user to link the user with the person by setting the user name, password, user status, and role.
- Select Existing User
- Select an existing user from the drop-down list to link the user with the person, or click Add User to add a user first. For details about adding a user, see Add Normal User.
- Credential Management
-
Add credential information for the person. See Manage Credentials for details.
- Optional:
Assign access levels to the person to define the access points where the person
can access during the authorized period.
- Superuser
-
If the person is set as a superuser, the person will be exempted from remaining locked (credential failed) restrictions, all anti-passback rules, and first person authorization.
- Extended Access
-
When the person accesses the door, grant this person more time to pass through doors which have been configured with extended open duration. Use this function for the persons with reduced mobility.
Note:The extended access and super user functions cannot be enabled concurrently.
- Device Administrator
-
Determine if the person has the administrator permission of access control devices.
If the check-box is checked, when you synchronize person information from access control devices, the administrator permission for the person will be retained.
- Open Door via Bluetooth on Mobile Client
-
Check the box to open enable opening door via bluetooth on the Mobile Client.
- PIN Code
-
Set the PIN code for access authentication. In most cases, the PIN code cannot be used as a credential alone: it must be used after card or fingerprint when accessing; It can be used alone only when Authenticate via PIN Code is enabled on the platform and the authentication mode of the card readers is also set to Authenticate via PIN Code.
Note:-
The PIN code should contain 4 to 8 characters.
-
For details about enabling Authenticate via PIN Code on the platform, see Add Departments.
-
- Assign Access Level
-
-
Click Assign.
-
Select one or more access levels for the person.
-
Click Assign to add the person to the selected access level(s).
Note:You can click
 to view
information on access points and access schedules.
to view
information on access points and access schedules. -
- Optional:
After adding persons, you can perform the following operation(s).
Option Description Edit Person
Click the person name to edit the person details.
Note:When editing the person's effective period, if you have issued temporary card(s) to the person, make sure the expiry date(s) of the person's temporary card(s) are within the effective period.
Delete Persons
Check the person(s) and click
 to delete the
selected person(s).
to delete the
selected person(s).Delete All Persons
Hover the cursor onto
 beside
  , and then click
Delete All to delete all persons.
, and then click
Delete All to delete all persons.Clear Profile Pictures
Hover the cursor onto
beside , and then click
Delete Profile Picture Only to clear all
the uploaded profile pictures.Export Person Information
Click
 > Export Person Information to export all the added person information as a ZIP
file to your PC. For information security, you need to set a
password for decompressing the ZIP file.Note:
> Export Person Information to export all the added person information as a ZIP
file to your PC. For information security, you need to set a
password for decompressing the ZIP file.Note:You can check Access Level Information or Schedule Information to export the additional information at the same time.
Export Profile Pictures
Click
> Export Profile Picture to export the profile pictures of the added persons
as a ZIP file to your PC. For information security, you need to set
a password for decompressing the ZIP file.Note:To activate this function, you should go to page to check the Export Profile Pictures.
Adjust Person
-
Move the persons to another department. Once moved, the access levels and schedules of the selected persons will be changed.
-
Select one or more persons, click
 > Adjust Department.
 -
Select the target department to which the persons are about to be moved.
-
Click Move.
-
-
Adjust the effective period for the person in applications.
-
Select one or more persons, click
> Adjust Effective Period. -
Select the effective period from the drop-down list.
-
Click OK.
-
-
Adjust the person's status as resigned.
-
Select one or more persons, click
> Adjust Effective Period. -
Set the departure date, type, and reason..
-
Click OK.
-
Synchronize Domain Persons
Select person(s) whose information has changed in the AD domain and click at the top of person list to get the latest person information.
Link Persons to Indoor Stations
Select one or more persons, and click , then select an indoor station for each person to apply the person information to the indoor station. For details, refer to Link Persons to an Indoor Station.
Note:-
A pop-up window will appear after you click Save. Click Yes to save the indoor station's room number as the room number, or click No to keep the old room number (if there is not an old room number, the room number of the indoor station you select will be saved).
-
Make sure you have added indoor stations to the platform.
-
Up to 10 persons can be linked to one indoor station. And one person can only be linked to one indoor stations.
-
Make sure the room number is consistent with the actual location information of the indoor station.
Clear Access Levels
Select one or more persons, click to clear the access levels of the selected persons.
Note:The access levels of these persons cannot be restored once they are cleared.
Disable Access Levels
Select one or more persons, and click to disable the access levels of the selected persons temporarily.
Note:The access level settings of the selected persons will not be cleared, and will be restored after restoring the persons access levels.
Restore Access Levels
Select one or more persons, and click to restore the disabled access levels.
Check Person Authorization
Select one or more persons, click to enter Check Person Authorization page. On the page, you can test whether the person's access levels and credentials are applied to the access control devices, elevator control devices, and video intercom devices. If failed to be applied, you can apply them again.
Enable/Disable Check-In/Out via Mobile Client
Select one or more persons, click .
Filter Displayed Persons
Enter a person's full name, ID, or card No. and click Filter to filter persons as required.
Note:When entering the card No., you can select Read Card Number by Device to select a device to read the card No. For details, refer to Set Card Issuing Parameters.
View/Edit Credential Information
In Credential Information column, you can view/edit a person's card, fingerprint, face picture, and iris information, and view and download the person's QR code.
-