Set Basic Parameters
To manage visitors in actual scenarios, you can set basic parameters such as Take Photo of Visitor's Belongings, Default Check-Out Time, Visiting Purpose, and Digits of Reservation Code.
If you do not configure basic parameters, the platform will manage visitors according to the default settings.
-
On the top left of the Web Client, select
 > Passing Management > Visitor > Basic Configuration > Basic Parameters.
-
Configure the following parameters according to your needs.
- General Settings
-
- Take ID Photo as Visitor Profile Picture
-
If enabled, the ID photo can be read via a connected passport reader and set as the visitor profile picture when you reserve for a visitor or check in a visitor without reservation. See Reserve a Visitor or Check In a Visitor Without Reservation for details.
- Visiting Purpose
-
You can define visiting purposes as options on the Reserve page. Click Add to add a new visiting purpose. You can also edit the name of an added visiting purpose, delete an added visiting purpose, or search for a visiting purpose.
- Custom Visitor Attribute
-
Click Add to add custom visitor attributes. The added ones will be displayed as fields on the Reserve page and the Unreserved Visitor Check-In page.
You can set a custom visitor attribute as a General Text, Number, Date, or Single Selection field. For example, if you name a custom visitor attribute as Covid-19 Vaccination Date and set it as a Date field, it will be displayed on the Reserve page as shown in the figure below.
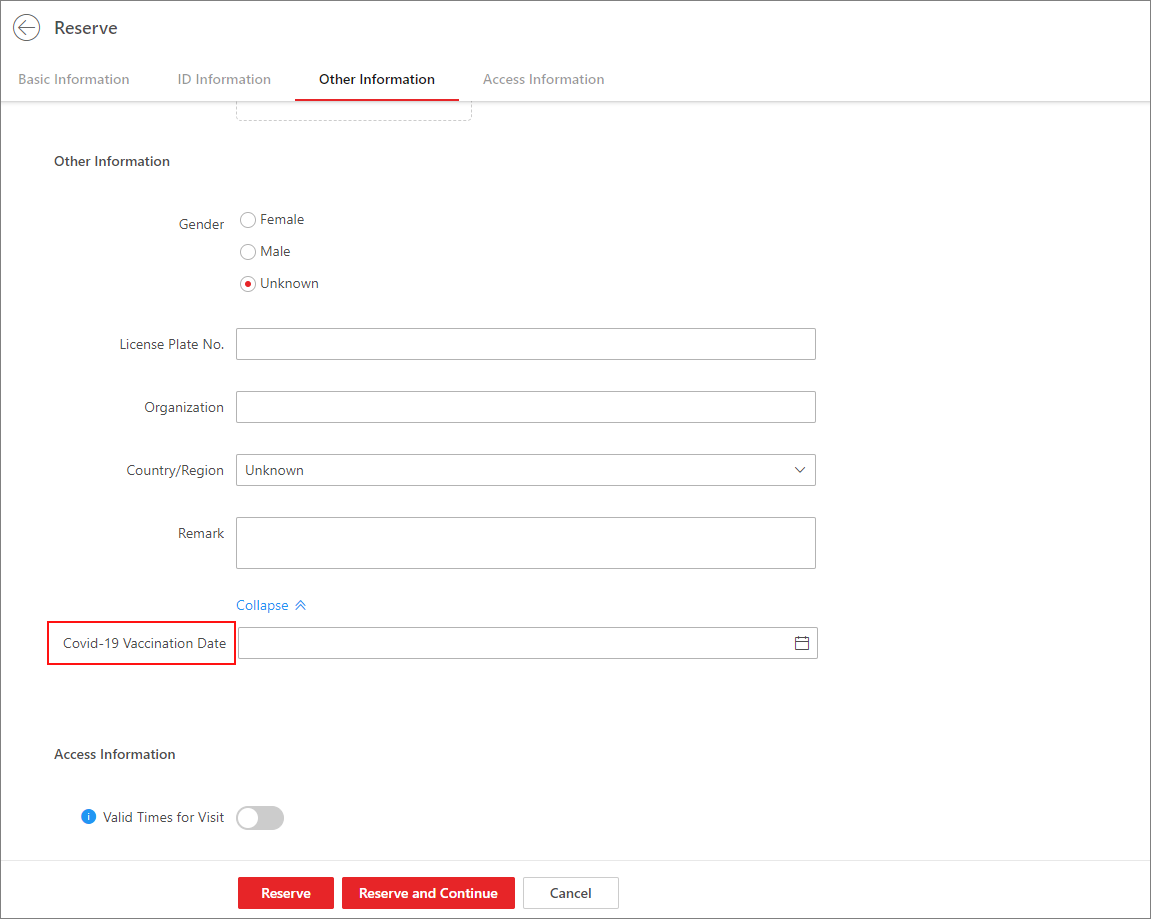 Figure 1 Example
 - Custom Field for Reservation & Check-In
-
Check fields to display on the visitor reservation page and the visitor check-in page.
Moreover, you can turn on the switches in the Set as Required column to set corresponding fields as required fields.
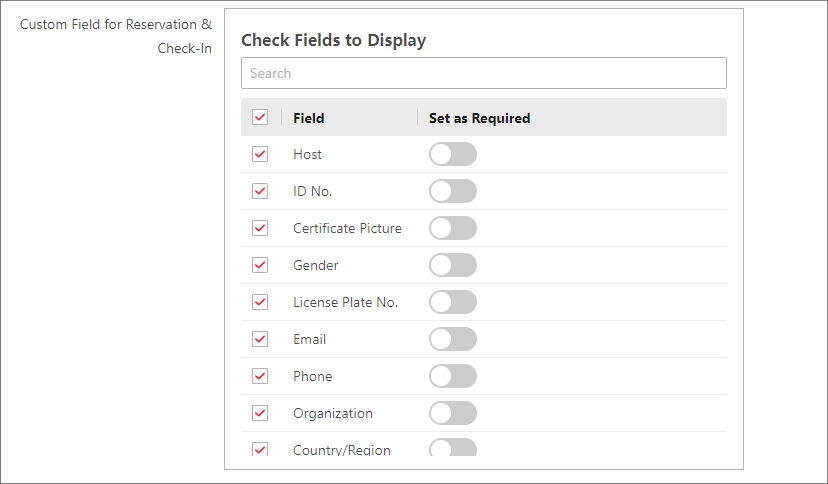 Figure 2 Check Fields to Display
 - Authorization Code for Self-Authentication on Visitor Terminal
-
Set the authorization code for allowing visitors to perform self-authentication on visitor terminals. The authorization code will be the initial verification code for all visitor terminals connected to the platform. The receptionist (or other similar staff) needs to enter the authorization code to allow visitors to skip authentication.
Note:This parameter is available only when the visitor terminal is added to the platform. See Manage Visitor Terminals for details.
- Visitor Reservation
-
- Check-In Not Required If Reservation Confirmed
-
Applicable to reception areas where neither a receptionist nor a visitor terminal is deployed. If this is checked, visitors will be automatically checked in when reservations are made for them.
- Digits of Reservation Code
-
Define the number of digits (4 digits or 6 digits) contained in each reservation code. The visitor reservation code acts as a verification code for visitor check-in. After reservation, the visitor will receive the reservation code by email and text message. When checking in, the visitor should provide the reservation code.
- Send Email When Reservation Approved
-
Send an email based on the selected email template to the recipient (the host or visitor) specified in the template when a visit reservation is approved.
- Send Email When Reservation Rejected
-
Send an email based on the selected email template to the recipient (the host or visitor) specified in the template when a visit reservation is rejected.
Note:-
If the recipient is the host, make sure that the host's email address is provided when you add the host to the platform. For details, see Add a Single Person.
If the recipient is the visitor, make sure that the visitor's email address is provided when you make a reservation for or check in the visitor.
-
You can customize email templates according to your needs. See Add Visitor Email Template for details.
- Visitor Check-In
-
- Print Visitor Pass Once Checked In
-
When checked, the printer connected to your PC will automatically print a visitor pass once a visitor is checked in.
- Format of Visitor Pass
-
Select Receipt or Card as the format of the printed visitor passes.
- Visitor Pass Template
-
Select a template as the one that will be automatically printed.
You can click View Template to preview the selected template.
Note:Make sure you have set templates as needed. For details about setting visitor pass templates, see Add Visitor Pass Template.
- Take Photo of Visitor's Belongings
-
If you enable this function, you can take a picture of the visitor's belongings and upload it to the platform when checking in/out the visitor.
- Send Email When Checked In
-
Send an email based on the selected email template to the recipient (the host or visitor) specified in the template when a visitor checks in.
Note:-
If the recipient is the host, make sure that the host's email address is provided when you add the host to the platform. For details, see Add a Single Person.
If the recipient is the visitor, make sure that the visitor's email address is provided when you make a reservation for or check in the visitor.
-
You can customize email templates according to your needs. See Add Visitor Email Template for details.
-
- Visitor Check-Out
-
- Default Check-Out Time
-
The default check-out time will be displayed on the Reserve page. After setting the time, you need not enter the visitor check-out time when reserving for a visitor. By default, the check-out time is 23:59:59. You can specify a time according to your needs.
- Visitor Not Checked Out After Exit Time
-
If a visitor does not check out before the end time of the visit or the exit time, the platform can automatically check out the visitor or trigger an alarm.
- Check Out Automatically
-
When this is selected, if a visitor does not check out before the end time of the visit or the exit time, the platform will automatically check out the visitor. You can set the Detection Frequency for detecting whether the visitors have checked out. For example, if you set it to 30 min, the platform will check the visiting status of all visitors every 30 minutes on the platform. The Detection Frequency should range from 30 to 60 minutes.
- Trigger Alarm
-
When this is selected, if a visitor does not check out before the end time of the visit or the exit time, an alarm will be triggered for notification. You can set the Alarm Detection Frequency for detecting whether the visitors have checked out. For example, if you set it to 3 min, the platform will check the visiting status of all visitors every 3 minutes on the platform. The Alarm Detection Frequency should range from 3 to 10 minutes.
-
Click Save.
Note:
After you click Save, the platform will apply the authorization code to all the connected visitor terminals. If the authorization code failed to be applied to specific visitor terminals,
 will appear next to
Authorization Code for Self-Authentication on
Visitor Terminal. In this case, you can move the cursor
to the icon and then click View or
Apply Again to view the failure details or
apply the authorization code to visitor terminals again.
will appear next to
Authorization Code for Self-Authentication on
Visitor Terminal. In this case, you can move the cursor
to the icon and then click View or
Apply Again to view the failure details or
apply the authorization code to visitor terminals again.