Link Display Screen and Set Displayed Content
The display screen linked to the parking lot can be used for displaying information including the date and time, parking duration, license plate number, expiration prompt, etc.
Make sure you have added display screens to the platform. See Add Display Screen for details about how to add a display screen.
-
On the top navigation bar, select
 > Passing Management > Parking Lot > Parking Lot Management.
 -
Click Settings of an added parking lot to enter the configuration page.
-
Select an entrance or exit from the left list.
-
Select a display screen to link it to the parking lot and click Display Screen Configuration beside the name of the display screen to open the Screen Configuration pane.
Configure Entrance and Exit Display Screen
The parameters to be configured for the entrance and exit display screen vary according to the linkage between the screen and the lane. If the screen is linked with a lane, both the Vehicle Detected screen and the Idle screen should be configured. If the screen has not been linked with a lane, only the Idle screen is required to be configured.
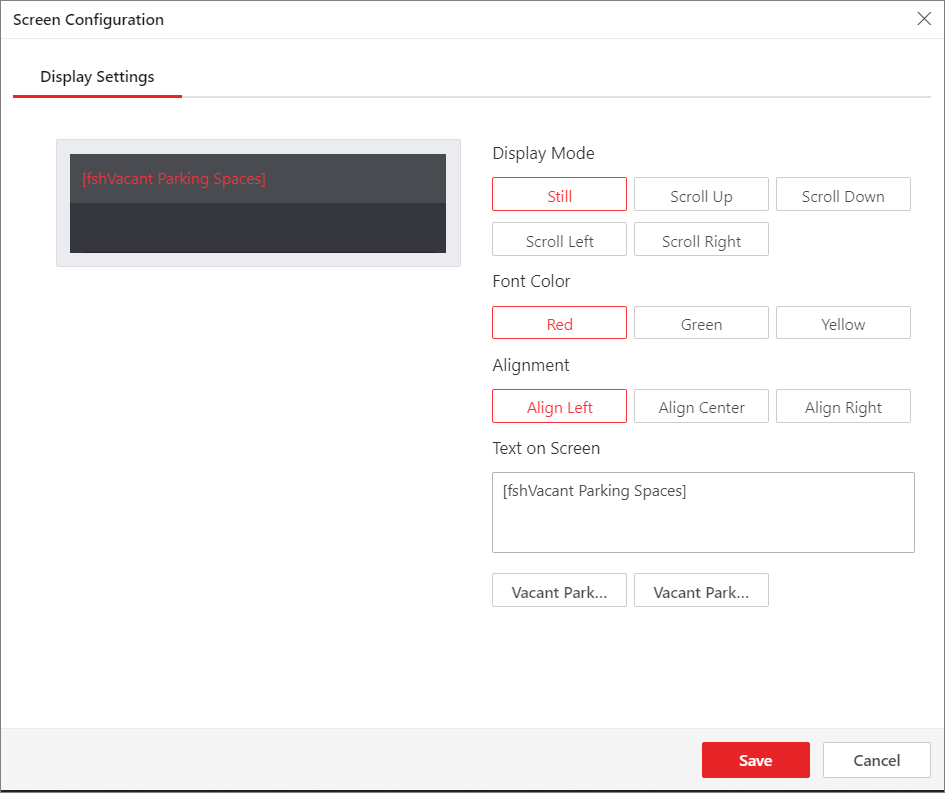 Figure 1 Configure the Entrance and
Exit Display Screen Not Linked with a Lane
Figure 1 Configure the Entrance and
Exit Display Screen Not Linked with a Lane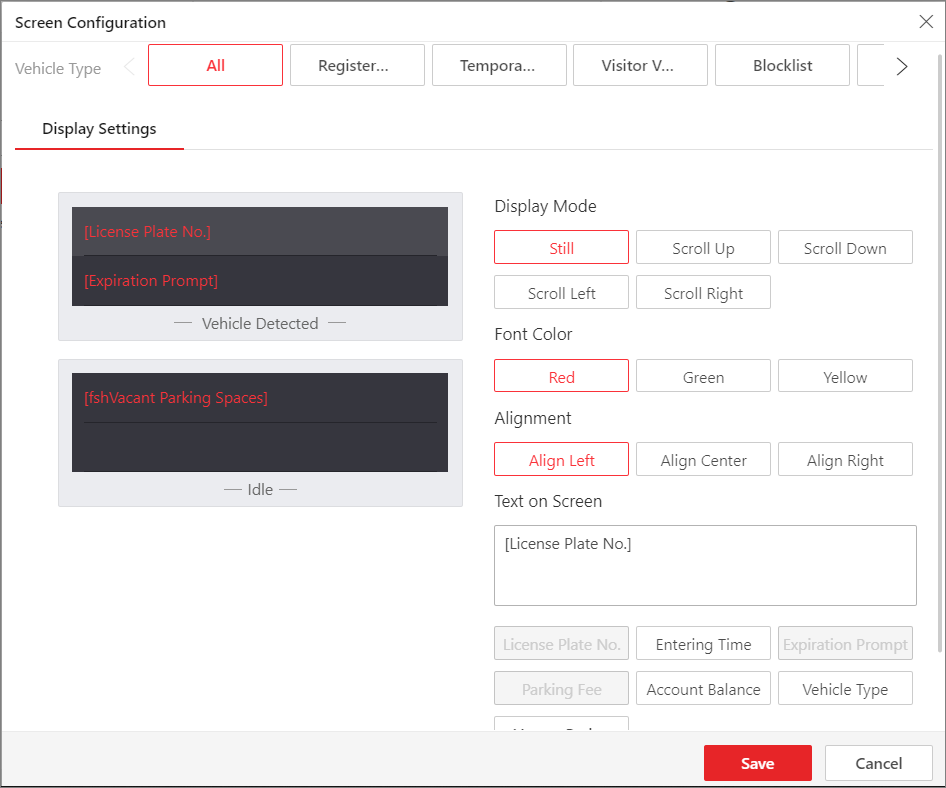 Figure 2 Configure the Entrance and
Exit Display Screen Linked with a Lane
Figure 2 Configure the Entrance and
Exit Display Screen Linked with a Lane-
Select a vehicle type.
Note:Vehicle type is not configurable for the entrance and exit display screen not linked with a lane.
- Configure the Vehicle Detected
screen.
-
Click a line on the Vehicle Detected screen to set its Display Mode, Font Color, and Alignment.
-
Select the information to be displayed on the line from Text on Screen.
- License Plate No.
-
Display the license plate number recognized by the capture unit. By default, this text is selected to be displayed on the screen linked with a lane.
- Entering Time
-
The time when a recognized vehicle enters the parking lot. This text is selectable only when the display screen is linked with an entrance lane.
- Exit Time
-
The time when a recognized vehicle exits the parking lot. This text is selectable only when the display screen is linked with an exit lane.
- Parking Duration
-
Display the parking duration when the vehicle exits the parking lot.
- Expiration Prompt
-
Inform the vehicle owners that their vehicles are about to expire. You need to enable the expiration prompt for a parking lot and set when to inform vehicle owners the expiration date. See Add Parking Lot for details. This text is selectable only when the display screen is linked with an exit lane.
- Parking Fee
-
Display the parking fee to be paid when the vehicle exits the parking lot. This text is selectable only when the parking lot is in the Charge mode.
- Account Balance
-
The balance in the vehicle owner's account.
- Vehicle Type
-
Display the vehicle type recognized by the capture unit.
- Vacant Parking Spaces
-
Display the number of vacant parking spaces on the selected floor with which the display screen is linked.
-
Configure other lines in the same way.
Note:There is only one line for displaying information on the screen not linked with a lane.
-
-
Configure the Idle screen in the same way you configure the Vehicle Detected screen.
Note:The Vacant Parking Spaces in Vehicle List refers to the number of vacant parking spaces for vehicles in a vehicle list. However, in the case that a parking lot is used by more than one company at the same time, a vehicle list can be regarded as a company.
-
Click Save.
Configure Indoor Guidance Screen
The number of sub screens on the indoor guidance screen varies with the model. Here only take the model with one sub screen as an example.
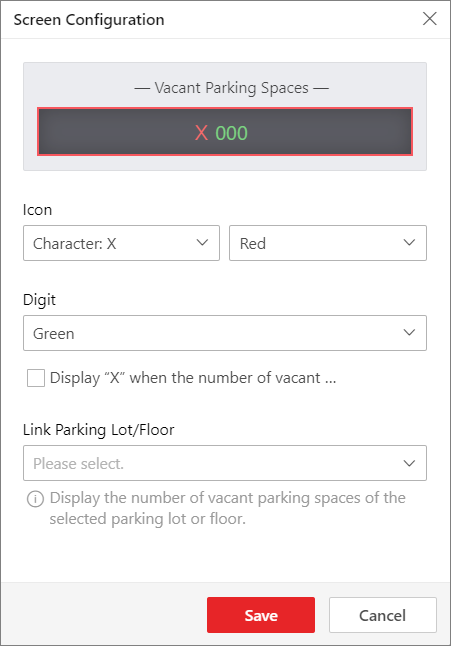 Figure 3 Configure Indoor Guidance
Screen
Figure 3 Configure Indoor Guidance
Screen-
Click a sub screen and select a icon type and color to be displayed.
-
Select a color for the digits displayed on the screen.
Note:If the current number of vacant parking spaces is 0, you can check the checkbox below the Digit field to display "X".
-
Select a parking lot or a floor to be linked with the indoor guidance screen.
-
Click Save.
Configure Entrance Guidance Screen
The number of sub screens on the entrance guidance screen varies with the product model. Here only take the product model with three sub screen as an example.
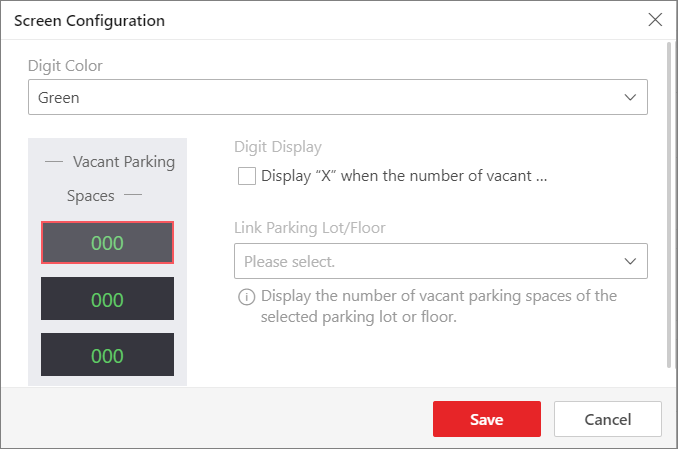 Figure 4 Configure Entrance Guidance
Screen
Figure 4 Configure Entrance Guidance
Screen-
Click a sub screen and select a color for the digits displayed on the screen.
Note:If the current number of vacant parking spaces is 0, you can check the checkbox below the Digit field to display "X".
-
Select a parking lot or a floor to be linked with the entrance guidance screen.
-
Click Save.