Add Terminal by IP Address
If you know the IP address of the terminal (referred to as device in the following pages) to be added, you can add the device to the platform by specifying the IP address, user name, password, etc.
Make sure you are in the Digital Signage mode. See details in Switch Application Mode.
-
On the top navigation bar, select
 > Basic Management > Device to enter the device management page.
- On the top, select Device.
- On the left navigation pane, click Device and Server > Digital Signage Terminal.
- Click Add to enter the Add Device page.
-
Select the Access Protocol as Hikvision Private
Protocol.
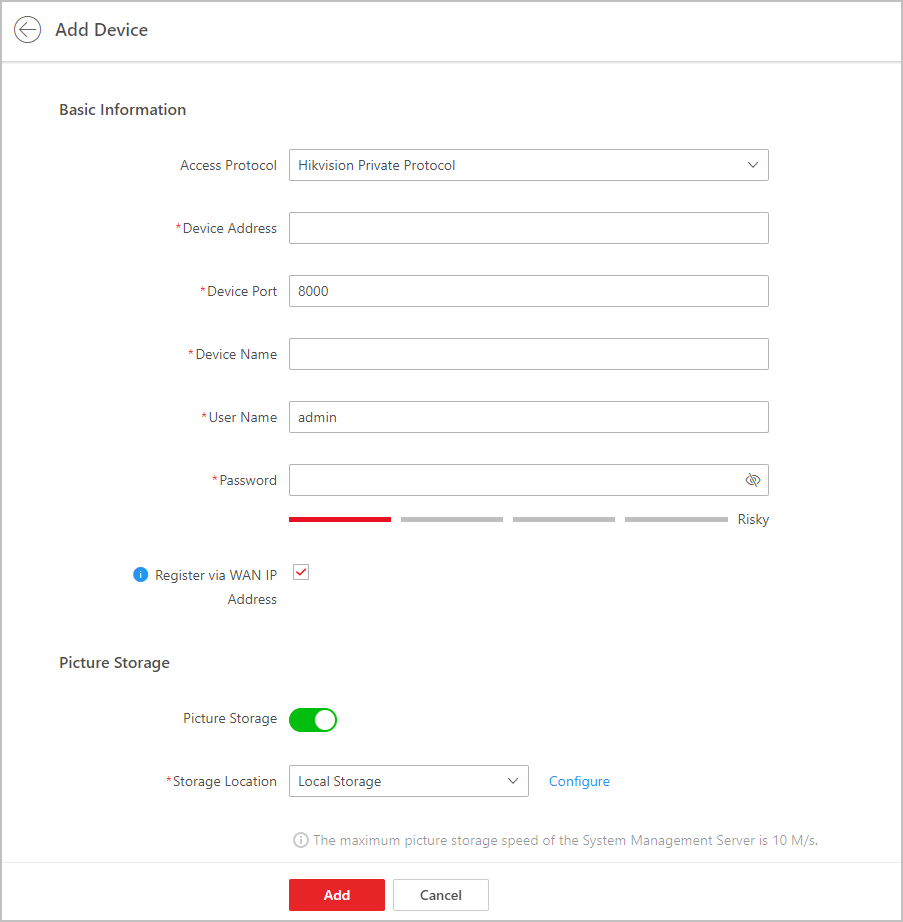 Figure 1 Add Terminal by IP
Address
Figure 1 Add Terminal by IP
Address -
Set the basic information.
- Device Address
-
Enter the IP address of the device.
- Device Port
-
Enter the port number of the device.
- Device Name
-
The name of the device, which can be used to describe the device function, location, etc.
- User Name
-
The admin account (which is created when activating the device) or the non-admin account, such as the operator. If you use a non-admin account to add devices, the permissions might be limited.
- Password
-
The password of the account.
CAUTION:The password strength of the device can be automatically checked. We highly recommend you change the password of your own choosing (using a minimum of 8 characters, including at least three kinds of following categories: upper case letters, lower case letters, numbers, and special characters) in order to increase the security of your product. And we recommend you change your password regularly, especially in the high security system, changing the password monthly or weekly can better protect your product.
Proper configuration of all passwords and other security settings is the responsibility of the installer and/or end-user.
- Register via WAN IP Address
-
The function is available when the device and the platform are not on the same LAN.
- Optional:
Enable Picture Storage to configure the
storage location.
- Local Storage
-
The pictures are stored in the SYS server.
Note:You can click Configure to configure the storage location for pictures and files respectively. For details, refer to Configure Storage for Imported Pictures and Files.
- pStor
-
The pictures are stored in the pStor server.
Note:In the attendance application scene, you should enable Picture Storage.
- Optional:
Set the time zone of the device.
-
Select Get Device's Time Zone to get the time zone of the device.
-
Select Manually Set Time Zone to manually set the time zone of the device and the time zone settings will be applied to the device automatically.
-
- Optional:
Switch on Add Resource to Area to import the resources
of the added devices to an area.
Note:
You can create a new area by the device name or select an existing area. Also, you can click Add to add new area(s). For details, refer to Add an Area for Current Site.
- Click Add.
- Optional:
Perform the following operations after adding devices.
Option Description Change Password
Select one or more devices, and click Change Password to change the password of the selected devices.
Note:If multiple devices have the same password, you can change the password for multiple devices simultaneously.
Delete Devices
Select one or more devices, and click Delete to delete the selected devices.
Note:If the device which has been linked to the video wall is deleted, the corresponding video wall program cannot be released.
Search Device(s)
Enter a keyword in the search box on the upper right corner of the page to quickly search the target device(s).
Configure Device Display Settings
Select one or more devices and click Display Settings to enter the Display Settings page. See Configure Device Display Settings for details.
Configure Device Privacy Settings
Select one or more devices, and then click Privacy Settings to enter the Privacy Settings page. See Configure Device Privacy Settings.
Set Time Zone
Select one or more devices, and click Time Zone to configure the time zone of the selected devices.
You can select Get Device's Time Zone or Manually Set Time Zone according to your requirements.