If you know the IP address or domain name of the Remote Site to be added,
you can add the site to the Central System by specifying the IP address (or domain name),
user name, password, and other related parameters.
Note:
-
When adding Remote Site, the site's cameras and area
information are imported to the Central System by default.
-
When you perform the following steps, the progress of
the whole task will be displayed on the upper right side.
-
On the top navigation bar, select .
-
On the left pane, click Remote Site Management.
-
Enter the Add Remote Site page.
-
If no Remote Site is added, click Add
Site to enter the Add Remote Site page.
-
If you have already added Remote Site, click  on the left to enter the
Add Remote Site page.
on the left to enter the
Add Remote Site page.
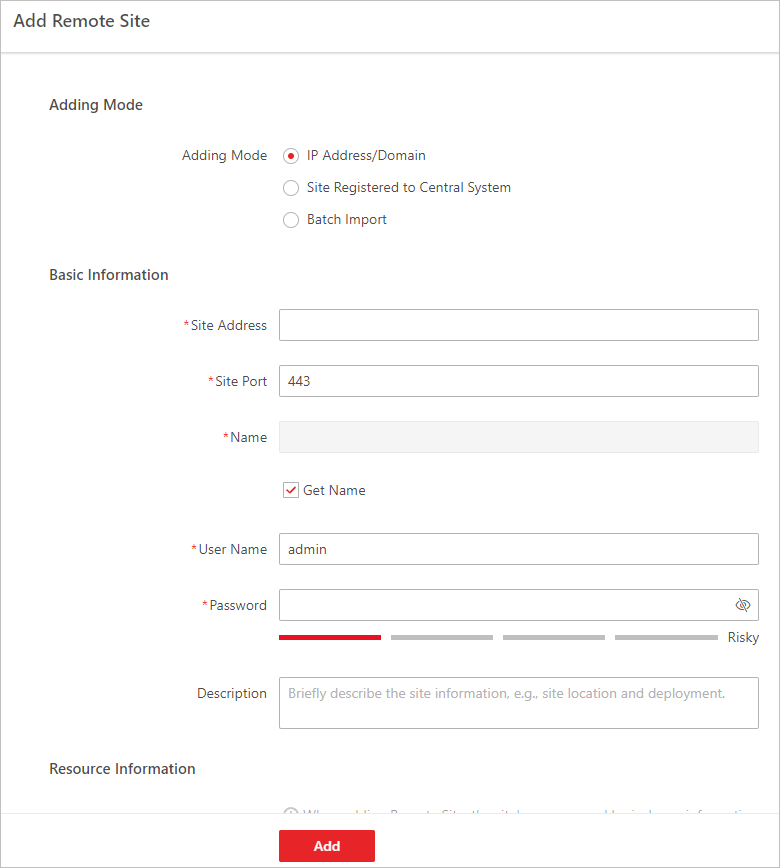 Figure 1 Add Remote
Site
Figure 1 Add Remote
Site
Note:
If you did not set the NTP server which is used for
synchronizing the time between the SYS and the NTP server, a message will be displayed on the
top of this page. If you need, click the button to go to the System
Configuration page.
-
Select IP Address/Domain as the adding mode.
-
Enter the required information.
- Site Address
-
The IP address or domain name of the Remote
Site.
- Site Port
-
Enter the port No. of the Remote Site.
- Name
-
Edit a name for the Remote Site as desired. You can
check Get Name to synchronize the Remote
Site's name automatically.
- User Name
-
The user name for the Remote Site, such as admin
user and normal user.
- Password
-
The password required to access the Remote Site.
CAUTION:
The password strength of the device can be automatically checked. We
highly recommend you change the password of your own choosing (using a minimum of 8
characters, including at least three kinds of following categories: upper case
letters, lower case letters, numbers, and special characters) in order to increase
the security of your product. And we recommend you change your password regularly,
especially in the high security system, changing the password monthly or weekly can
better protect your product.
Proper configuration of all passwords and other security settings is the
responsibility of the installer and/or end-user.
- Description
-
Optionally, you can enter the descriptive
information for the Remote Site, such as location and
deployment.
- Optional:
Enable receiving the alarms configured on the Remote Site.
-
Switch on
Select
Configured Alarms to Be Received by Central
System to display all the configured
alarms on a Remote Site.
- Optional:
Click
 to filter the configured alarms by the alarm source, area, triggering
event, etc.
to filter the configured alarms by the alarm source, area, triggering
event, etc.
-
Select the configured alarm(s).
Note:
-
After receiving the alarm from Remote Site,
the alarm will be configured as alarm in Central System
automatically. You can click Default
Configuration Rule to view the imported
alarms' default settings including alarm name, alarm
priority, actions, etc.
-
You can view and edit alarms in Event and
Alarm module. For details about setting the event and
alarm, refer to Event and Alarm.
-
Back up the Remote Sites' database in the Central System and you can set the
maximum number of backups and view the database saving path in the Central
System.
- Max. Number of Backups
-
Define the maximum number of backup files available
on the platform.
- Optional:
Enable backing up the Remote Site's database in schedule.
-
Switch on Scheduled Database Backup.
-
Select how often to back up the database.
Note:
If you select Weekly or
Monthly for running the backup task,
select which day to run.
-
Select what time of a day to start backup.
-
Click Add to add the remote site.
 > Security Monitoring > Video.