Add an On-Board Device by Device ID

If an on-board device supports the ISUP protocol, you can add it to the platform by its device ID. This way is cost-effective when you need to manage an on-board device on the public network without a fixed IP address.

  • Make sure the devices you are going to add are correctly installed and connected to the network as specified by the manufacturers. Such initial configuration is required in order to be able to connect the devices to the HikCentral Professional via network.

  • Make sure you have activated the devices. Refer to Create Password for Inactive Device(s) for detailed instructions on activating devices.

  1. On the top left of the Web Client, click > Device > Device and Server > On-Board Device.
  2. ClickAdd.
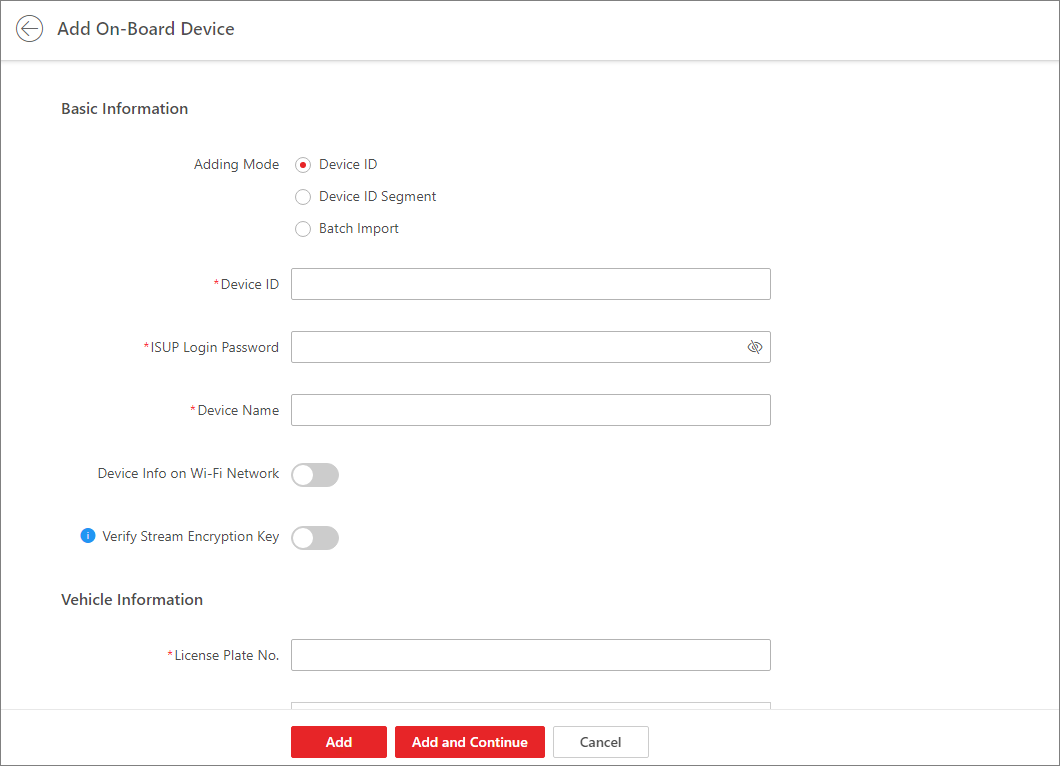
    Figure 1 Add On-Board Device
  3. Set basic information.
    1. Select Device ID as the adding mode.
    2. Enter the ID, ISUP login password, and name of the on-board device.
    3. Optional: Switch on Device Info on Wi-Fi Network and enter the address and port of the on-board device as well as the user name and password of the Wi-Fi.
      Note:

      Once a vehicle reaches its destination and the on-board device successfully connects to the Wi-Fi there, the video recorded during the journey will be copied back to the platform.

    4. Optional: Switch on Verify Stream Encryption Key and enter the stream encryption key set on the on-board device.
      Note:

      The precondition is that the on-board device supports stream encryption and this feature has been enabled for it.

      When starting live view or remote playback of the cameras related to the on-board device, the Client will verify the key stored in the SYS server for security purpose.

  4. Set vehicle information.
    1. Enter the license plate number of the vehicle the on-board device is related to.
    2. Add the vehicle to an existing area or click Add to add it to a newly-created area.
  5. Optional: Set picture storage.
    1. Switch on Picture Storage.
    2. Select a storage location.
      Note:
      • If you select Local Storage, you need to click Configure to configure picture storage on the SYS server.

      • If you select Hybrid Storage Area Network, Cluster Storage, pStor, or Network Video Recorder, you need to select a storage medium from the drop-down list.

  6. Set device's time zone.
    Get Device's Time Zone

    The time zone of the device will be automatically chosen according to the region of the device.

    Manually Set Time Zone

    You can select a time zone and the settings will be applied to the device automatically.

  7. Set resource information.
    1. Select a Streaming Server.
    2. Optional: Check Wall Display via Streaming Server.
      Note:

      If the encoding device is not on the same network with cameras, it will get the stream for live view and playback via the Streaming Server, if they are on the same network, the encoding device can get stream directly from cameras.

    3. Optional: Check Get Device's Recording Settings to get cameras' recording settings configured on the on-board device.
  8. Click Add to finish or click Add and Continue to add another on-board device.
  9. Optional: Perform the following operations after adding the on-board device.
    Option Description

    Edit On-Board Device

    On the device list, click the name of an on-board device to edit it.

    Configure On-Board Device Remotely

    On the device list, click in the Operation column to configure an on-board device remotely.

    Reset Device's Time Zone

    On the device list, select one or multiple on-board devices and click Time Zone to edit their time zones.

    Delete On-Board Device

    Select one or multiple devices and click Delete to delete them.

    Search for On-Board Device(s)

    Enter key words in the search box and click to search for specified on-board device(s).