Add On-Board Devices by Device ID Segment

You can add on-board device(s) to the platform by device ID segment, and perform further operations, such as editing device settings, configuring devices remotely, deleting devices.

  1. On the top left of the Web Client, click > Device > Device and Server > On-Board Device.
  2. Click Add.
  3. Select Device ID Segment as the adding mode.
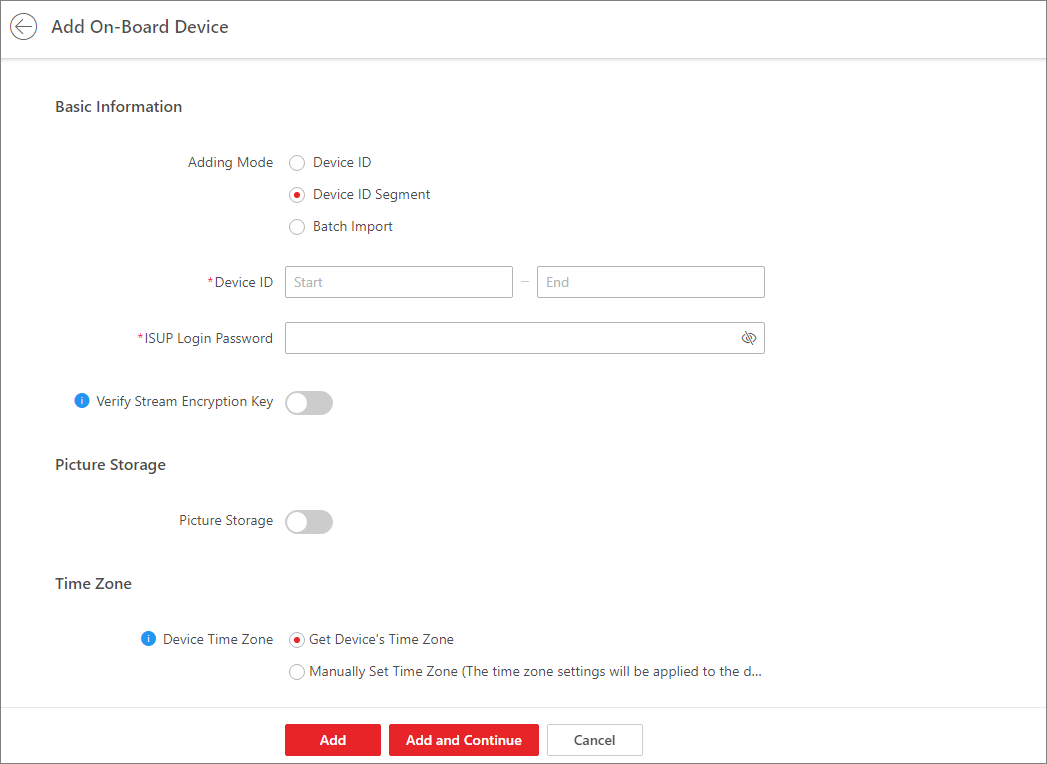
    Figure 1 Add On-Board Device by Device ID Segment
  4. Configure the basic information of the device(s).
    1. Enter the start device ID and end device ID.
      Note:
      • If the start ID and end ID are the same, only one device will be added.

      • If the start ID is smaller than the end ID, multiple devices will be added with their IDs arranged in ascending order. For example, if you set the start ID and end ID to 1 and 3 respectively, then devices named 1, 2, and 3 will be added.

    2. Optional: Enter the ISUP login password.
    3. Optional: Enabled stream encryption, and switch on Verify Stream Encryption Key and enter the stream encryption key on the device.
      Note:

      This function should be supported by the device.

  5. Configure picture storage for the device(s).
    1. Switch on Picture Storage.
    2. Select a storage server type and a storage server from the drop-down list as the storage location.
  6. Optional: Set the time zone for the device.
    • Get Device's Time Zone

      The time zone of the device will be automatically chosen according to the region of the device.

    • Manually Set Time Zone (The settings will be applied to the device automatically)

      You can select a time zone of the device. The settings will be applied to the device automatically.

  7. Configure the resource information.
    1. Select a streaming server from the drop-down list.
    2. Optional: Check Wall Display via Streaming Server to use the Streaming Server to play videos on the smart wall.
      Note:

      This parameter is configurable only when you select a Streaming Server in the former substep.

    3. Optional: Check Get Device's Recording Settings to get camera's recording settings configured on the device.
  8. Click Add to finish, or click Add and Continue to add other device(s).
  9. Optional: Perform the following operation(s) if needed.
    Option Description

    Edit Device Settings

    Click the name of a device in the Device Name column to edit its settings.

    Delete Device

    In the device list, check one or multiple devices, and click Delete to delete the device(s).

    Configure Device Remotely

    • Option 1: Click in the Operation column to configure the device remotely.

    • Option 2: Click the name of a device to enter its settings page, and then click Configuration on Device in the upper-right corner to configure the device remotely.

    Note:

    To support remote configuration, the device should be configured with an IP address.

    Edit Device's Time Zone

    On the device list, check a device, and click Time Zone to edit its time zone settings. You can also check multiple devices and configure the same time zone for them.

    Search for On-Board Device(s)

    Enter one or multiple key words in the search box and click to search for specified on-board device(s).