Create Attendance Program
You can create attendance programs on the platform. The program can be used to display the persons' basic information, check-in time and temperature information. You can also configure welcoming words for persons when they check in. The platform provides two types of program templates including Attendance and Temperature Screening Template and Attendance Template. You can select one template according to the actual scene and edit the predefined template as needed. After creating the program, you can preview the program, cut in program, etc.
You have added terminal(s) to the platform and have linked a device that supports face attendance with the terminal. For details, refer to Add Digital Signage Terminal and Link External Device to Terminal.
-
On the top navigation bar, select
 > Integrated Service > Digital Signage to enter the digital signage page.
-
Select a template type and the corresponding template as needed.
Note:
-
You can click
 to add the template to My Favorites. Up to 1,000 templates
can be added to Favorites.
to add the template to My Favorites. Up to 1,000 templates
can be added to Favorites. -
You can click
My Favorites in the lower-left corner to view
and select the templates that have been added to Favorites.
-
-
Click OK to enter the creating program page.
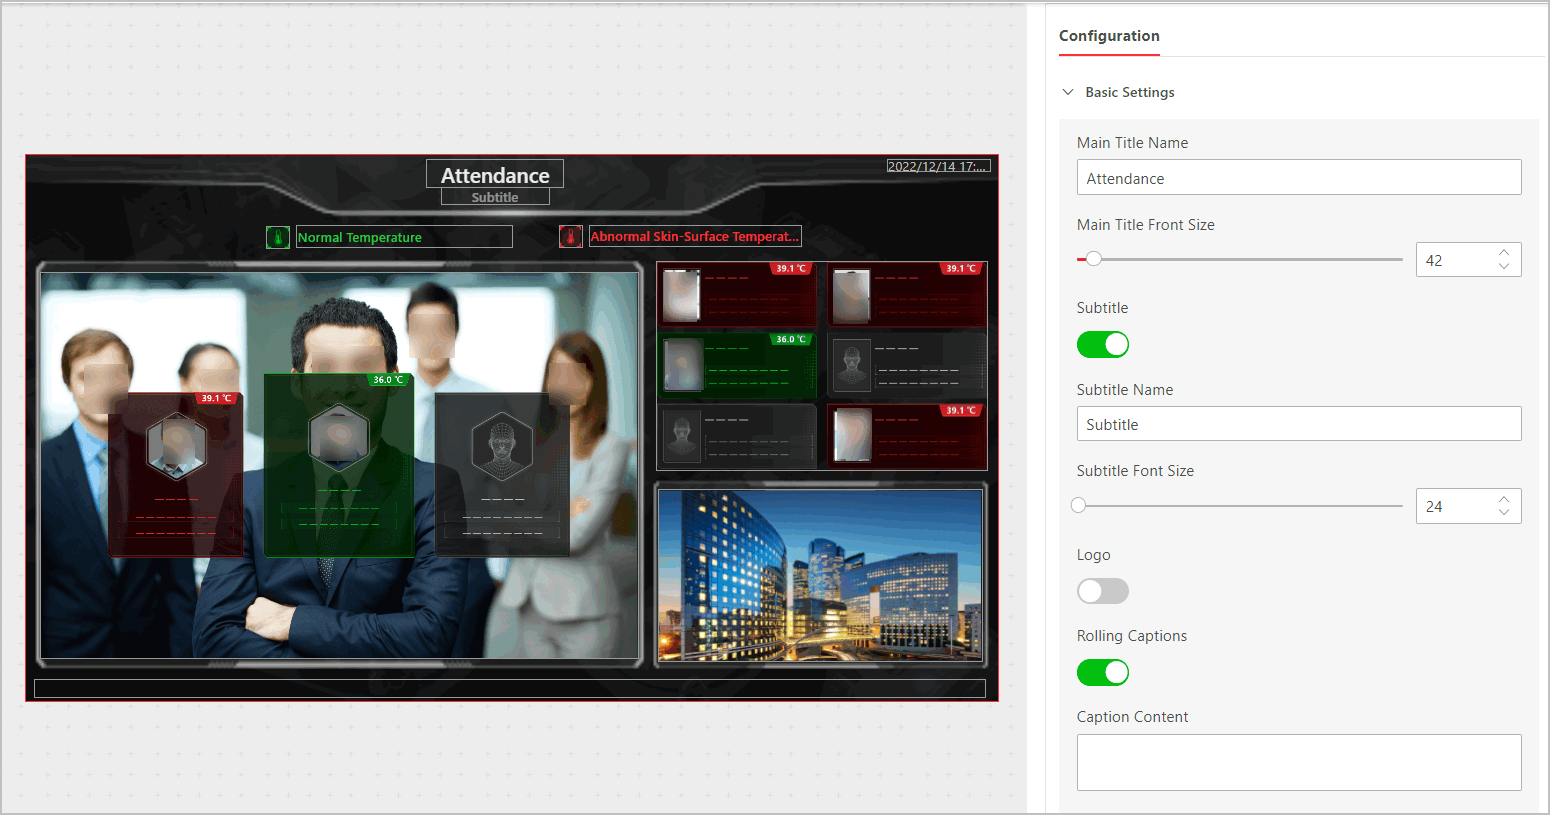 Figure 1 Create Program
- Basic Settings
-
Configure the content and font size for main title and subtitle; enable Logo and select a logo from the local PC; enable Rolling Captions and configure the related content and scrolling direction; enable Welcome Words and configure the content of welcome words; enable Audio Announcement and configure the related settings such as announcement speed, the content of person's voice and voice prompt; and set the threshold of alarm temperature.
- Check-in Information Display Settings
-
Select the time to show the check-in records or not to show records.
Note:There is some default information being displayed on the check-in records. If you need to display more check-in information, refer to Configure Device Privacy Settings.
- More
-
Click
 to set the background picture for
the current program.Note:
to set the background picture for
the current program.Note:Make sure you have added picture materials to the platform and the materials have been approved. For details, refer to Material Library and Content Review.
- Advertisement Settings
-
You can add advertisements (pictures, videos, etc.) to the program, and configure switching effect and playing time for the advertisements.
Note:Only when selecting Attendance Template, you can configure advertisements.
- Optional:
On the current editing program page, perform the following operations if needed.
Option Description Edit Program
Click
 to edit program parameters in the
pop-up window. For details, refer to Step 3.
to edit program parameters in the
pop-up window. For details, refer to Step 3.Preview Program
Click Preview to preview the current program.
During previewing, you can click
 or
or  to pause or start playing; click
 or
or  to adjust the playing speed as 1x, 2x,
or 4x; and click
to adjust the playing speed as 1x, 2x,
or 4x; and click  to preview the program in
fullscreen.
to preview the program in
fullscreen.Cut In Program
Click Cut In to cut in the current program.
Note:For details, refer to Cut in Program.
Create Schedule
Click Next to enter the managing schedules page and create a schedule for the program.
Note:For details, refer to Schedule Management.
- Optional:
On the program list page, perform the following operations if needed.
Option Description View Program in List or Thumbnail Mode
Click
 /
/ to view the added programs in the thumbnail mode or in the
list mode.
to view the added programs in the thumbnail mode or in the
list mode.Add Program to Favorites
Click
to add the current program to
Favorites.Preview Program
Click
 to preview the program.
During previewing, you can click
or to pause or start playing; click
or to adjust the playing speed as 1x, 2x,
or 4x; and click to preview the current page in
fullscreen.Copy Program
Click
 to enter editing program page. Click
Save on the upper right corner to copy the current program,
and a new program with the same content is created.Note:
to enter editing program page. Click
Save on the upper right corner to copy the current program,
and a new program with the same content is created.Note:When copying a program (e.g., Program A) for the first time, the name of the new program (Program A_1) will be generated automatically. If you need to copy this program (Program A) for a second or more times, you should manually edit its name, or the program cannot be created successfully.
Cut In Program
Click
 to cut in the current program. For
details, refer to Cut in Program.
to cut in the current program. For
details, refer to Cut in Program.Create Schedule
Click
 to enter the managing schedules page and create a
schedule for the program. For details, refer to Schedule Management.
to enter the managing schedules page and create a
schedule for the program. For details, refer to Schedule Management.Enlarge Program Page
Click
 to enlarge the program page and view
it.
to enlarge the program page and view
it.Filter Program
Click
 , and filter programs by conditions
such as name and sharing property.
, and filter programs by conditions
such as name and sharing property.Refresh Program List
Click Refresh to refresh the program list. The programs will be listed according to the time they were added.
Delete Program
Check one/more programs, or click Select All to select all programs, and click Delete to delete the selected programs.
Note:Programs that are releasing or cutting in cannot be deleted.