Add a Registered Vehicle
You can add the information of one vehicle to the platform as a registered vehicle at one time.
-
On the top navigation bar, select
 > Basic Management > Vehicle to enter the vehicle management page.
-
In
the top left corner of the Vehicle page, click
Add to enter the Add Vehicle
page.
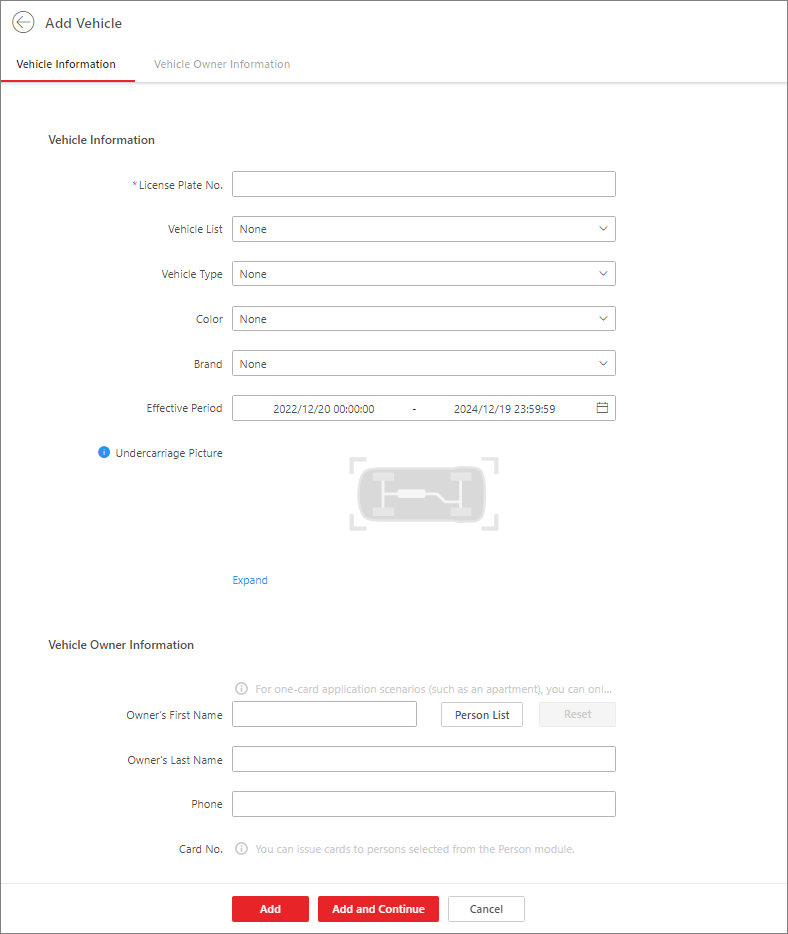 Figure 1 Add a Registered
Vehicle
Figure 1 Add a Registered
Vehicle -
Set the information for the vehicle owner.
-
Enter the owner's first name, last name, and phone number.
-
Click Person List to select an existing person as the vehicle owner from a person list and select a card No. (if cards are issued to the person) for the owner to swipe card when entering and exiting the parking lot.
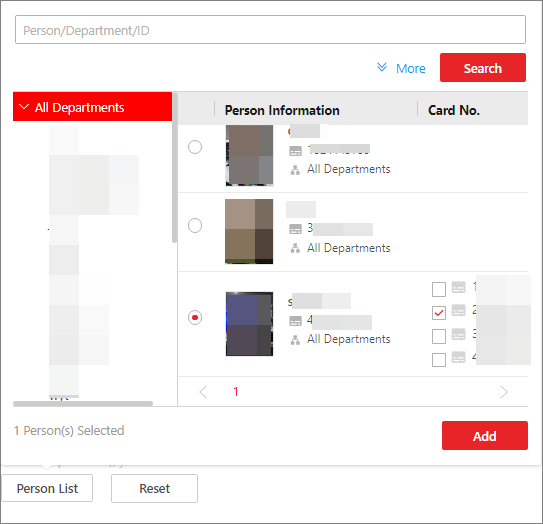 Figure 2 Select an Existing
Person as Vehicle OwnerNote:
Figure 2 Select an Existing
Person as Vehicle OwnerNote:-
You can also select a person who has been linked to another vehicle.
-
On the person list pane, you can enter the person's name, department, or ID to search for a specific person. Or you can click More to display persons' additional information fields, enable the field(s), and enter the corresponding keywords to make the search result more accurate.
-
For how to add persons and how to issue cards to persons, refer to Add a Single Person and Batch Issue Cards to Persons.
-
-
- Optional:
Perform the following operation(s) after
adding
registered vehicles.
Option Description Edit a Vehicle
Click a number in the License Plate Number column to edit the vehicle information.
Delete Vehicles
-
Check the vehicle(s) and click Delete to delete the selected vehicle(s).
-
Click
 > Delete All beside Delete to
delete all the added vehicles in different vehicle
lists.
> Delete All beside Delete to
delete all the added vehicles in different vehicle
lists.
Delete Expired Vehicles
Click Delete Expired Vehicle to delete all expired vehicles from different vehicle lists.
Filter Vehicles
Click
 and set conditions
to filter specific vehicles.
and set conditions
to filter specific vehicles.Export Vehicles
Click Export All to save the filtered vehicles or vehicles from all vehicle lists to your PC as an XLSX file, which can be imported to the platform again.
-