Before you view live video or record video files, you must add network
cameras to the device.
Ensure the network connection is valid and correct, and the network
camera is activated.
-
Click
 on the main menu.
-
Click Custom Add.
-
Set the parameters. For example, IP Camera
Address, Protocol, etc.
Note:
Management port ranges from 1 to 65535.
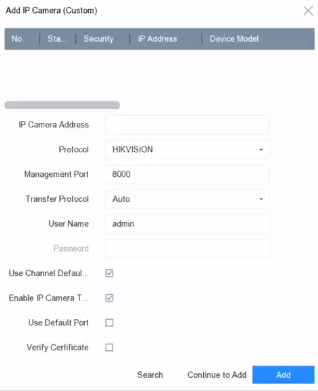 Figure 1 Add Network
Camera
Figure 1 Add Network
Camera
- Optional:
Check Use Channel Default Password to use the default
password to add the camera.
- Optional:
Check Enable IP Camera Time Sync to synchronize the time
of the connected IP camera automatically. For details, refer to IP Camera Time Sync.
- Optional:
Check Use Default Port to use the default management
port to add the camera. For SDK service, the default port value is 8000. For
enhanced SDK service, the default value is 8443.
Note:
The function is only available when you use HIKVISION
protocol.
- Optional:
Check Verify Certificate to verify the camera with
certificate. The certificate is a form of identification for the camera that
provides more secure camera authentication. It requires to import the network
camera certificate to the device first when you use this function. For details,
refer to Import Network Camera Certificate.
Note:
The enhanced SDK service is only available when you use
HIKVISION protocol.
- Optional:
Click Search to search other network cameras.
- Optional:
Click Continue to Add to add other network
cameras.
-
Click Add.