Add Encoding Device from the Site on Hik-Partner Pro
If you have configured parameters for the site on Hik-Partner Pro accessing the platform, you can add encoding devices from the site on Hik-Partner Pro to the platform. Deleting devices on the platform will not delete devices from the site on Hik-Partner Pro.
-
Make sure the devices (cameras, DVRs, etc.) you are going to use are correctly installed and connected to the network as specified by the manufacturers. Such initial configuration is required in order to be able to connect the devices to the HikCentral Professional via network.
-
Make sure you have enabled Access Site on Hik-Partner Pro in System Configuration and configured the required parameters. For details, refer to Set Hik-Partner Pro Site Access.
-
On the top navigation bar, select
 > Basic Management > Device.
-
Select the device source.
-
Select New Device, and enter the device serial No., and verification code.
Note:Make sure the new device to be added has registered to Hik-Connect. After the device is added, the corresponding site where the device is on Hik-Partner Pro will also be added.
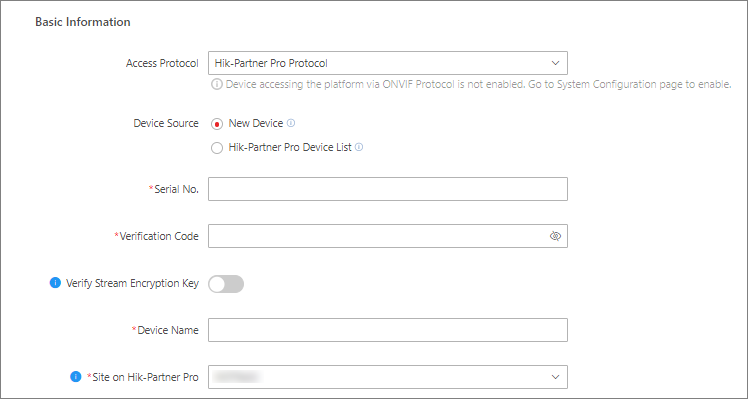 Figure 1 Add New Device
 -
Select Hik-Partner Pro Device List, and select a device from the list.
Note:If the selected device is deleted from the platform, it will not be deleted from the site on Hik-Partner Pro.
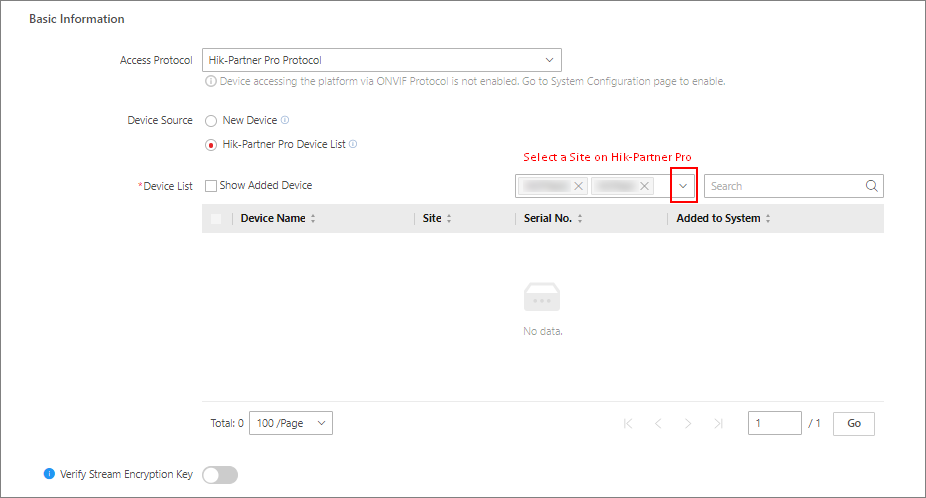 Figure 2 Add Device from Hik-Partner Pro
Device List
Figure 2 Add Device from Hik-Partner Pro
Device List
-
- Optional:
Set the time zone for the device.
-
Click Get Device's Time Zone to get the device's time zone.
-
Click Manually Set Time Zone, and click
 to select a time zone
from the drop-down list.Note:
to select a time zone
from the drop-down list.Note:You can click View to view the details of the current time zone.
-
- Optional:
If you need to add resources to area, select a Streaming Server to get the
video stream of the channels via the server.
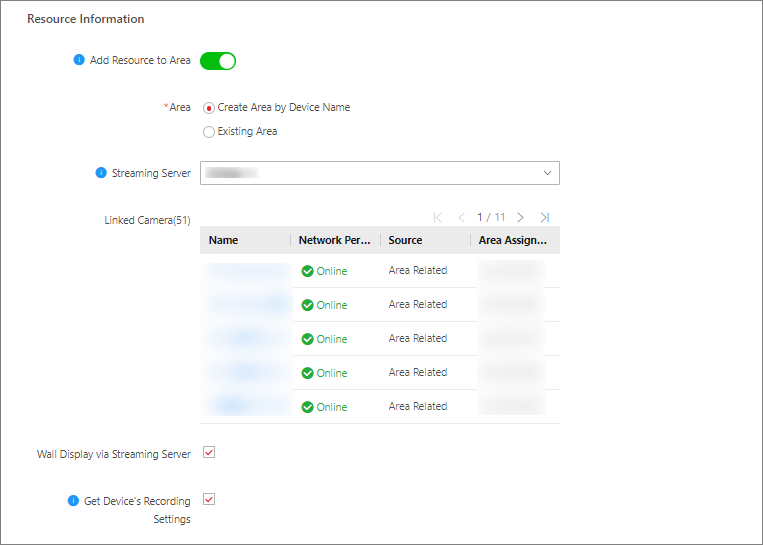 Figure 3 Add Resource to AreaNote:
-
The camera(s) related to the selected server will be displayed, you can view their information and click the name of a camera to edit it.
-
You can check Wall Display via Streaming Server to get stream via the selected streaming server when starting live view on the smart wall.
-
- Optional:
Perform the following operations after adding the device.
Option Description Remote Configurations
Click in the Operation
column to set the remote configurations of the corresponding
device.Note:
in the Operation
column to set the remote configurations of the corresponding
device.Note:For details about remote configuration, see the user manual of the device.
Change Password
Select the added device(s) and click Change Password to change the password for the device(s).Note:-
You can only change the password for online HIKVISION devices currently.
-
If the devices have the same password, you can select multiple devices to change the password for them at the same time.
Edit Bandwidth for Video Downloading
Select one or more NVRs (V4.1.5 or later versions), and click Edit Bandwidth for Video Downloading to set the bandwidth upper-limit for video downloading of the selected NVR(s).
Note:For details, refer to Limit Bandwidth for Video Downloading.
Set Time Zone
Select one or more device(s), click Time Zone to set/edit the time zone of the selected device(s).
Set N+1 Hot Spare for NVR
Click N+1 Hot Spare to set N+1 hot spare for NVRs.
Note:For details, refer to Set N+1 Hot Spare for NVR.
Replace Device
When a device is replaced with another one, and the serial No. of the new device is different from that of the old one, you need to confirm the replacement on the platform.
In the Operation column, click
 to replace the old
device with the new device
on
the platform.
to replace the old
device with the new device
on
the platform.
Delete Device
Select one or multiple device(s) and click
 to delete. Note:
If you delete the device(s), the device channel(s) will also be deleted, and you will not be able to search for historic video footage of the device(s) on the platform.
Search Device
Enter keyword(s) in the search box in the top right corner, and click
 (or press the Enter
key) to search for the target device(s).
(or press the Enter
key) to search for the target device(s).Filter Device
Click All in the upper left corner and select a device type to filter devices by encoding device types.
-
For facial recognition cameras / ANPR cameras / thermal cameras (report
supported), click Maintenance and Management > License Details >  > Configuration, and then select the added cameras as these types of cameras
respectively. Otherwise, these cameras' functions cannot be performed normally on
the platform.
> Configuration, and then select the added cameras as these types of cameras
respectively. Otherwise, these cameras' functions cannot be performed normally on
the platform.