Send Vehicle Analysis Reports Regularly

You can set a regular report rule for specified ANPR cameras. Once set, the platform will send an email with a report attached to the target recipients daily, weekly, or monthly, showing the number of passing vehicles detected by these ANPR cameras during the set time periods.

Note:

No more than 32,000 records can be contained in one report.

  1. On the top navigation bar, select > Passing Management > ANPR > Scheduled Report Configuration.
  2. Enter the Create Report page.
    • For the first time, click Add in the middle of the Scheduled Report Configuration page.

    • For non first time, click at the top of the left pane.

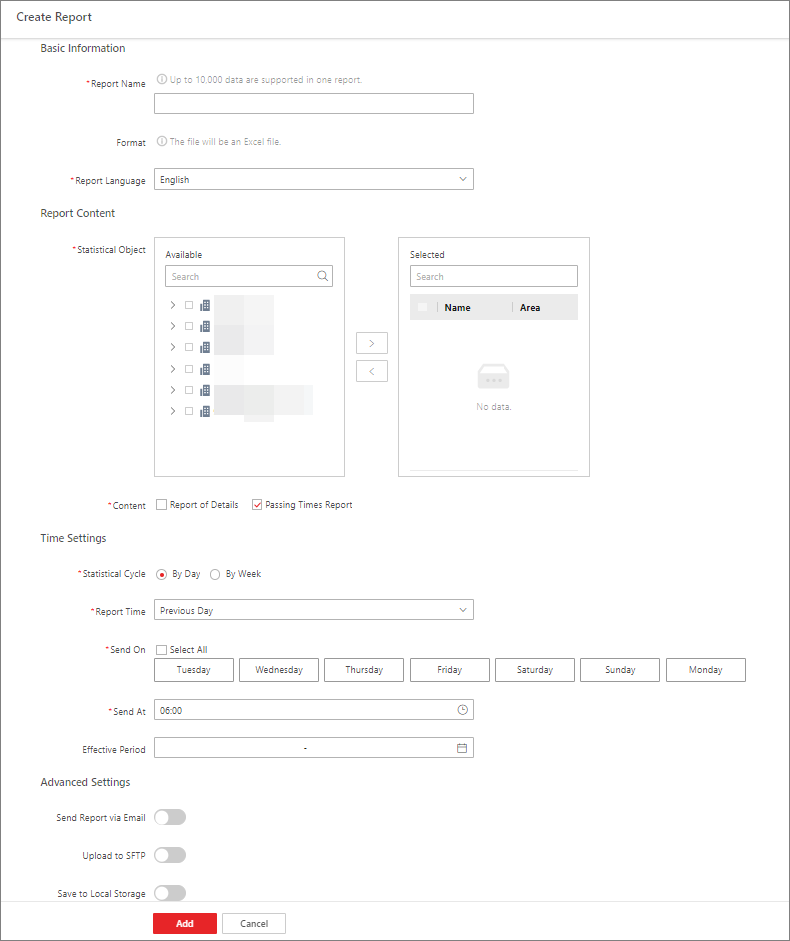
    Figure 1 Create Report Page
  3. Create a name for the report and select a report language from the drop-down list.
    Note:

    By default, the language matches with the one you selected when logging in to the Web Client.

  4. Set the report content.
    Statistical Object

    Select the ANPR camera(s) whose analysis results should be contained in the report.

    Content

    Check Report of Details or Passing Times Reportor both of them to determine the content contained in the report. If you checked Passing Times Report, you can get the statistics of vehicle passing times in the report.

  5. Set time parameters for the report.
    Statistical Cycle
    By Day

    The report contains analysis results of a day.

    By Week

    The report contains analysis results of a week or two weeks.

    Report Time

    The available report time varies with the statistical cycle you selected.

    • If the statistical cycle is set to By Day, you can select Previous Day as the report time, which means that the report will contain analysis results of the day (24 hours) before the sending time.

    • If the statistical cycle is set to By Week, you can select Recent 7 Days / Recent 14 Days as the report time, which means that the report will contain analysis results of the recent 7/14 days before the sending time.

    Send On / Send At
    • When the statistical cycle is set to By Day, the Send On field is required, as you need to select the day(s) of the week to determine the day(s) of which analysis results will be contained in the report and on which the report will be sent.

      For example, if you select Friday and Monday in the Send On field, and set the Send At field to 08:00, a report containing analysis results of Thursday will be sent at 08:00 on Friday and another report containing analysis results of Sunday will be sent at 08:00 on Monday.

    • When the statistical cycle is set to By Week, you should set the time and a day of the week to determine the period during which analysis results will be contained in the report and at/on which the report will be sent.

      For example, if you select Recent 7 Days in the Report Time field and set the Send At field to Sunday and 12:00, a report containing analysis results between the last Sunday and the current Saturday (total 7 days) will be sent at 12:00 on the current Sunday.

    Effective Period (Optional)

    Set a period in which the above time settings will take effect. Outside the effective period, the report will not be sent according to the configured sending time.

  6. Optional: Set advanced parameters.
    Send Report via Email

    Select an email template from the drop-down list to define the recipient information and email format, so that the report can be regularly sent to the recipient via email.

    Note:

    You can click Add to add a new email template. For setting an email template, refer to Add Email Template for Sending Report Regularly.

    Upload to SFTP

    Configure SFTP settings including address, port No., user name, password, and saving path for the report to be uploaded to the SFTP regularly.

    Note:

    You can also click > SFTP Settings at the top of the left pane to open the SFTP Settings pane to configure the corresponding parameters.

    Save to Local Storage

    Configure a saving path for the report to be saved to the local storage regularly.

    Note:

    You can also click > Configure Local Storage at the top of the left pane to open the Configure Local Storage pane to configure the corresponding parameter.

  7. Click Add to finish setting the scheduled report rule.