Add Normal Event and Alarm
The platform has provided multiple triggering event types for you to configure rules for detection or triggering alarms.
In the top left corner
of the Home page, select  > Security Monitoring > Event and Alarm.
Select on the left.
Click Add to enter the Add Event and Alarm page
Basic Information
- Triggering Event
-
The specific event type detected on the event source will trigger an event or alarm.
Note:If you select Intrusion (VCA Event) as the triggering event, you can select specific regions under a source.
- Source
-
This field refers to the specific entity (such as cameras, devices, servers, etc.) which can trigger this event and alarm.
Note:-
When setting a thermal-related event and alarm for thermal cameras, you can select areas, points, or lines as event and alarm sources.
-
Triggering event types including Camera, Alarm Input, and Face in Video and Camera, Encoding Device, Decoding Device, Recording Server, and Streaming Server in Maintenance support selecting sources in remote sites. For different device types, the labels vary.
-
The Triggering Event and Source fields support fuzzy search.
-
- Name
-
After selecting the source(s), you need to name the event or alarm. You can customize a name, or click the labels below to name the event or alarm by the selected label(s). If you name the event or alarm by the selected labels, the platform will display the event/alarm name by the combination of source name, area name, triggering event name, or site name, so that you can quickly know the location where the event/alarm occurs.
- Face Comparison Group
-
If the triggering event you select is Face, you need to select the face comparison group so that the platform can compare the detected face pictures with face pictures in the group.
- Threshold
-
If the triggering event you select is Regional People Counting, you need to set extra conditions to define the triggering event.
Currently, you can set People Counting Above/Below Threshold and People Counting Above/Below Threshold (Pre-Alarm) for the people counting group. For these two alarms, you need to set the threshold which determines whether the selected people counting groups will trigger an alarm when the detected number of people stayed less than or more than the threshold.
For example, if you set the threshold as "≥ 100 or ≤ 10", when the number of people detected in the selected people counting group is more than 100 or less than 10, an alarm will be triggered to notify the security personnel.
- Frequency
-
If the source type you selected is Parking Lot and the triggering event is Frequently Appeared Vehicle, you can predefine the frequency.
For example, if you set the frequency to daily 3 times, when the devices in the source parking lot detect the license plate numbers of the vehicles in the selected vehicle list more than 3 times in one day, an alarm will be triggered.
- Vehicle List
-
If you select triggering events related to vehicle recognition, you need to select vehicle lists, so that the platform will compare detected vehicles with vehicles in the selected list.
- Vehicle Type
-
If the source type you selected is Vehicle Features and the triggering event is Vehicle Type Matched Event, you need to specify the vehicle type(s). When the source camera detects a vehicle the type of which matches the one(s) you selected here, a vehicle type matched alarm will be triggered.
For example, if the oil tank truck is not allowed on one road, you can set a vehicle type matched alarm for the camera mounted on this road and set the vehicle type as Oil Tank Truck. When the camera detects an oil tank truck, an alarm will be triggered.
- Color
-
Select the color to indicate this event or alarm. You can set the color according to the emergency of this event or alarm. For example, you can set red color for the urgent alarm and set green color for the prompt event.
- Ignore Repetitive Events/Alarms
-
This function is used to avoid the same event or alarm occurring frequently in a short time. You need to set the Ignore For (Second) which is the threshold of the recurring events or alarms.
For example, if you set Ignore For (Second) to 30 seconds, the events or alarms of the same type that occurred on the same camera within 30 seconds will be regarded as one event or alarm.
- Delay Alarm
-
If the source type you selected is Camera of Maintenance and the triggering event is Camera Offline, you can enable this function and set a delay duration. During the delay duration, when the source detects the triggering event, the triggering event will not be uploaded to the platform. After this duration, if the source still detects this triggering event, the triggering event will be uploaded to the platform and trigger an alarm.
With this function, when the platform detects that the camera is offline, if the camera gets online again within the delay duration, it will not trigger a camera offline alarm. Thus the maintainers can focus on the cameras which are truly disconnected.
Actions
The field links actions for the alarms, you can click Add Linkage Action to select actions.
- Trigger Recording
-
Select the related camera to record the alarm video (make sure the related camera(s) have been configured with the recording schedule) when the alarm is triggered.
-
To relate the source camera itself for recording, select Source Camera and select the storage location (i.e., Store in Main Storage, Store in Auxiliary Storage, and Not Store) for storing the video files.
Note:If the camera is not configured with the main storage, you can still select the storage location as Store in Main Storage, but the rule exception will be prompted.
-
To relate other cameras, select Specified Camera and click Add to add other cameras as related cameras. Select the storage location for storing the video files.
-
View Pre-Event Video: You can view the video recorded from periods preceding the alarm. Specify the number of seconds which you want to view the recorded video for before the alarm starts. For example, when someone opens a door, you can view the recorded video to see what happens right before the door opened.
-
Post-record: Record video from periods following detected alarms. Specify the number of seconds which you want to record the video for after the alarm stops. You can also click Custom to custom the time period.
-
Lock Video Files For: Set the days for protecting the video file from being overwritten.
-
Display Video by Default: Set the video to be displayed by default on the Control Client when receiving the triggered alarm information. You can select the recorded video or the live video to be displayed.
-
- Capture Picture
-
Select cameras to capture pictures during the alarm, and you can view the captured pictures when checking the alarm.
-
If the alarm source is a camera, you can set it to trigger the source camera itself for capturing pictures by selecting Source Camera.
-
To trigger other cameras for capturing pictures, select Specified Camera and select cameras for capturing pictures.
-
-
Capture Picture: Specify the number of seconds to define when the camera will capture pictures for the alarm. After you set the number of seconds for pre/post-event (here the event refers to the triggering event), the camera will capture one picture at 3 time points respectively: at the configured seconds before the alarm starts, at the configured seconds after the alarm ends, and when the event is happening (as shown in the picture below).
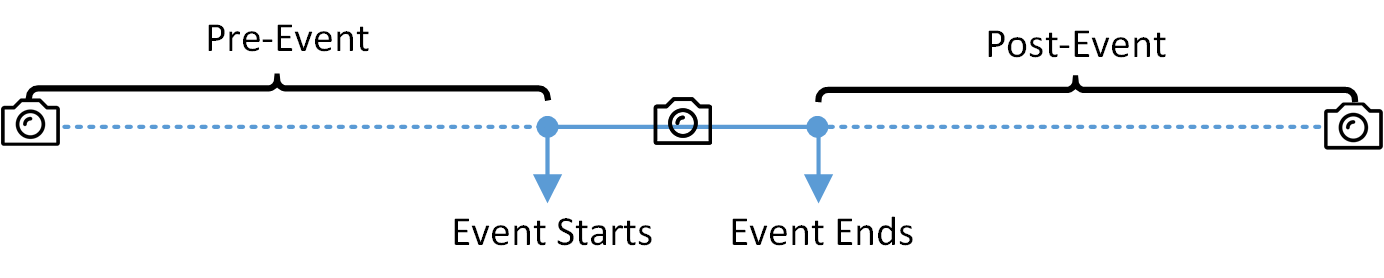 Figure 1 Capture
PicturesNote:
Figure 1 Capture
PicturesNote:The pre-event picture is captured from the camera's recorded video footage. This pre-event capture function is only supported by the camera which is set to store the video in the recording server.
- Create Tag
-
Select the camera(s) to record video when the event occurs and set the storage location for storing video files. The platform will add a tag to the event-triggered video footage for convenient search.
-
If the event source is a camera, to relate the source camera itself for tagged recording, select Source Camera and select the storage location (i.e., Store in Main Storage, Store in Auxiliary Storage, and Not Store) for storing the video files.
Note:If the camera is not configured with the main storage, you can still select the storage location as Store in Main Storage, but the rule exception will be prompted.
-
To trigger other cameras for tagged recording, select Specified Camera and click Add to add other cameras.
You can enter the tag name as desired. You can also click the button below to add the related information to the name.
Set the time range to define the tagged length of the video footage. For example, you can set it to record the tagged video starting from 5 seconds before the event and lasting until 10 seconds after the event. The tagged video can be searched and checked via the Control Client.
-
-
Add the description to the tagged video as needed.
- Link Access Point
-
You can enable this function to trigger the access points to take certain actions.
For doors, the doors can be locked, unlocked, remained locked, or remained unlocked when the event occurs.
For floors, the elevators can access the floors freely, with credentials, temporarily, or the access is forbidden.
For example, you can set it to trigger all the doors remaining locked and all the floors access forbidden when the intrusion of a suspicious person is detected.
-
All Access Points: When the alarm is triggered, the platform will trigger all the doors and floors to take certain actions.
-
Specified Access Point: Click Add to select specified access points or emergency operation groups as the linkage targets. When the event occurs, the platform will trigger these doors, floors, or doors/floors in the emergency operation groups to take certain actions.
-
- Link Alarm Input
-
Select alarm inputs and these alarm inputs will be armed or disarmed when the event occurs.
For example, when adding an intrusion alarm of camera A, which is mounted at the entrance of the building, you can link to arm the alarm input B, C, and D, which are PIR detectors mounted in different rooms in the building and are disarmed usually. When camera A detects the intrusion alarm, these PIR detectors will be armed and trigger other events or alarms (if rules are configured), so that the security personnel will get to know where the suspect goes.
- Link Alarm Output
-
Select alarm output (if available) and the external device connected can be activated when the event occurs.
Note:Up to 64 alarm outputs can be selected as event linkage.
-
Close Alarm Output: The added alarm output(s) can be closed manually, or you can set the time period (unit: s) after which the alarm output(s) will be closed automatically.
- Trigger PTZ
-
Call the preset, patrol, or pattern of the selected cameras when the event occurs.
Note:Up to 64 PTZ linkages can be selected as event linkage.
- Link Third-Party Integrated Resource
-
Click Add to select the resources integrated from a third-party platform and set the control about detailed operations that will happen when the event occurs.
- Send Email
-
Select an email template to send the event information according to the defined email settings. If you have purchased the License for emergency mustering, you can select an emergency counting group in the drop-down list of Send Data of Emergency Counting Groups. When the event occurs, the platform will send the data of the selected emergency counting group to the email in a PDF file.
Note:For details about setting the email template, refer to Set Email Template.
- Attach with Entry & Exit Counting
-
If the source type you selected is Alarm Input, you can select an entry & exit counting group from the drop-down list to attach a report of entry & exit counting in the sent email.
For example, if the fire alarm input detects fire in the building, the security personnel will receive a file, which contains information such as the number of people still in the building, their names and profile photos, phone numbers, and locations of last access.
- Trigger User-Defined Event
-
Select the user-defined event(s) in the event list as the linkage action when the event occurs.
Note:-
Up to 16 user-defined events can be selected as linkage actions.
-
For setting the user-defined event, refer to Add User-Defined Event.
-
- Link Printer
-
If the source type you selected is Alarm Input, you can link to print the entry & exit counting report of a certain entry & exit counting group.
For example, if the fire alarm input detects fire in the building, the platform will automatically send the entry & exit counting report to all the printers configured on the platform so that they can get the information such as how many people are still in the building, their names and profile photos, phone numbers, and locations of last access.
For details about printer settings, refer to Set Printer.
- Apply Notice to Indoor Station
-
If the source type you selected is Alarm Input, you can apply notice to specific indoor stations.
- Link Speaker Unit
-
You can link the speaker unit to an event and set the broadcast content (audio file, custom broadcast content, or none). The linked speaker unit will play the set content when the event occurs. When you select None for the broadcast content, you can perform remote speaking via the Control Client.
- Trigger Remaining Open for Entrance and Exit
-
When the event occurs, the selected entrance(s) and exit(s) will turn to the status of remaining open so that the vehicles can enter or exit the parking lot without authentication or the allowance of guards.
Event Receiving Schedule
The field defines a time period when the event or alarm can be triggered.
- Receiving Schedule
-
The source is armed for detecting or triggering events or alarms during the receiving schedule. The platform provides two types of receiving schedules:
-
Schedule Template: Select a receiving schedule template for the event or alarm to define when the event or alarm can be detected or triggered. For customizing a template, refer to Configure Receiving Schedule Template.
-
Event Based: Specify a user-defined event or an alarm input as the start or end of the receiving schedule. You can set the Stop Receiving switch to on and set the specified time to automatically stop receiving this event or alarm even if the schedule does not end.
Note:For example, assume that you have set event A as the start event, event B as the end event, and set the value of Automatically Stop Receiving After to 60 s. Under these conditions, when event A occurs at T1, if event B occurs within 60 s, the receiving schedule ends at the occurrence of event B (see the following figure Receiving Schedule 1); if not, ends at 60 s after the occurrence of event A (see the following figure Receiving Schedule 2).
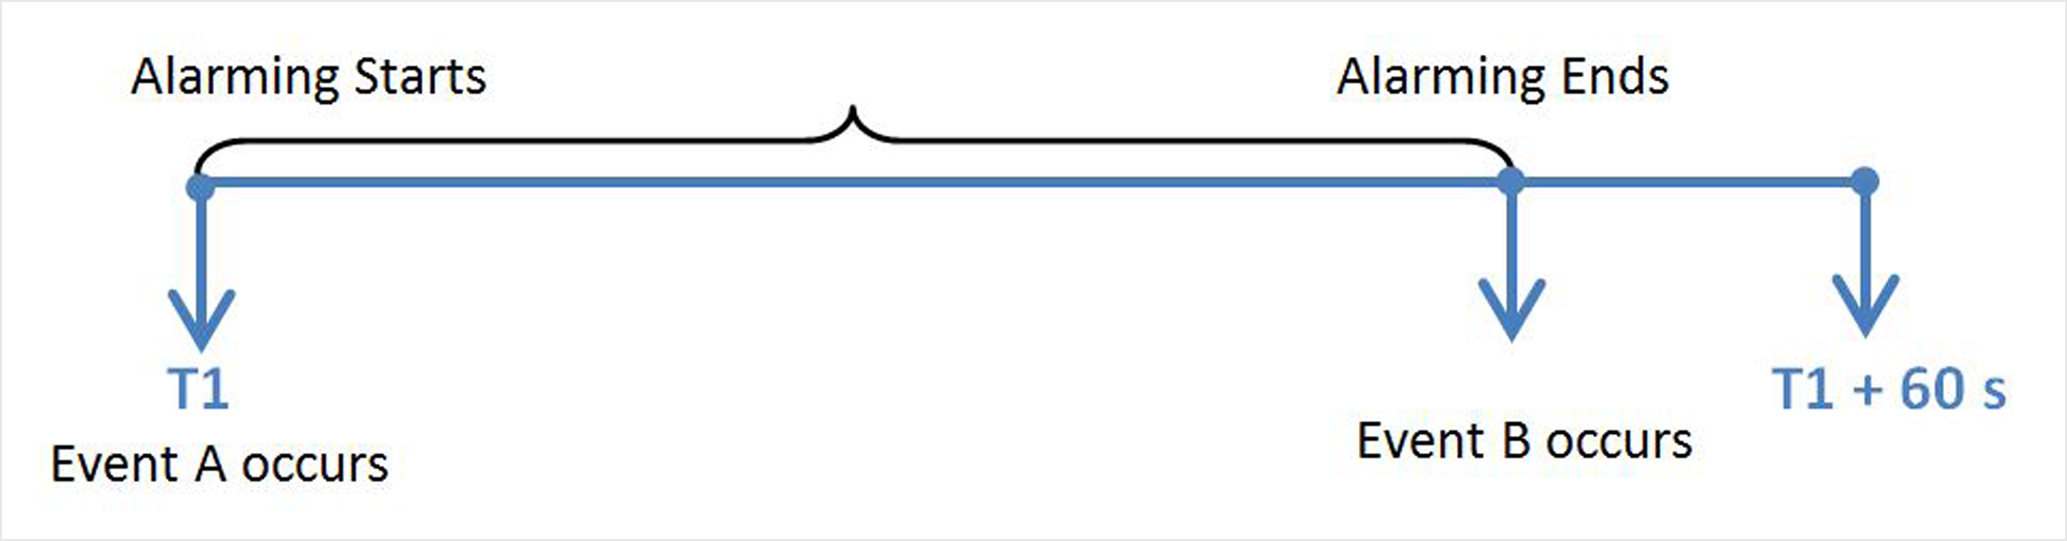 Figure 2 Event
Receiving
Schedule 1
Figure 2 Event
Receiving
Schedule 1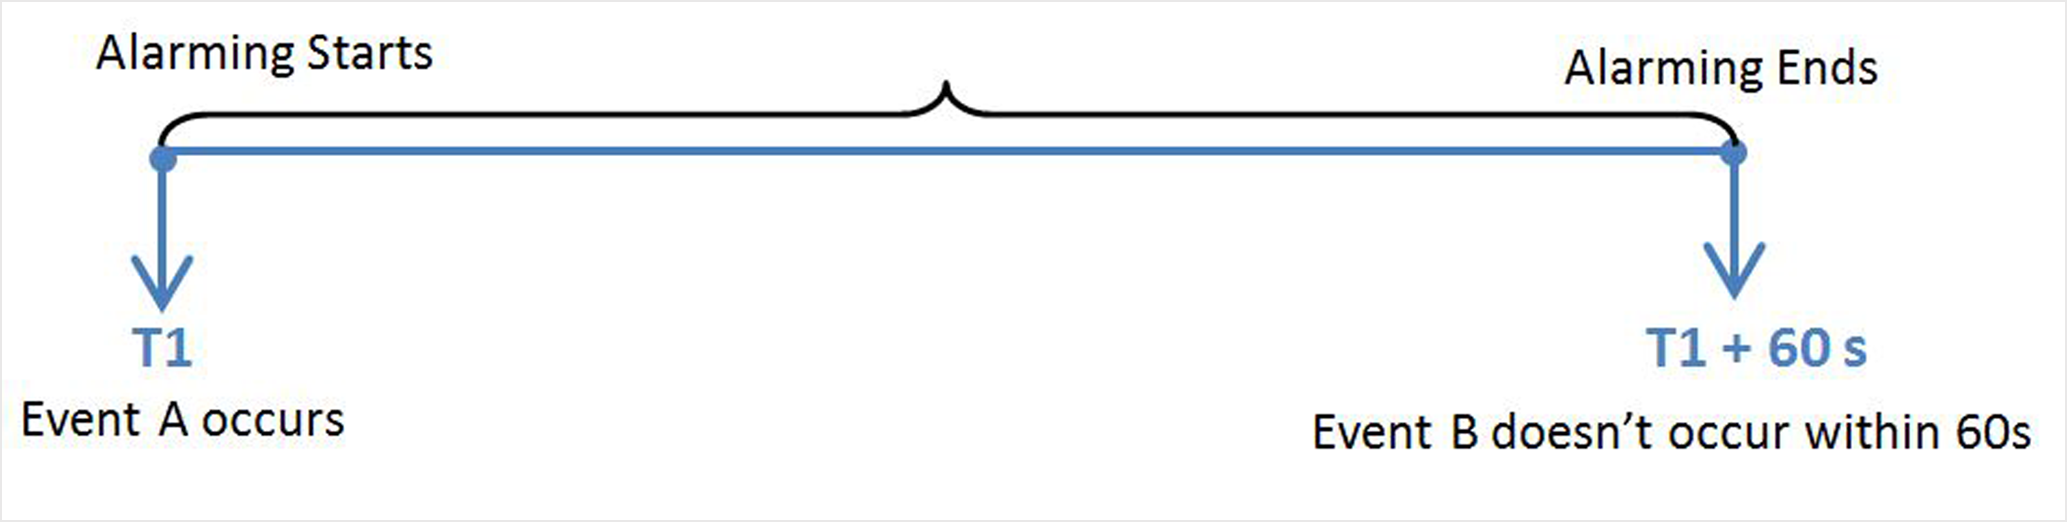 Figure 3 Event
Receiving
Schedule 2
Figure 3 Event
Receiving
Schedule 2When A occurs at time T1, the event or alarm will be armed from T1, if A occurs again at time T2 but B doesn't occur, the event or alarm will be armed from T2 again.
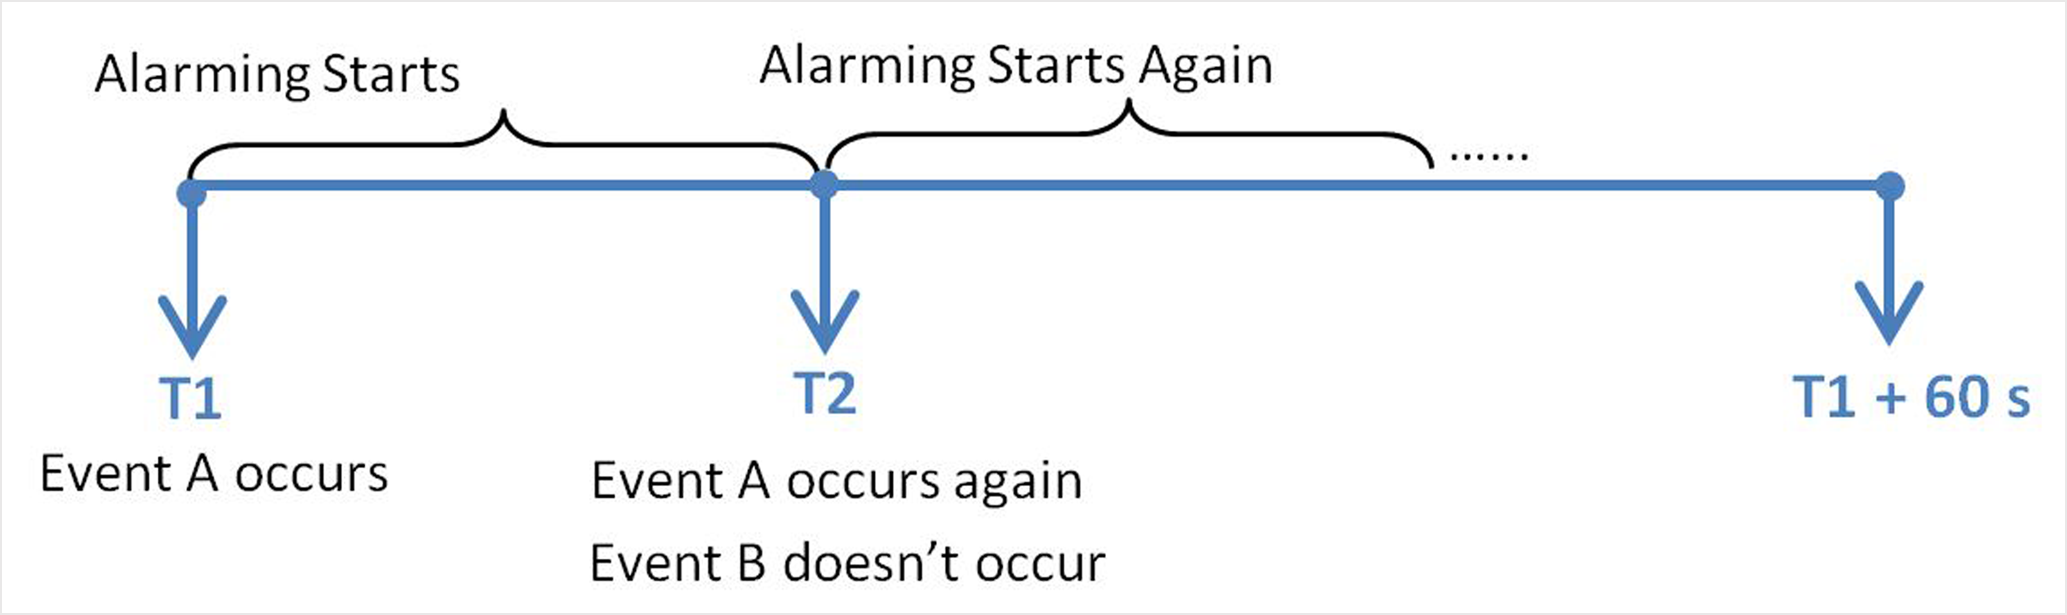 Figure 4 Event
Receiving
Schedule 3
Figure 4 Event
Receiving
Schedule 3
-
Alarm Settings
Switch on Trigger Alarm to trigger the configured event as an alarm.
- Alarm Priority
-
The field defines the importance or urgency of this alarm. Priority can be used for filtering alarms.
- Recipients
-
The field defines users who can receive the alarm notification and check the alarm details when the alarm is triggered.
Select the recipient group(s) or user(s) to send the alarm information to and the recipient(s) can receive the alarm information when he/she logs in to HikCentral Professional via the Mobile Client.
Note:By default, users configured as the default recipients on the Alarm Receiving Configuration page will be automatically selected and cannot be deselected. For how to configure default recipients and recipient groups, refer to Add Call Recipients.
- Trigger Pop-up Window
-
Display the alarm window on the Control Client to show the alarm details and all the alarm-related cameras' live videos and playback when the alarm occurs.
- Trigger Emergency
-
When the alarm is triggered by an emergency (such as a fire), the platform automatically switches to the Trigger Emergency mode or Turn Off Emergency mode.
- Link Map
-
Select a map to show the alarm information and you should add the camera to the map as a hot spot (refer to Add Hot Spot).
- Display on Smart Wall
-
Display the alarm video or the specified public view on the smart wall. You can select the added smart wall and select which window to display the alarm.
-
Wall Related to Graphic Card: Display the alarm video on the wall which adopts the graphic card of the PC that runs the Control Client to decode the video.
-
Wall Related to Decoding Device: Display the alarm video on the wall which adopts the decoding device (namely the wall that is linked to the decoding device) to decode the video.
-
Alarm's Related Cameras: Display the video of the alarm-related cameras on the smart wall. You can select to display the video on which smart wall and which window and set the video's stream type.
-
Public View: A view enables you to save the window division and the correspondence between cameras and windows as the Favorites to quickly access the related cameras later. If you select Public View, when the alarm is triggered, the platform will display the selected public view on the specified smart wall and users can view the video of the cameras predefined in the view.
-
Smart Wall No.: Select the No. of the smart wall window to display the alarm video.
-
Stop Displaying Alarm: Define when the platform will stop displaying the alarm on the smart wall. The platform can stop displaying the alarm within specified seconds, or replace the original alarm when another alarm with higher alarm priority is triggered.
-
- Trigger Audible Alarm
-
Set the voice text for playing on the PC when the alarm is triggered.
Note:You should set the voice engine as the alarm sound on the System Settings page of the Control Client.
- Restrict Alarm Handling Time
-
Enable this function to trigger the user-defined event(s) / alarm output(s) or automatically acknowledge the alarm if the alarm is not handled within the configured alarm handling time.
Note:Up to 16 user-defined events and alarm outputs can be triggered when handling alarm timed out.
- Custom Alarm Receiving
-
Enable this function to set and view the customized alarm receiving schedule.
Other Operations
Click Add to add the event to the platform, or click Add and Continue to save the current settings and add another one. The added event will be listed on the Normal Event and Alarm page, and then you can perform the following operations if needed.
|
Operation |
Description |
|---|---|
|
Edit Event |
Click the event name to enter the details page and edit the settings. |
|
Copy to Other Events |
|
|
Delete Events |
Select events and click Delete to delete the selected ones. |
|
Delete All Invalid Events |
Click Delete All Invalid Items to batch delete all the invalid events. |
|
Enable Events |
Select an event and click to enable the selected event, or click to enable all the added events. |
|
Disable Events |
|
|
Test Events |
Select the event(s) and click Test to manually trigger the event(s) for testing if the linkage actions work properly. |