Add or Configure a Receiving Schedule Template
Receiving schedule template defines when the user can receive calls. For example, if a resident is absent from home during workdays and is at home during weekends and holidays, the resident can customize a schedule template to receive calls from device during weekends and holidays.
-
On the top navigation bar, select
 > Passing Management > Video Intercom > Basic Configuration > Receiving Schedule Template.
-
Click
 to add a schedule
template.
to add a schedule
template.
The default templates, namely All-Day Receiving Schedule Template, cannot be edited or deleted.
-
Draw the receiving time. Click a grid or drag the cursor on the time line to
draw a time period during which the user can receive calls.
Note:
-
Move the cursor to a drawn period, and then adjust the period in the pop-up dialog shown as
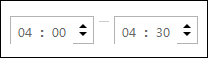 .
. -
Click Erase, and then click a grid or drag the cursor on the time line to erase the drawn time period.
-
- Optional:
Select a template from the template list, and then click
 to delete it.
Note:
to delete it.
Note:Schedule templates that has been linked cannot be deleted.