Add Security Control Partitions (Areas) from Device
After adding security control devices to the platform, you need to import the partitions (areas) configured on the devices and the alarm inputs in the partitions (areas) to areas on the platform for further operations, including configuring arming schedules for the partitions (areas), arming/disarming partitions (areas), bypassing zones, clearing alarms, etc.
Make sure you have added security control devices. See details in Manage Security Control Device.
-
On the top navigation bar, go to
 > Security Monitoring > Alarm Detection > Partition (Area).
-
Click
 Add to
show the Add Security Control Partition (Area) pane.
Add to
show the Add Security Control Partition (Area) pane.
In the Partition (Area) list, all the security control devices with partitions (areas) which are not added to the platform will be displayed.
-
Click Save.
The partitions (areas) will be displayed in the partition (area) list.
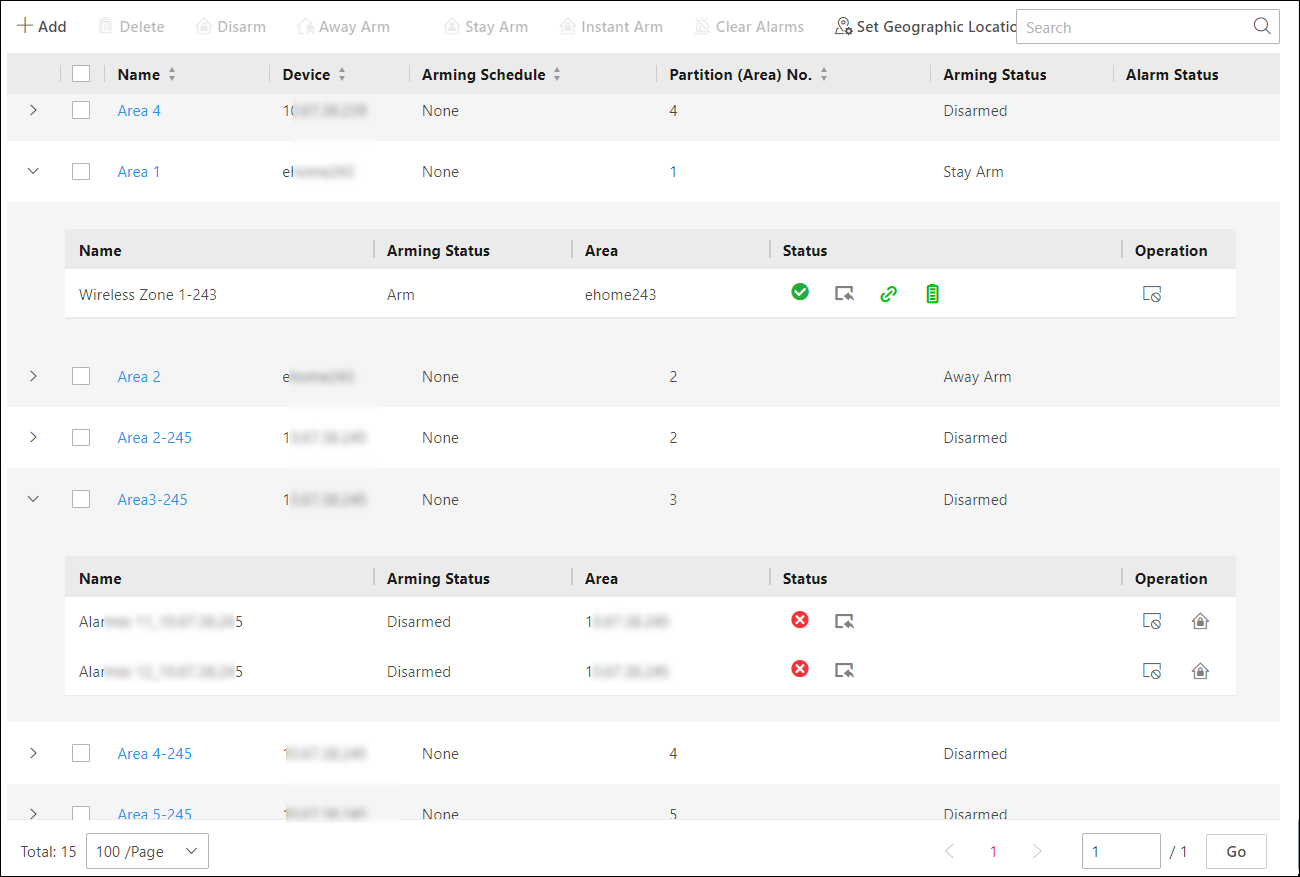 Figure 1 Partition (Area) List
 - Optional:
Perform further operations.
Option Description Edit Security Control Partition (Area)
Click the name of a partition (area) to display the partition (area) details and then edit its name or set the arming schedule for it (see details in Configure Arming Schedule Template).
Note:For the partition (area) of AX security control panel, you cannot edit the arming schedule via the platform. Only editing on the device is supported.
Delete Security Control Partition (Area)
Select one or multiple partitions (areas) and click Delete.
Arm/Disarm Security Control Partition (Area)
After arming the partitions (areas), the platform can receive the triggered alarms in the partitions (areas).
There are three arming modes available.
Note:The supported arming modes are displayed according to the device's capability.
-
Away Arm: If all people in the detection area are going to leave, turn on this mode to arm the zones in the area after the defined dwell time.
-
Stay Arm: It is used when people stay inside the detection area. Turn on the Stay mode to turn on all the perimeter burglary detectors (such as perimeter detectors, magnetic contacts, curtain detectors in the balcony). Meanwhile, the detectors inside the detection area are bypassed (such as PIR detectors). People can move inside the area and alarms will not be triggered.
-
Instant Arm: When people leave the detection area, the zones will be armed immediately without delay.
In the partition (area) list, select one or multiple partitions (areas) and click these buttons above to arm the partitions (areas), or click Disarm to disarm them.
Arm/Disarm Zone
Note:For partitions (areas) that are disarmed, you can arm only a part of their zones.
Click
 to expand the
partition (area) details and click
to expand the
partition (area) details and click  /
/ in the Operation
column to arm/disarm the zone of the alarm input.
in the Operation
column to arm/disarm the zone of the alarm input.Bypass/Restore Zone
Note:When some exception occurs in one zone, and other zones can work normally, you need to bypass the abnormal zone to turn off the protection of it. Otherwise, you cannot arm the security control partition (area) which the zone belongs to.
Click
to expand the
partition (area) details and click  /
/ in the Operation
column to bypass/restore the zone of the alarm input.
in the Operation
column to bypass/restore the zone of the alarm input.Clear Alarm
Select one or multiple partitions (areas) and click Clear Alarms to clear the generated alarms.
Add Partition (Area) on Map
Select one or multiple partitions (areas) and click Set Geographic Location to add them on the map. See details in Add Hot Spot on Map.
-