Cloud Storage Service: Secure & Expand Your Customers' Storage
Customers' Pain Points and What They Want
|
Pain Points of Customers (End Users) |
What They Want |
|---|---|
|
|
What You Can Sell & Offer to Your Customers
-
Scalability and flexibility: Cloud storage solutions can easily scale to accommodate large volumes of data, providing flexibility as data storage needs fluctuate.
-
Cost savings: Cloud storage eliminates the need for expensive on-premises hardware and reduces maintenance costs.
-
Lower risk of data loss: Recordings are synchronously stored on the cloud.
-
Certified security with data protection: Only users can access their own cloud stored videos.
-
Improved usability and accessibility: Easy downloading and retrieval of videos anytime and anywhere.
Device Compatibility for Cloud Storage Service
Check Device Compatibility for Cloud Storage Service Using the Portal
-
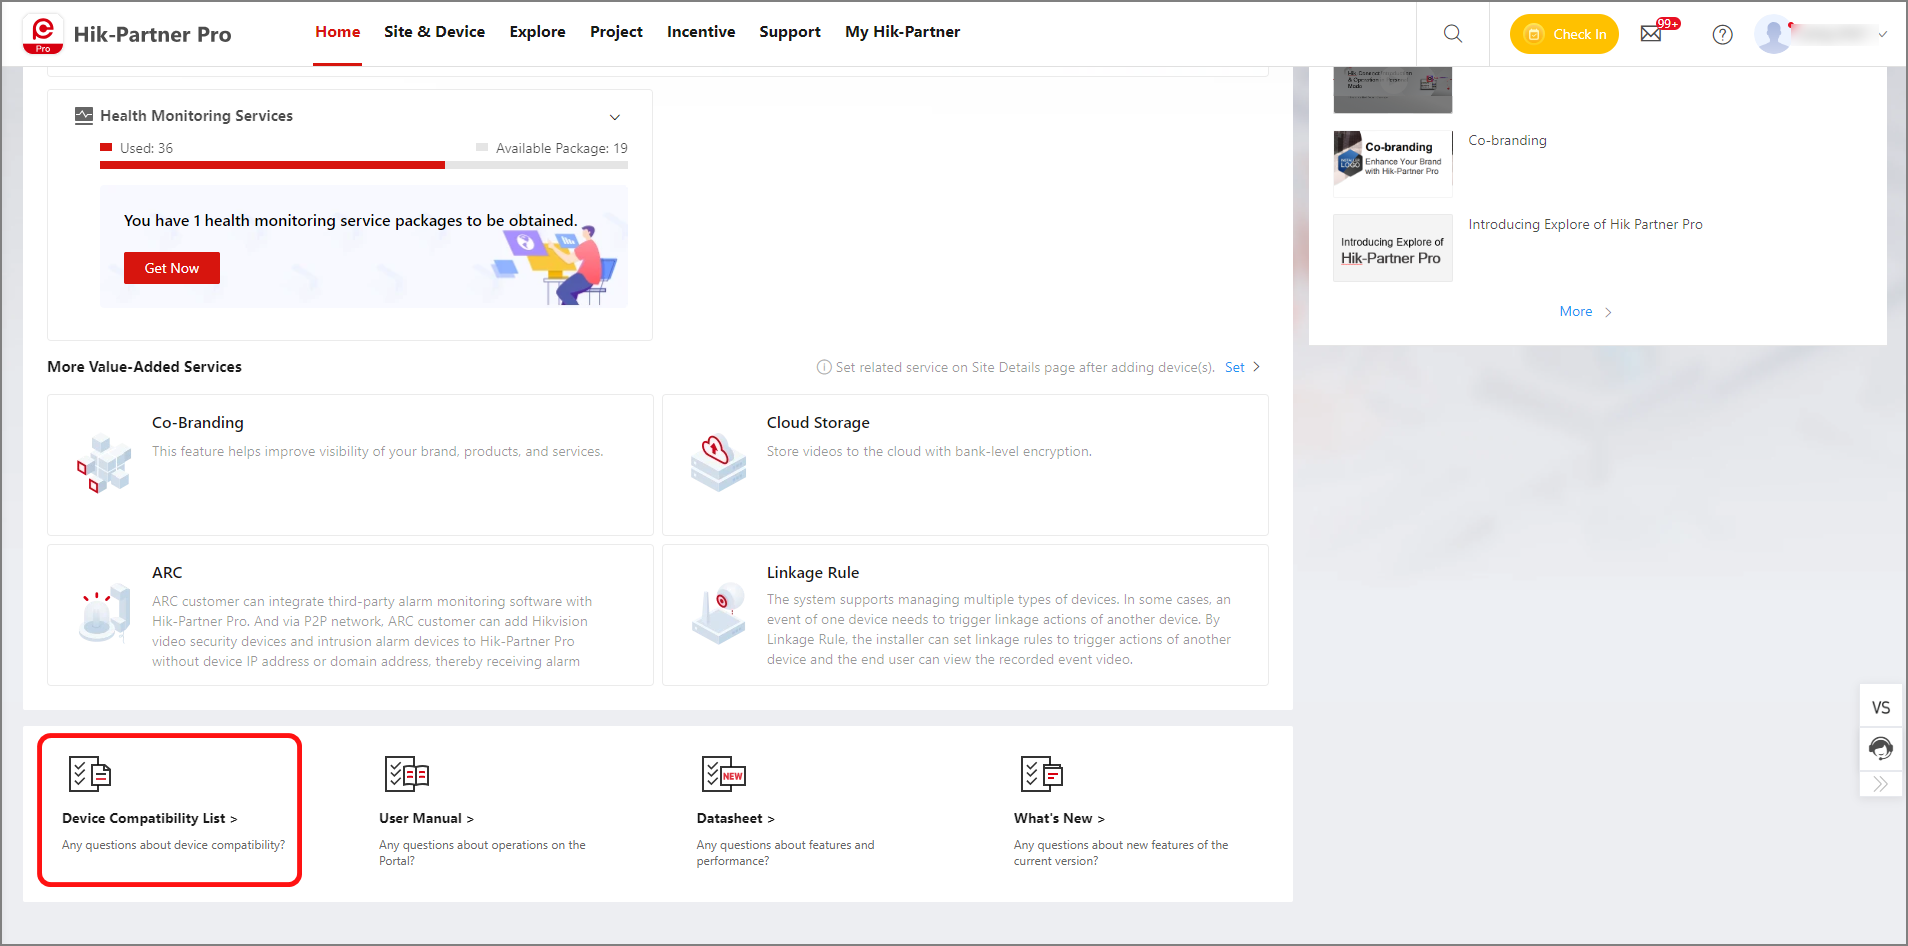
Visit the Portal and scroll down to the bottom of the Portal. Click Device Compatibility List.
Figure 1 Device Compatibility List -
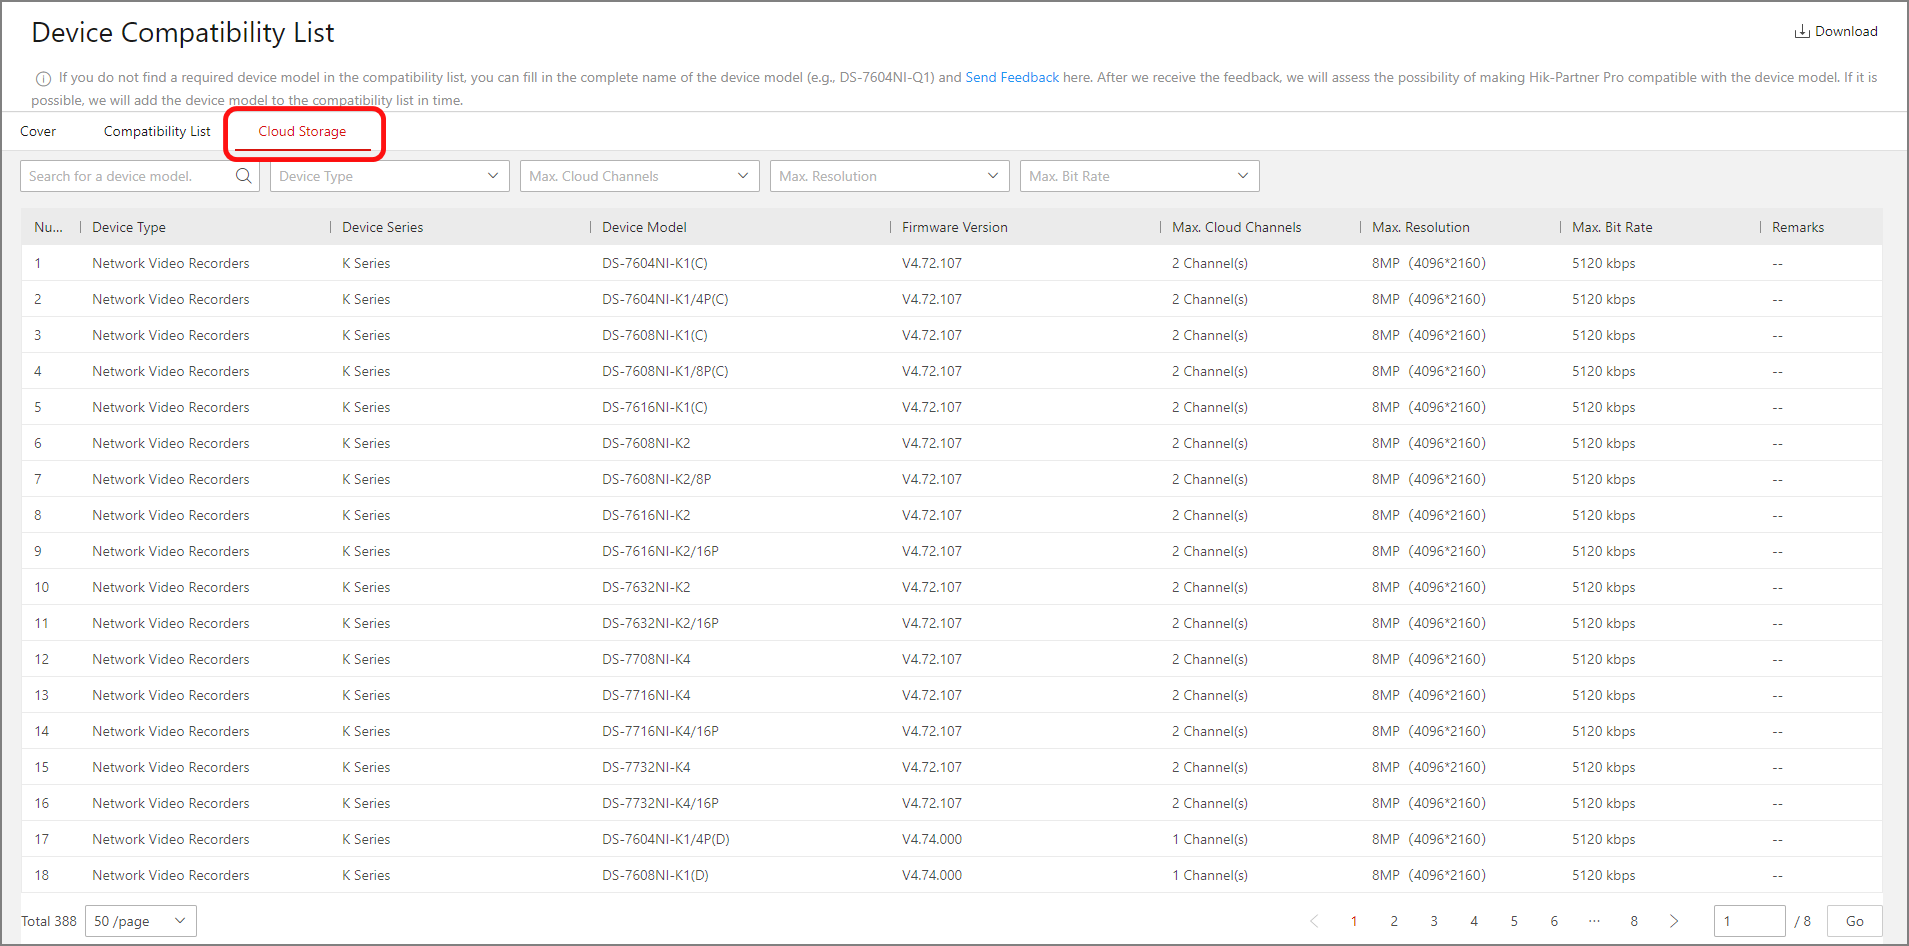
Click Cloud Storage, and search for a NVR / DVR / network camera model to check whether it supports the cloud storage service.
Figure 2 Compatibility List
Check Device Compatibility for Cloud Storage Service Using the Mobile Client
-
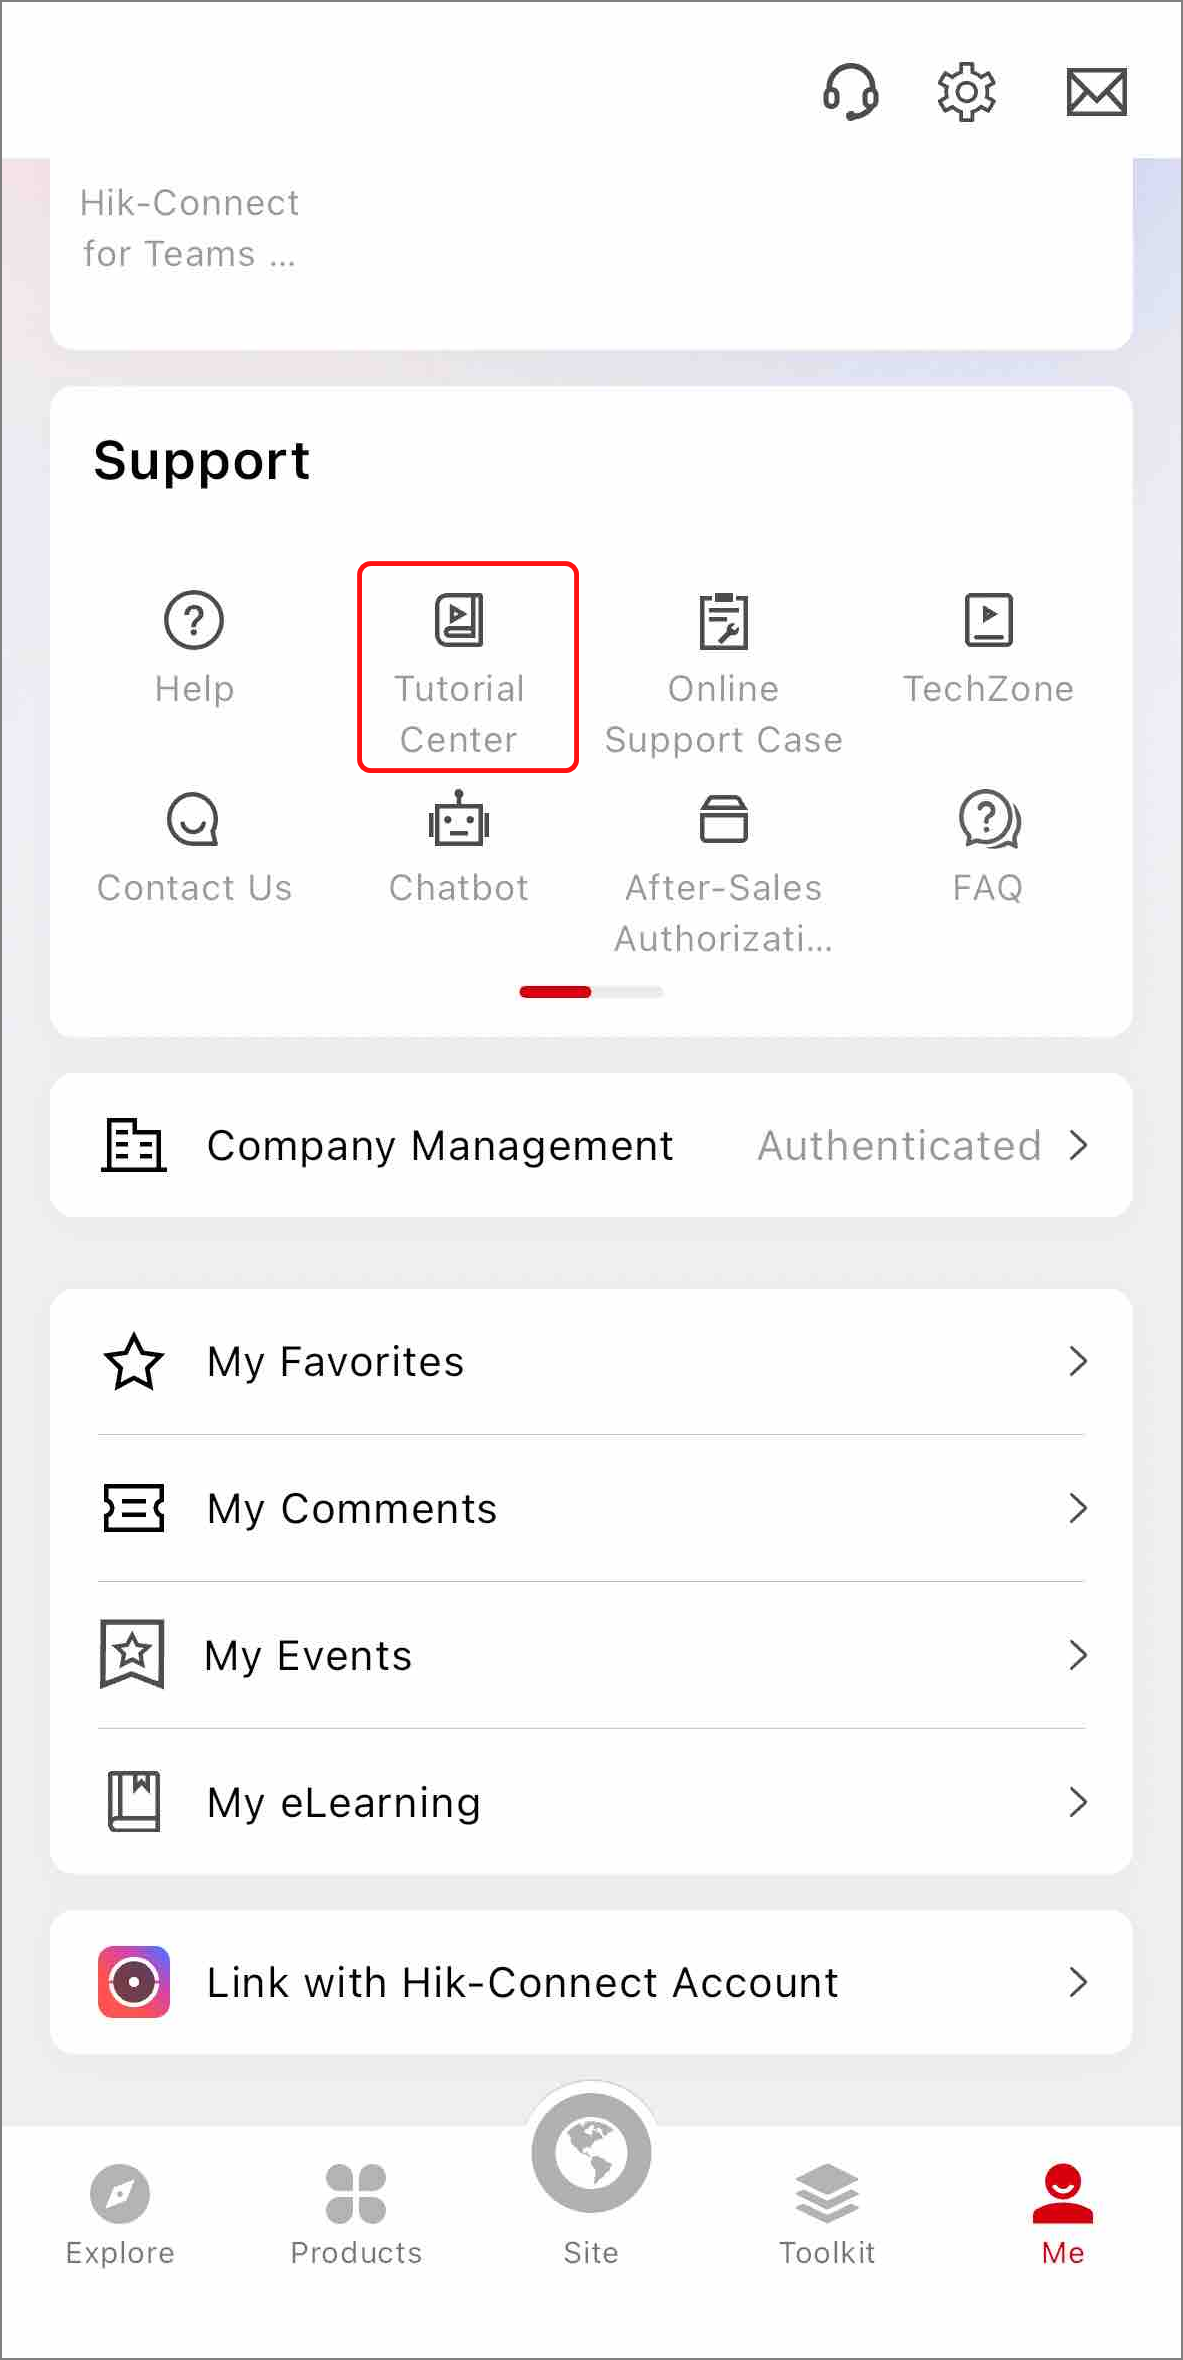
Log in to the Mobile Client, tap .
Figure 3 Tutorial Center -
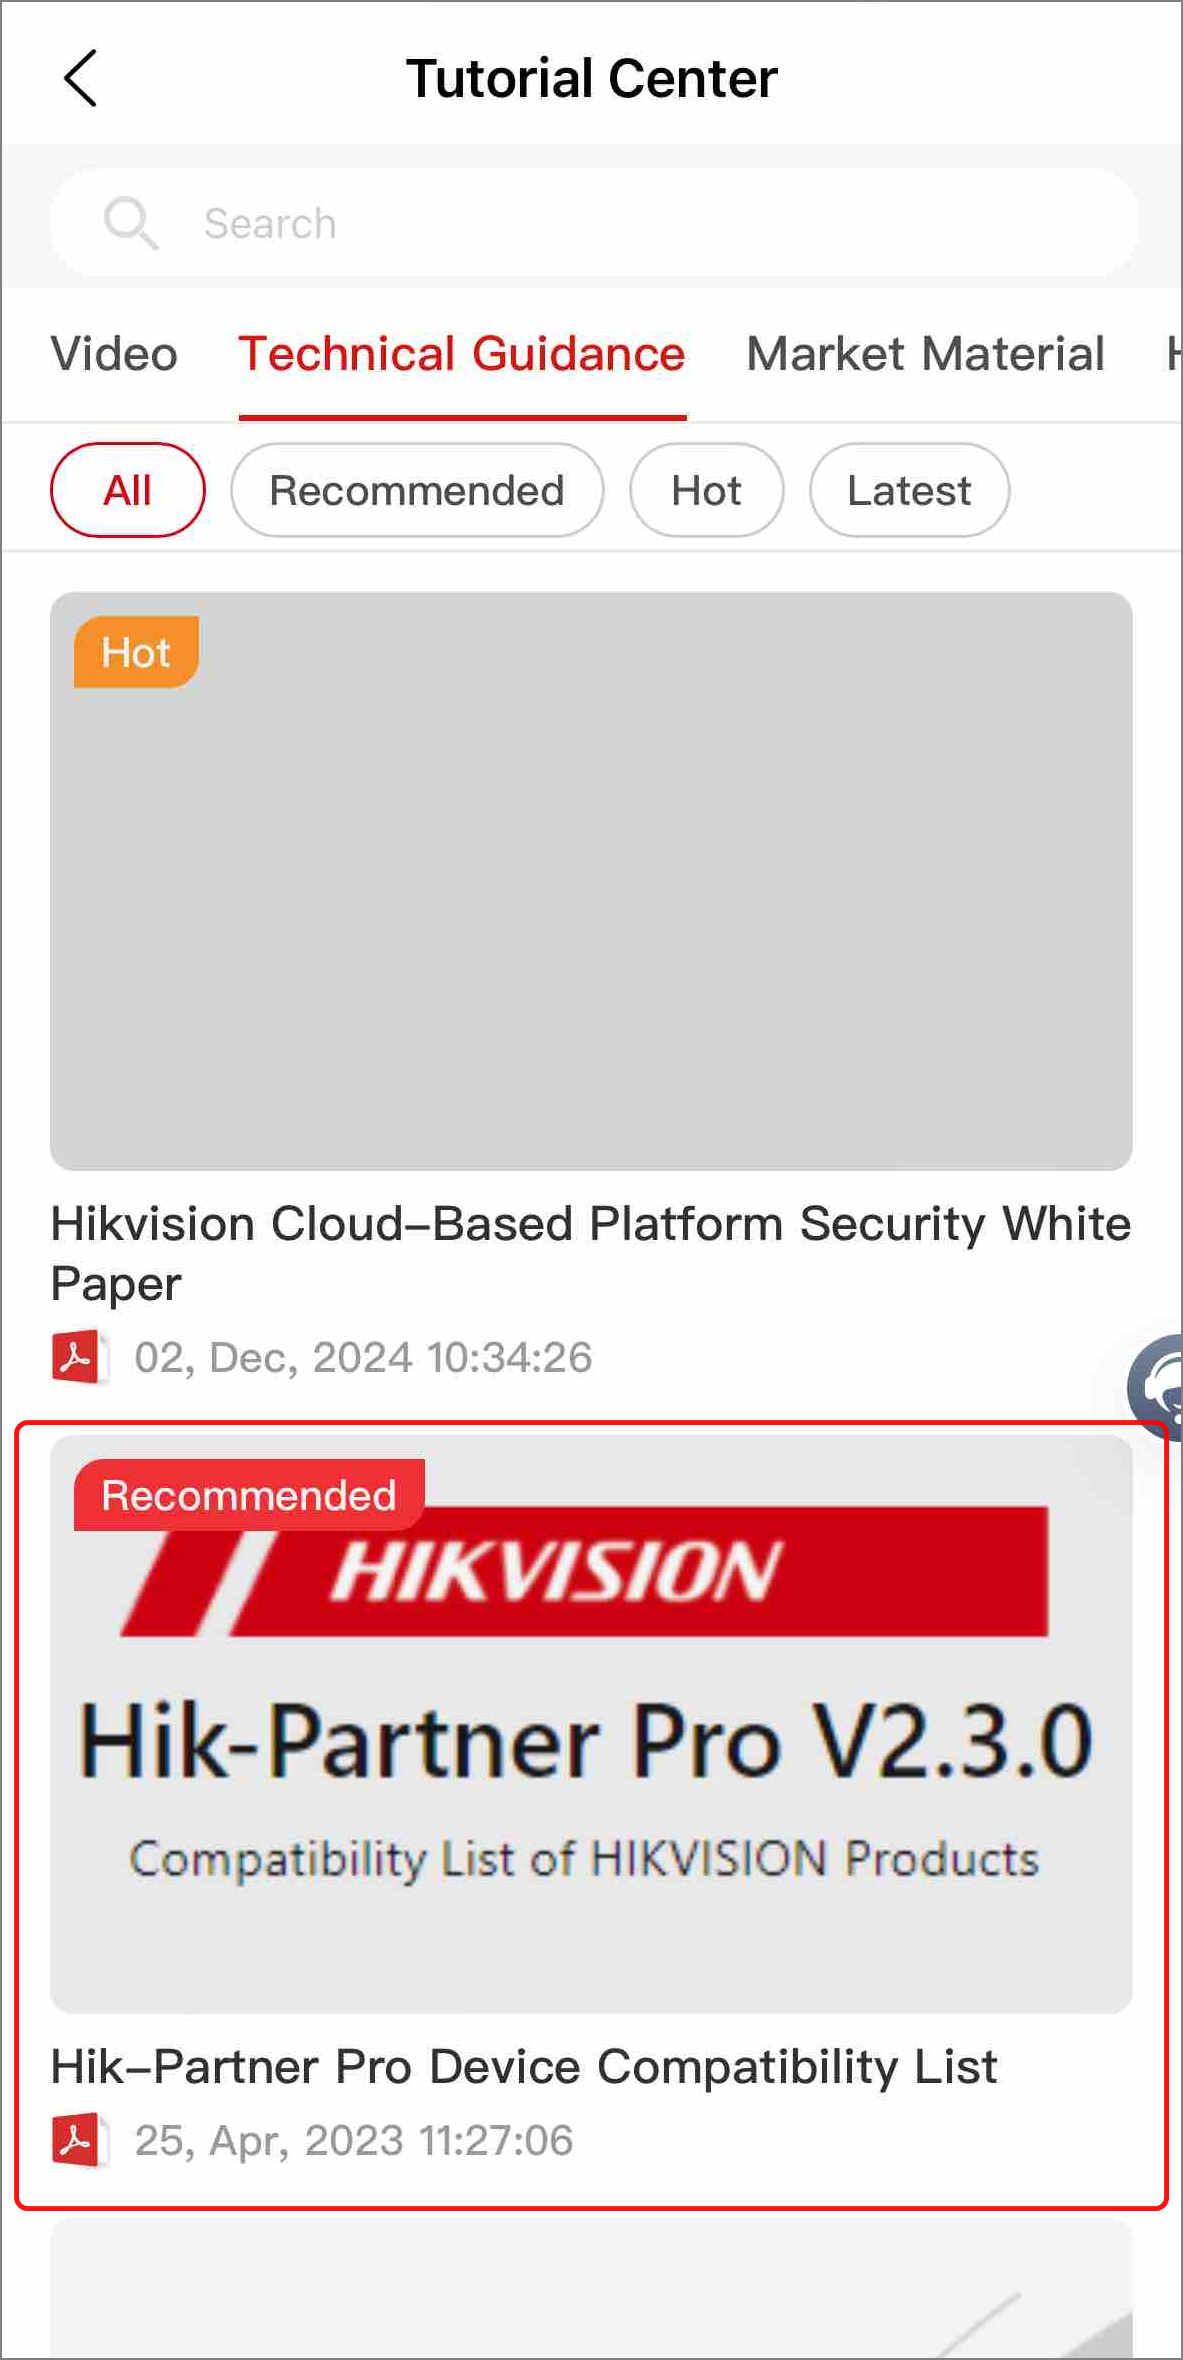
Tap .
Figure 4 Compatibility List -
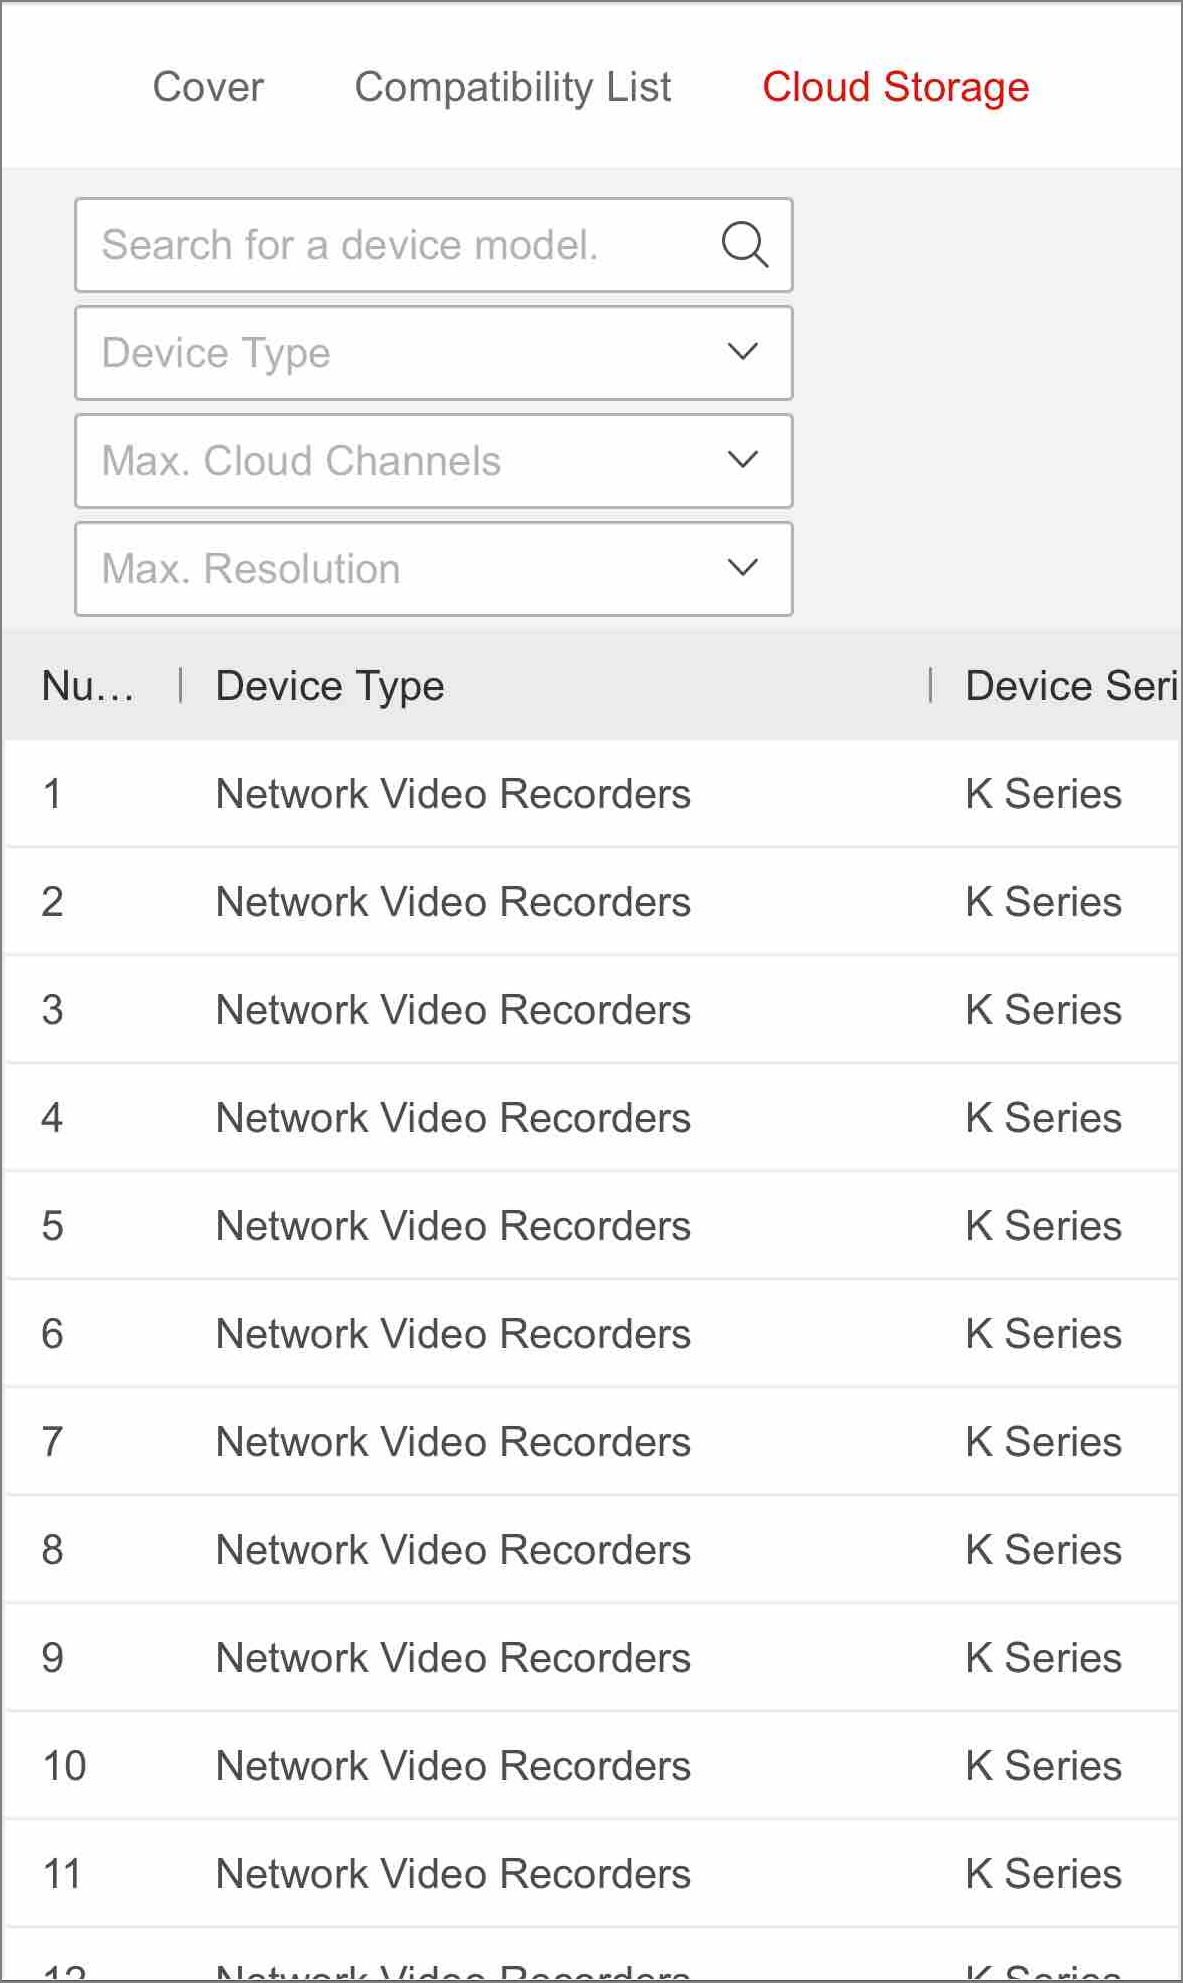
Tap Cloud Storage, and search for a NVR / DVR / network camera model to check whether it supports the cloud storage service.
Figure 5 Cloud Storage Compatibility
Step 1: Get Cloud Storage Service Packages
You can purchase the cloud storage service packages online in the Service Market in Hik-Partner Pro, or purchase a service key from the local distributor first and then activate by the service key to get the purchased service packages.
The supported purchase methods vary depending on your country/region. Contact the local distributor for details.
Purchase Online Using the Portal
-
Go to .
-
In the Cloud Storage Service area, click Online Purchase.
-
Set the number of packages to purchase. You can purchase one or more types of packages at a time.
The number before "Day" (e.g. 7-Day, 30-Day, 90-Day, 180-Day, 365-Day) refers to the retention period of video footage on the cloud. Monthly and Annual refer to how long the service will last after activation.
For example, if you select 7-Day Monthly Package, the video footage can be saved on the cloud for 7 days, and it will be covered by new video footage from the 8th day; and the service will last for a month after activation.
-
Enter the distributor invitation code and the code from Hikvision sales.
NoteBy entering the codes when you purchase services online, you may get some discounts and the distributor/reseller can earn some rebates. For details, refer to How to Earn Commissions as a Distributor/Reseller.
-
Enter your VAT number. The VAT number will be displayed in the payment receipt.
-
Select Credit/Debit Cards as the payment method.
-
Click Checkout to enter the payment page and finish the payment.
Get Packages by Service Key Using the Portal
-
Contact your local distributor and purchase a service key from them.
-
Go to .
-
In the Cloud Storage Service area, click Activate by Service Key.
-
In the Service Key field, enter the service key.
-
Click OK.
Get Packages by Service Key Using the Mobile Client
-
Contact your local distributor and purchase a service key from them.
-
Go to .
-
In the Cloud Storage Service area, tap Activate by Service Key.
-
In the Service Key field, enter the service key.
-
Tap OK.
(Optional) Step 2: Perform Uplink Bandwidth Test
Before you set cloud storage for devices, it is recommended that you perform the uplink bandwidth test first, so you can refer to the test result to decide the quantity of cloud storage channels to set and their definitions.
Perform Uplink Bandwidth Test Using the Portal
-
Add a Hik-ProConnect box or an NVR/DVR/camera with the cloud storage capability to a site.
NoteRefer to Quick Start Guide: Add Devices to Hik-Partner Pro for Remote Maintenance. Do not add the device by IP / domain name, or its cloud storage functionality will be unavailable.
-
Go to .
-
Find the device and click it to enter its details page.
-
Click Uplink Bandwidth Test.
-
Click Start. When it completes, the recommended quantity and resolution are shown on the test page.
Perform Uplink Bandwidth Test Using the Mobile Client
-
Add a Hik-ProConnect box or an NVR/DVR/camera with the cloud storage capability to a site.
NoteRefer to Quick Start Guide: Add Devices to Hik-Partner Pro for Remote Maintenance. Do not add the device by IP / domain name, or its cloud storage functionality will be unavailable.
-
Tap .
-
Find the device and tap it to enter its details page.
-
Tap .
-
Tap Start Testing. When it completes, the recommended quantity and resolution are shown on the test page.
Step 3: Configure Cloud Storage and Activate Service for Devices
Hik-Partner Pro provides a seamless configuration process that contains enabling cloud storage, service activation, and event settings.
|
Scenario |
Instruction |
|---|---|
|
If your NVRs/DVRs/cameras have cloud storage capabilities themselves, you can directly set cloud storage for them. |
For NVRs/DVRs: For Cameras: |
|
If your NVRs/DVRs/cameras do not have cloud storage capabilities themselves, you should use a Hik-ProConnect box to help the NVRs/DVRs/cameras to upload videos to the cloud. |
Set Cloud Storage Service for Hik-ProConnect Boxes Using the Portal
-
Add a Hik-ProConnect box and the NVRs/DVRs/cameras to the same site (also need to be on the same LAN).
NoteRefer to Quick Start Guide: Add Devices to Hik-Partner Pro for Remote Maintenance. Do not add the device by IP / domain name, or its cloud storage functionality will be unavailable.
-
Enter the Configure Cloud Storage page by one of the following ways.
-
On the adding result page, click Cloud Storage Settings.
-
Go to , find the Hik-ProConnect box, and click on the device card.
-
Go to , click the Hik-ProConnect box to enter its details page, and click Configure Cloud Storage.
-
Go to , click the site, and go to Cloud Storage > Configure Cloud Storage / .
-
-
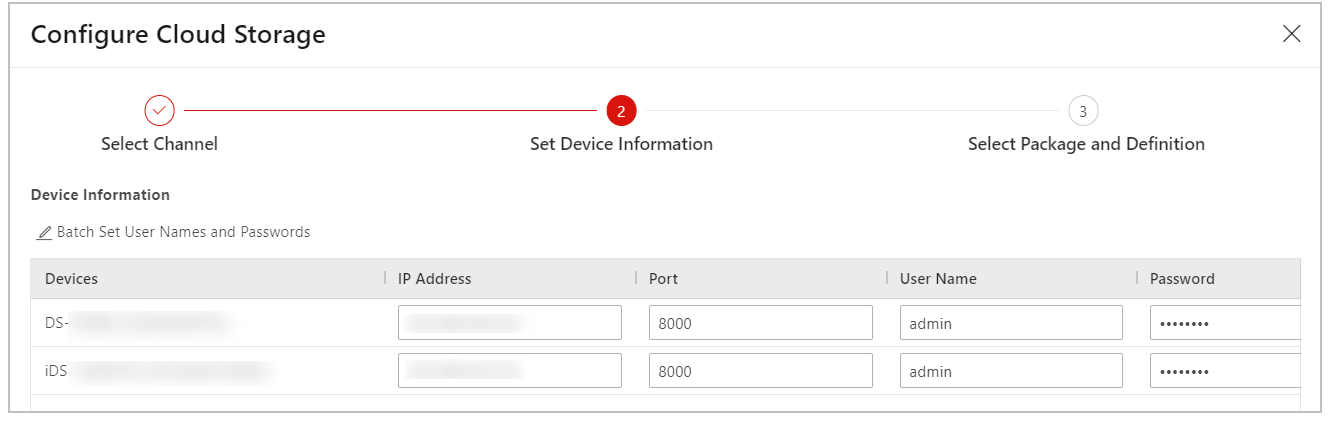
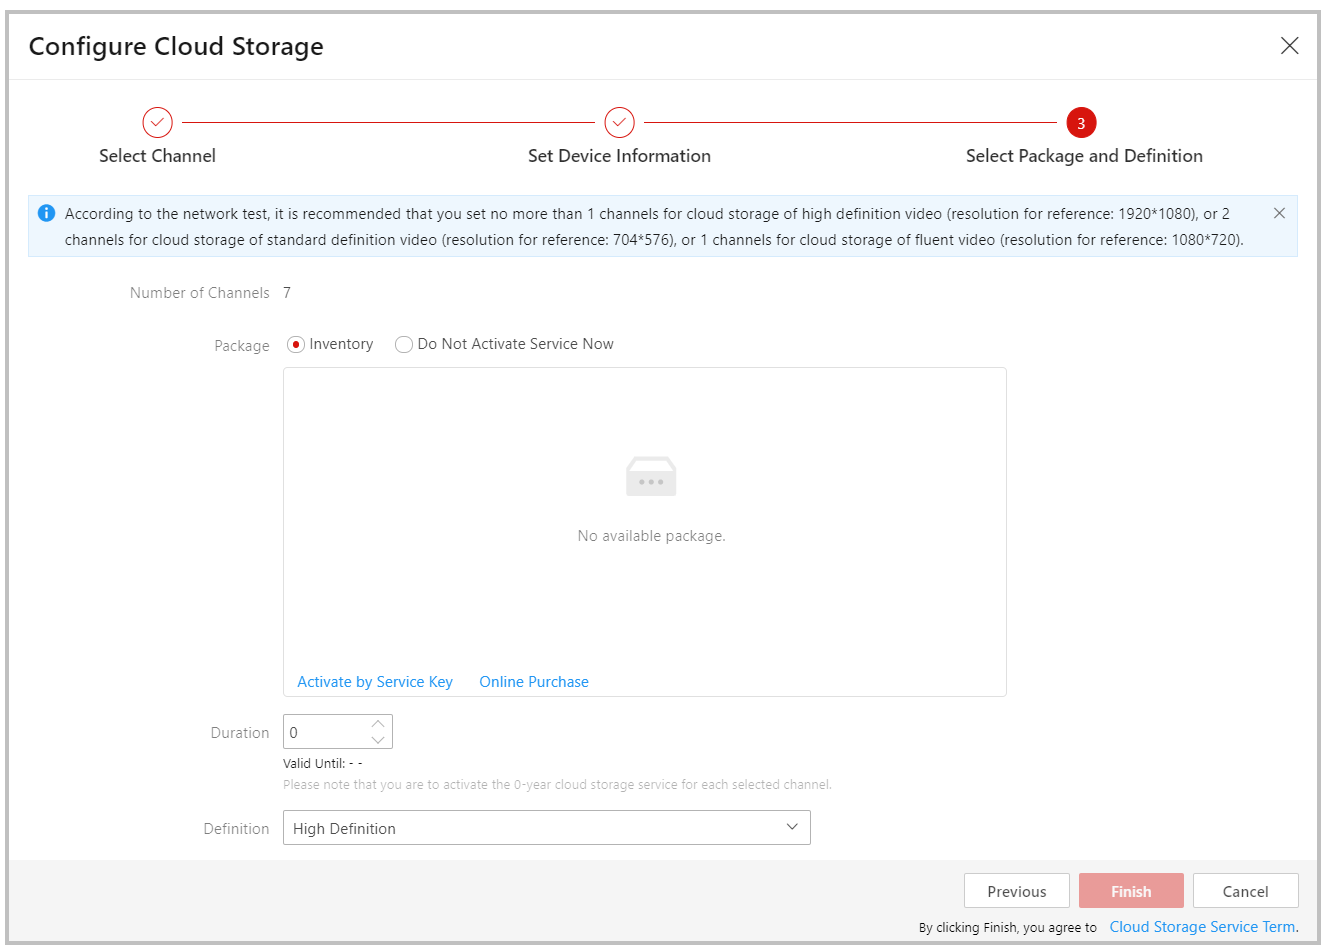
Set required information: Select channels to be configured, set device information (user name, password, IP address, port No.), select cloud storage package for service activation, and select definitions.
Select ChannelsSet Device InformationSelect Package and Definition -
Wait for the configuration to complete. You can click Run in Background to hide the page.
Settings completed automatically in the background include:
-
Linking the selected channels to the Hik-ProConnect box.
-
Enabling SVC.
-
Enabling the device's cloud storage capability.
-
Setting motion detection events and enabling Notify Surveillance Center.
-
Activating the cloud storage service.
-
-
On the result page, click Event Settings to continue to set events.
 on the device
card.
on the device
card.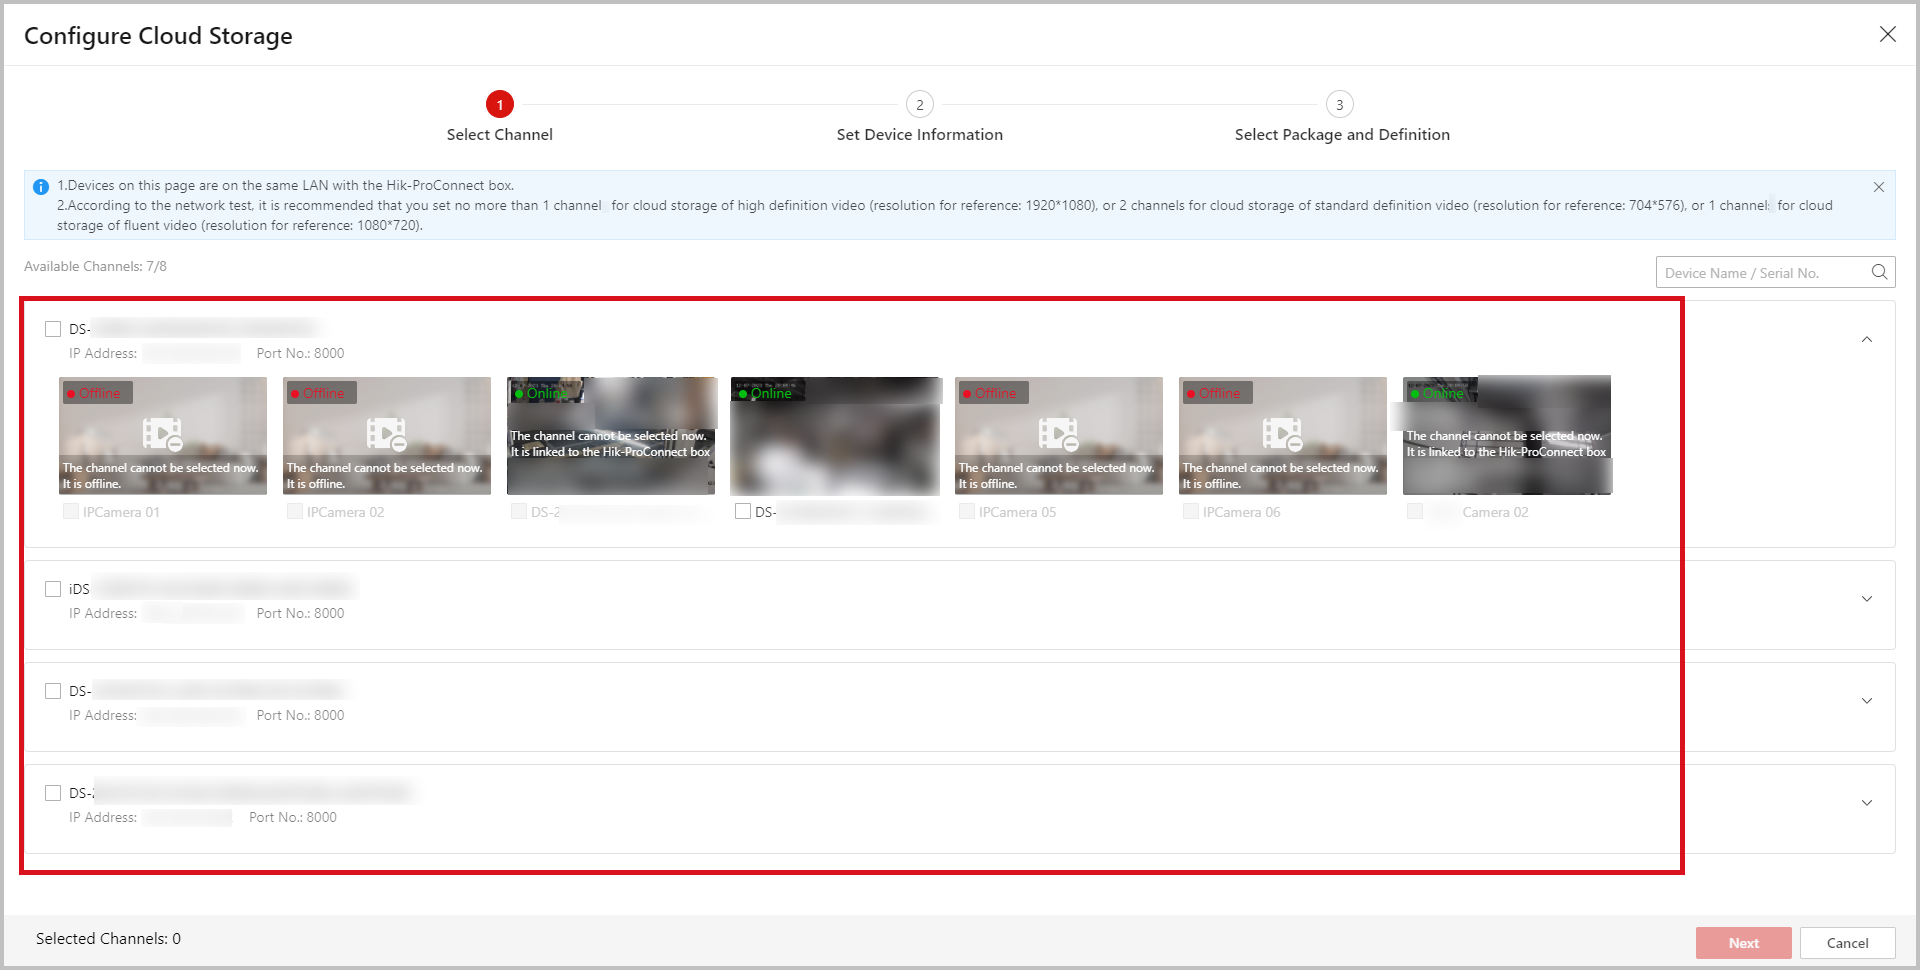
Set Cloud Storage Service for Hik-ProConnect Boxes Using the Mobile Client
-
Add a Hik-ProConnect box and the NVRs/DVRs/cameras to the same site (also need to be on the same LAN).
NoteRefer to Quick Start Guide: Add Devices to Hik-Partner Pro for Remote Maintenance. Do not add the device by IP / domain name, or its cloud storage functionality will be unavailable.
-
Enter the Configure Cloud Storage page by one of the following ways.
-
On the adding result page, tap Cloud Storage Settings.
-
Tap Site, select the site, find the Hik-ProConnect box, and tap on the device card.
-
Tap Site, select the site, tap the Hik-ProConnect box to enter its details page, and tap .
-
Tap Site, select the site, and go to Cloud Storage > Configure Cloud Storage / .
-
-
Set required information: Select channels to be configured, set device information (user name, password, IP address, port No.), select cloud storage package for service activation, and select definitions.
-
Wait for the configuration to complete. You can tap Run in Background to hide the page.
Settings completed automatically in the background include:
-
Linking the selected channels to the Hik-ProConnect box.
-
Enabling SVC.
-
Enabling the device's cloud storage capability.
-
Setting motion detection events and enabling Notify Surveillance Center.
-
Activating the cloud storage service.
-
-
On the result page, tap Event Settings to continue to set events.
Set Cloud Storage Service for NVRs/DVRs Using the Portal
-
Add the NVR/DVR with the cloud storage capability itself to a site.
NoteRefer to Quick Start Guide: Add Devices to Hik-Partner Pro for Remote Maintenance. Do not add the device by IP / domain name, or its cloud storage functionality will be unavailable.
-
Enter the Configure Cloud Storage page by one of the following ways.
-
On the adding result page, click Cloud Storage Settings.
-
Go to , find the NVR/DVR, and click on the device card.
-
Go to , click the NVR/DVR to enter its details page, and click Configure Cloud Storage.
-
Go to , click the site, and go to Cloud Storage > Configure Cloud Storage / .
-
-
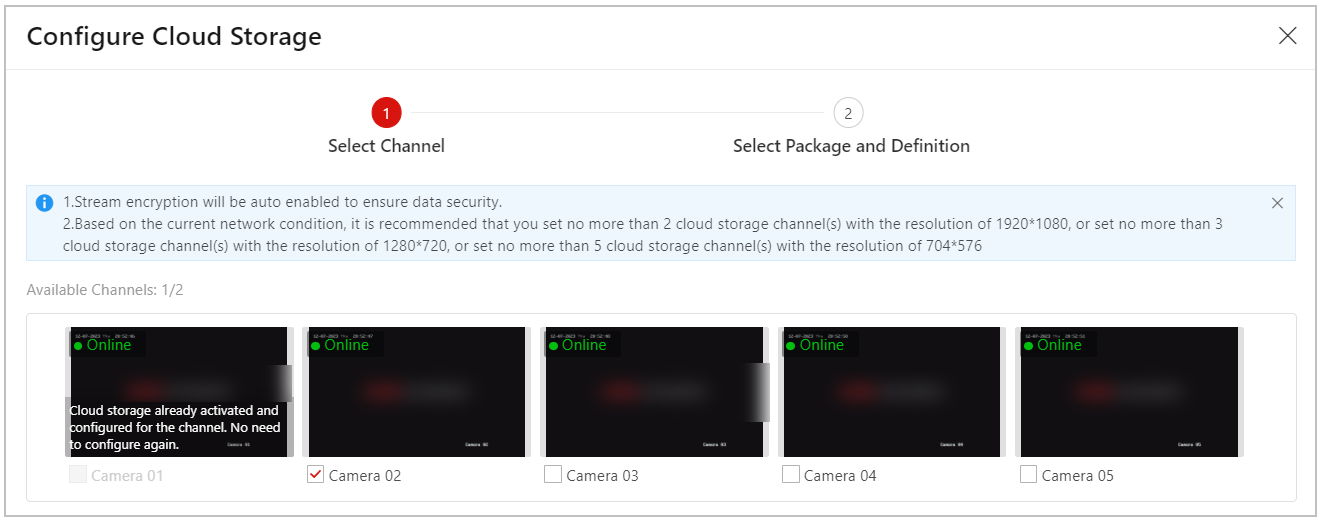
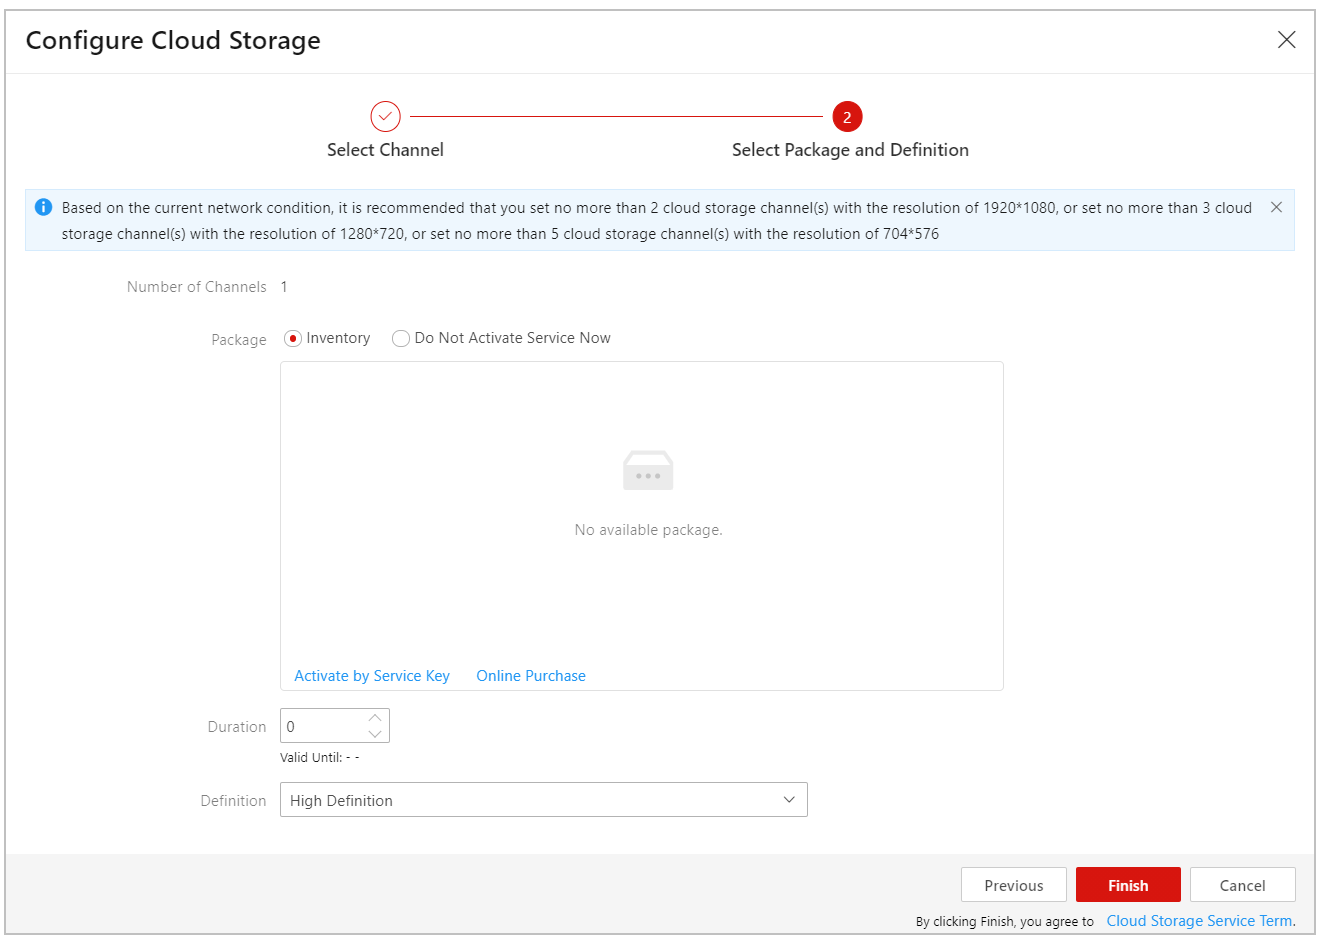
Set required information: Select channels to be configured, select cloud storage package for service activation, and select definitions.
Select ChannelsSelect Package and Definition -
Wait for the configuration to complete. You can click Run in Background to hide the page.
Settings completed automatically in the background include:
-
Disabling Smart H.264+/H.265+ encoding and enabling SVC.
-
Enabling the device's cloud storage capability.
-
Setting motion detection events and enabling Notify Surveillance Center.
-
Activating the cloud storage service.
-
-
On the result page, click Event Settings to continue to set events.
Set Cloud Storage Service for NVRs/DVRs Using the Mobile Client
-
Add the NVR/DVR with the cloud storage capability itself to a site.
NoteRefer to Quick Start Guide: Add Devices to Hik-Partner Pro for Remote Maintenance. Do not add the device by IP / domain name, or its cloud storage functionality will be unavailable.
-
Enter the Configure Cloud Storage page by one of the following ways.
-
On the adding result page, tap Cloud Storage Settings.
-
Tap Site, select the site, find the NVR/DVR, and tap on the device card.
-
Tap Site, select the site, tap the NVR/DVR to enter its details page, and tap .
-
Tap Site, select the site, and go to Cloud Storage > Configure Cloud Storage / .
-
-
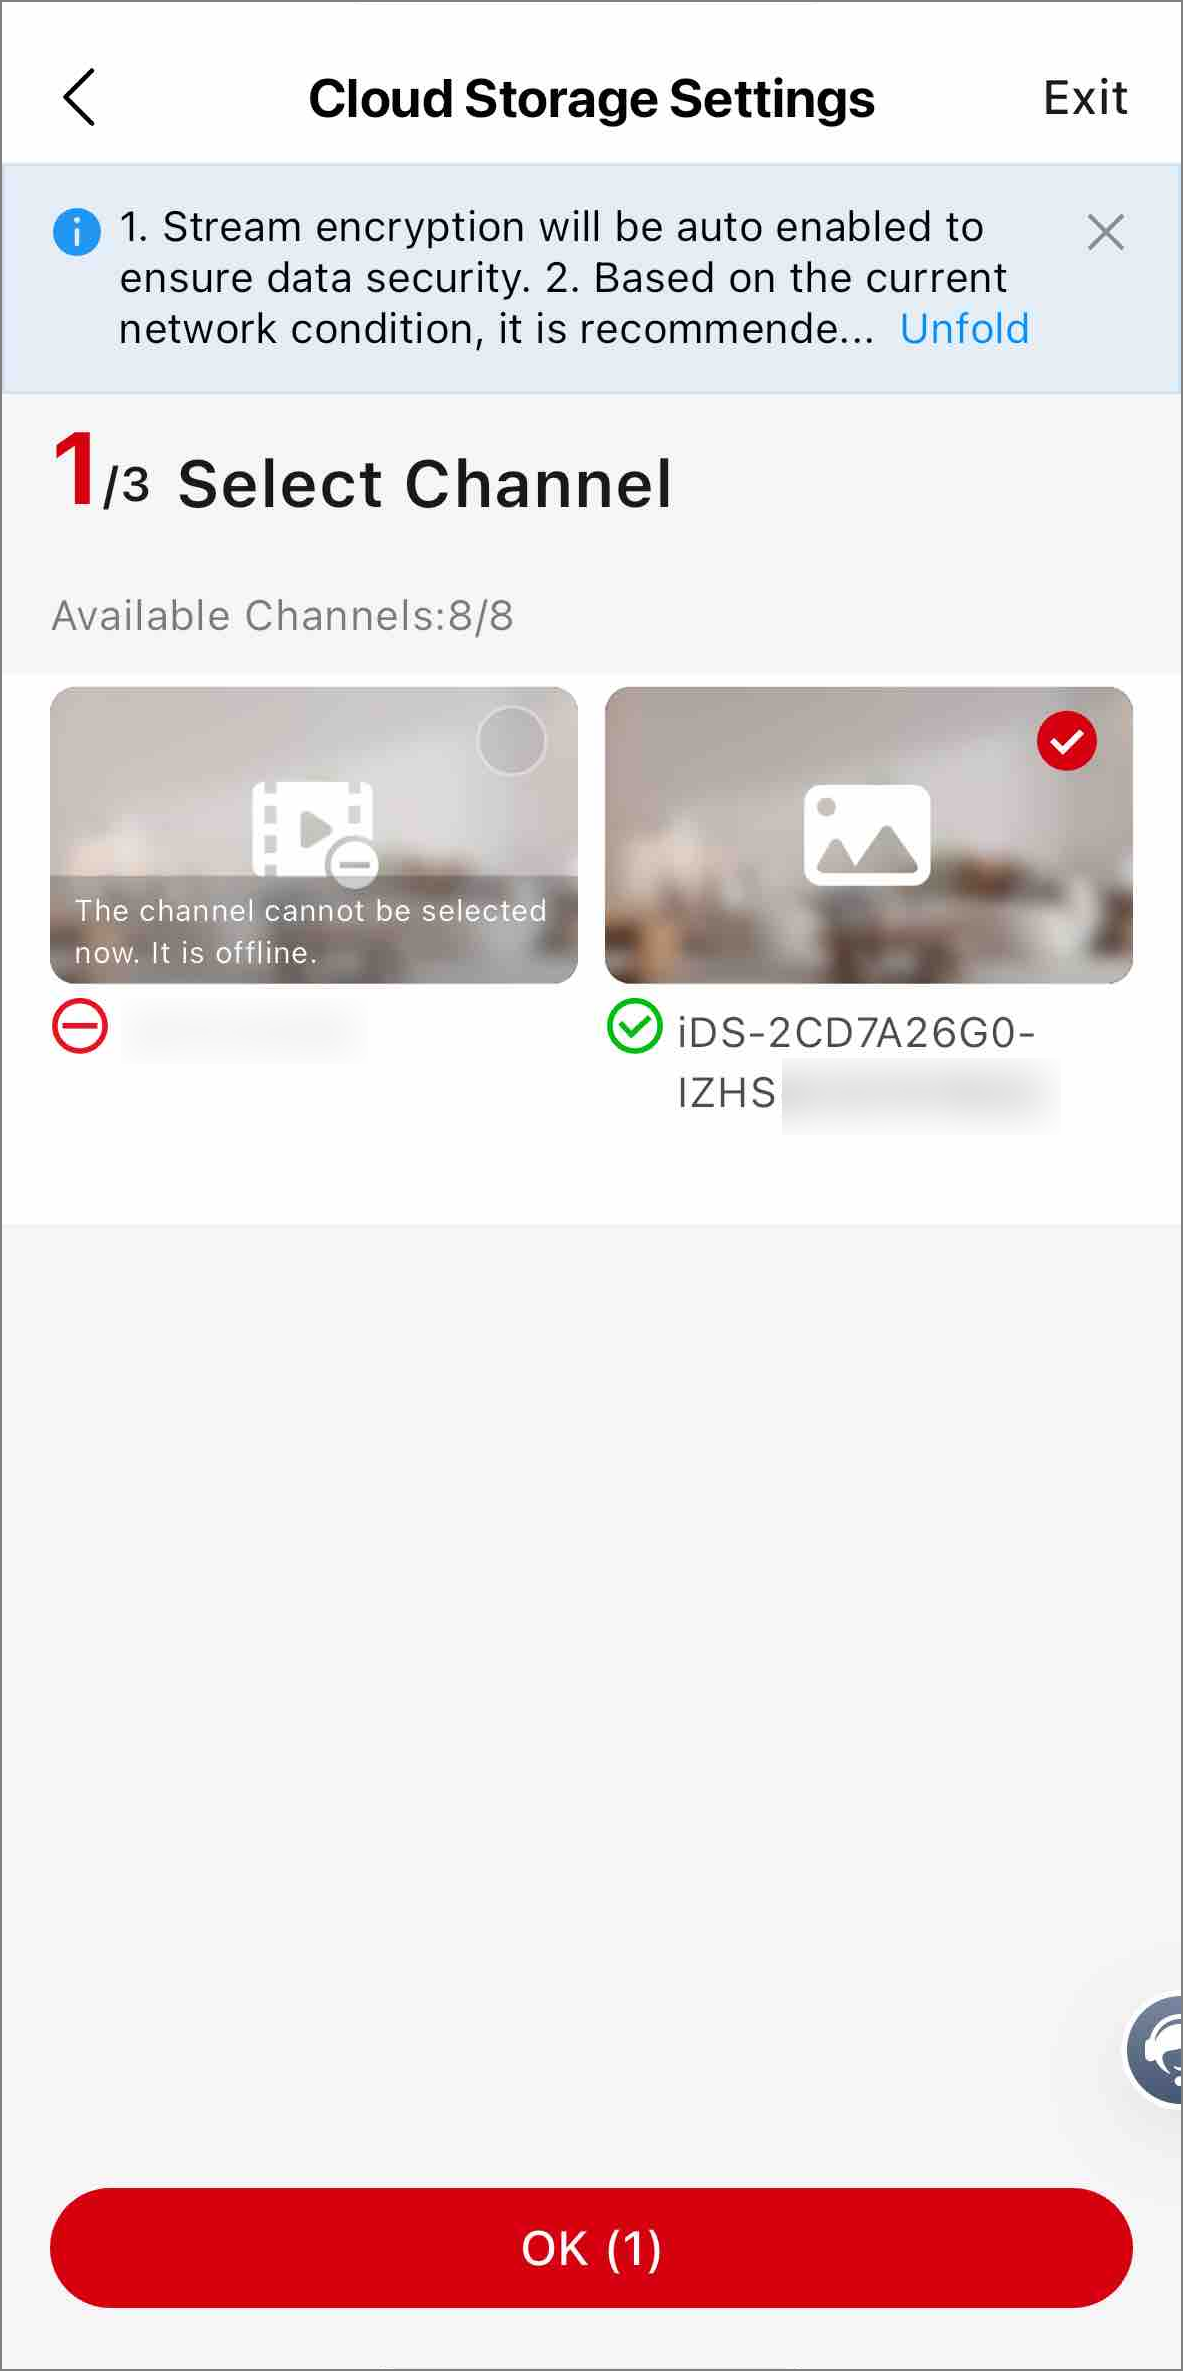
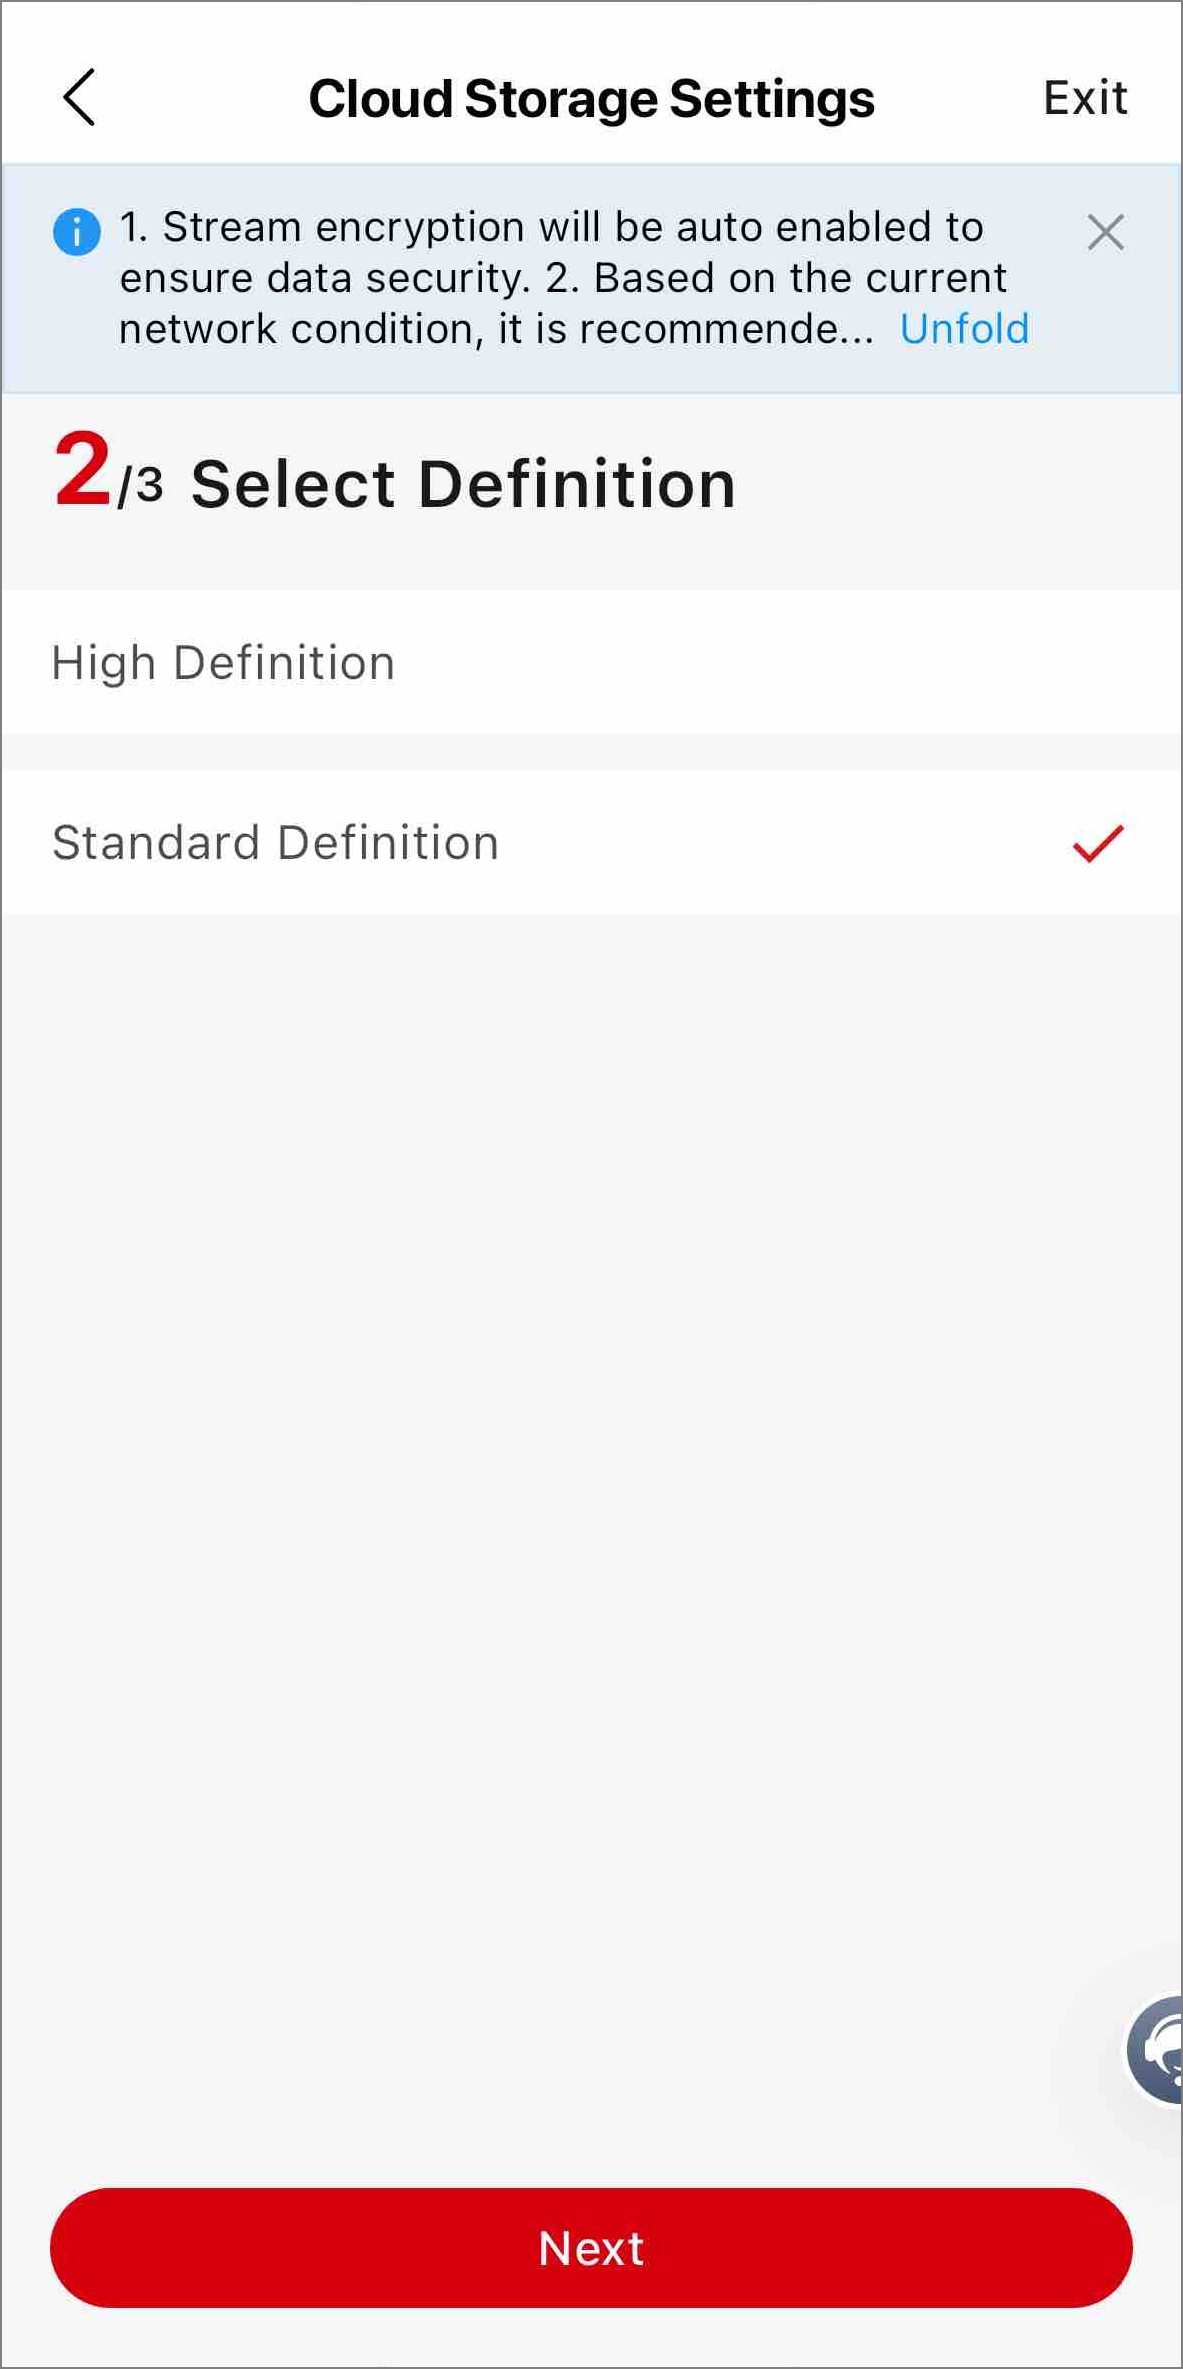
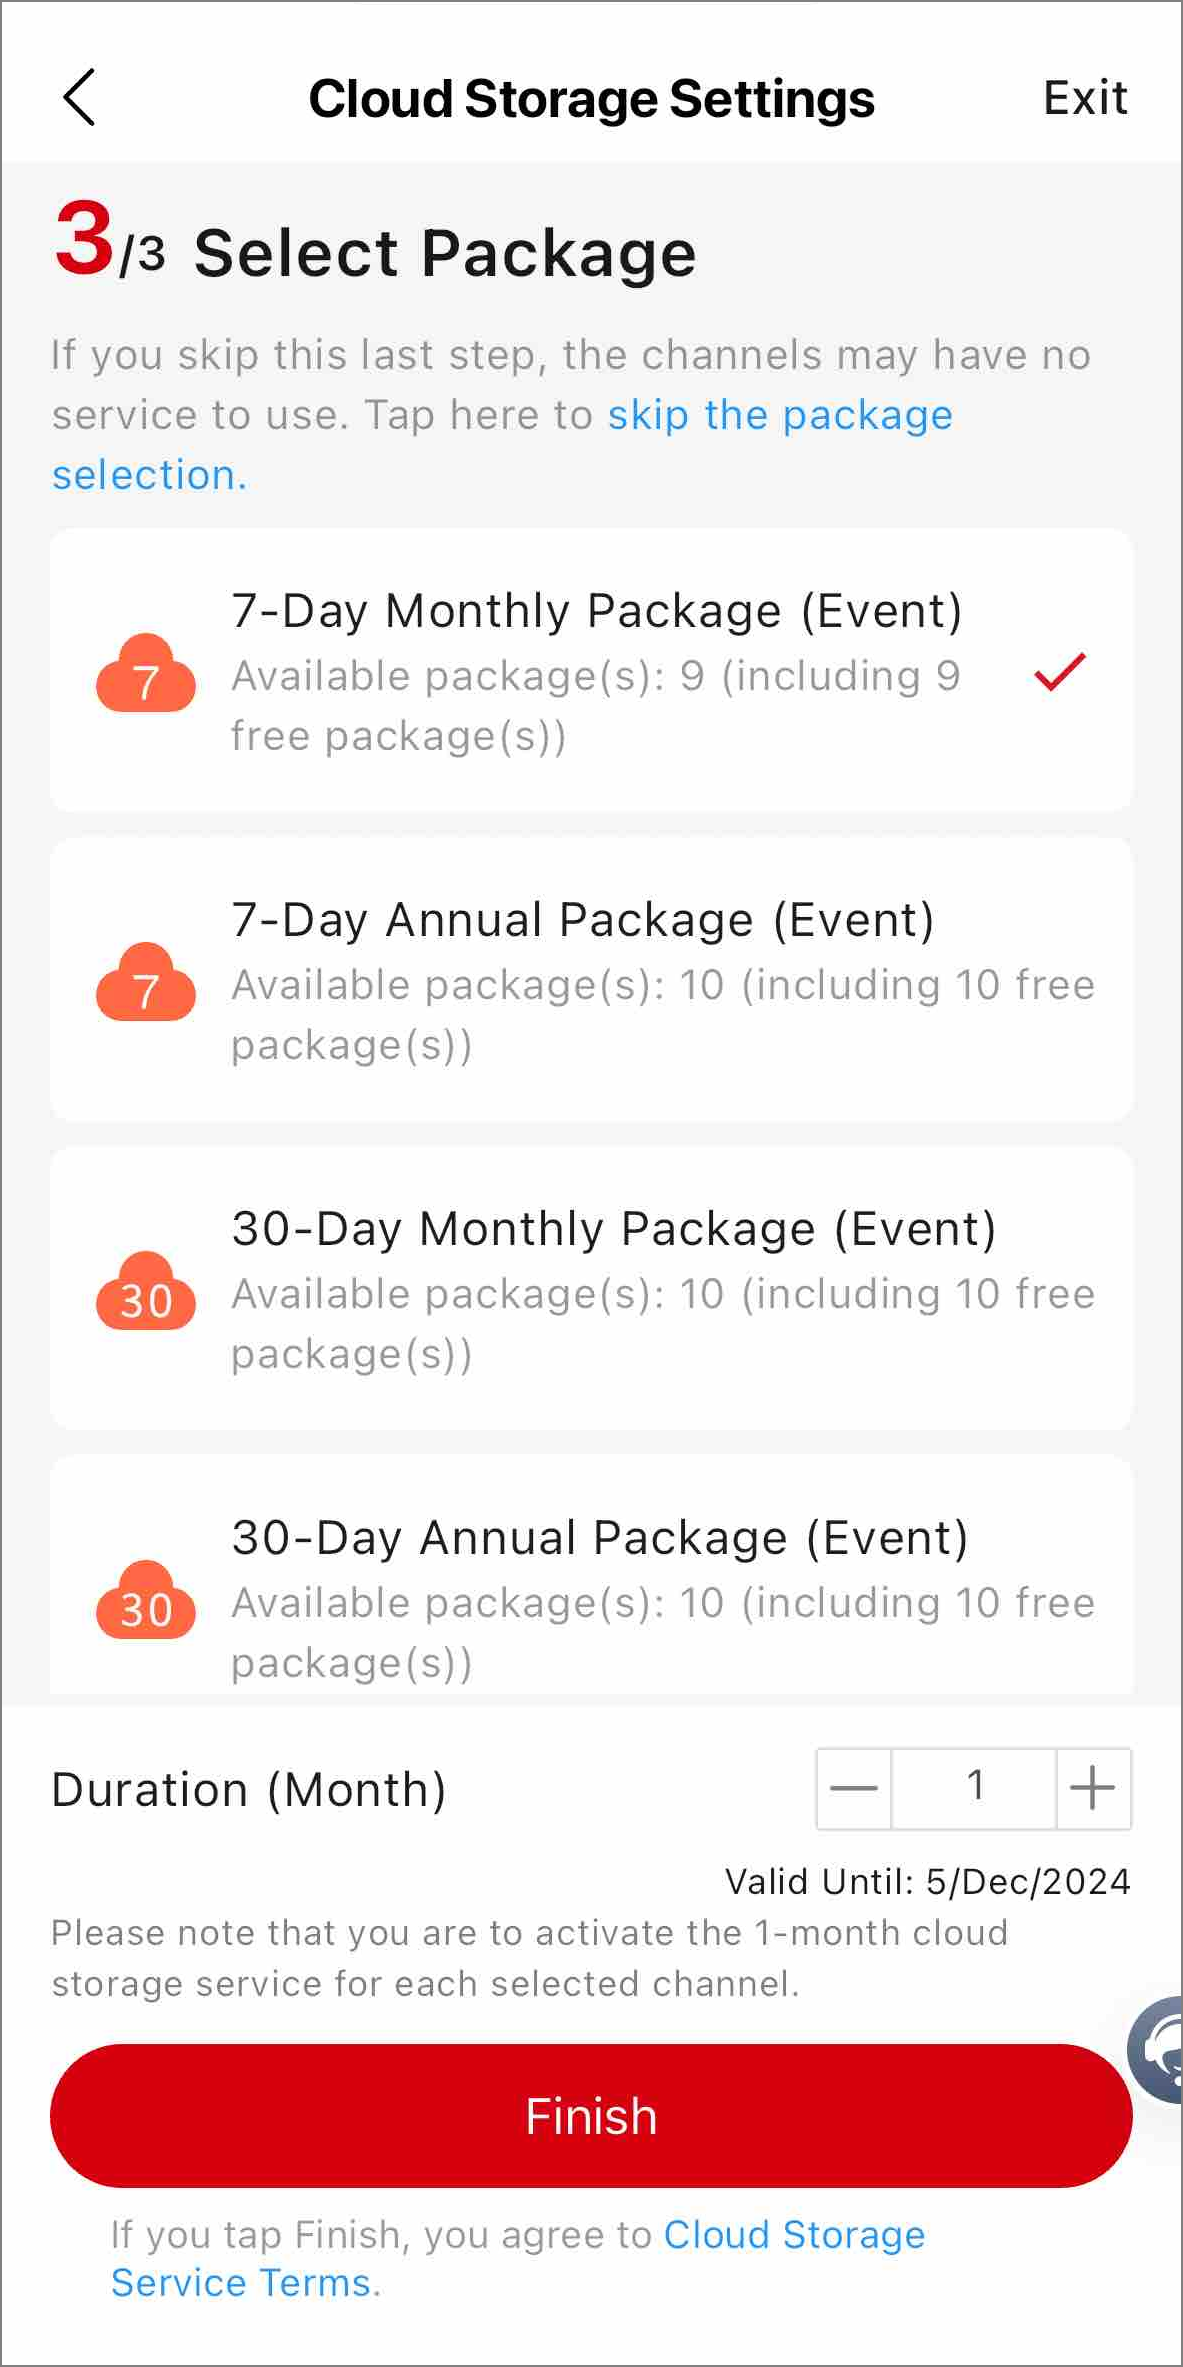
Set required information: Select channels to be configured, select cloud storage package for service activation, and select definitions.
Cloud Storage ConfigSelect ChannelsSelect DefinitionSelect Package -
Wait for the configuration to complete. You can tap Run in Background to hide the page.
Settings completed automatically in the background include:
-
Disabling Smart H.264+/H.265+ encoding and enabling SVC.
-
Enabling the device's cloud storage capability.
-
Setting motion detection events and enabling Notify Surveillance Center.
-
Activating the cloud storage service.
-
-
On the result page, tap Event Settings to continue to set events.
Set Cloud Storage Service for Cameras Using the Portal
-
Add the camera with the cloud storage capability itself to a site.
NoteRefer to Quick Start Guide: Add Devices to Hik-Partner Pro for Remote Maintenance. Do not add the device by IP / domain name, or its cloud storage functionality will be unavailable.
-
Enter the Configure Cloud Storage page by one of the following ways.
-
On the adding result page, click Cloud Storage Settings.
-
Go to , find the camera, and click on the device card.
-
Go to , click the camera to enter its details page, and click Configure Cloud Storage.
-
Go to , click the site, and go to Cloud Storage > Configure Cloud Storage / .
-
-
Set required information: Select the cloud storage package for service activation, and select the definition.
-
Wait for the configuration to complete. You can click Run in Background to hide the page.
Settings completed automatically in the background include:
-
Disabling Smart H.264+/H.265+ encoding and enabling SVC.
-
Enabling the device's cloud storage capability.
-
Setting motion detection events and enabling Notify Surveillance Center.
-
Activating the cloud storage service.
-
-
On the result page, click Event Settings to continue to set events.
Set Cloud Storage Service for Cameras Using the Mobile Client
-
Add the camera with the cloud storage capability itself to a site.
NoteRefer to Quick Start Guide: Add Devices to Hik-Partner Pro for Remote Maintenance. Do not add the device by IP / domain name, or its cloud storage functionality will be unavailable.
-
Enter the Configure Cloud Storage page by one of the following ways.
-
On the adding result page, tap Cloud Storage Settings.
-
Tap Site, select the site, find the camera, and tap on the device card.
-
Tap Site, select the site, tap the camera to enter its details page, and tap .
-
Tap Site, select the site, and go to Cloud Storage > Configure Cloud Storage / .
-
-
Set required information: Select the cloud storage package for service activation, and select the definition.
-
Wait for the configuration to complete. You can tap Run in Background to hide the page.
Settings completed automatically in the background include:
-
Disabling Smart H.264+/H.265+ encoding and enabling SVC.
-
Enabling the device's cloud storage capability.
-
Setting motion detection events and enabling Notify Surveillance Center.
-
Activating the cloud storage service.
-
-
On the result page, tap Event Settings to continue to set events.
Step 4: Manage Cloud Storage Service Packages
Manage Cloud Storage Service Using the Portal
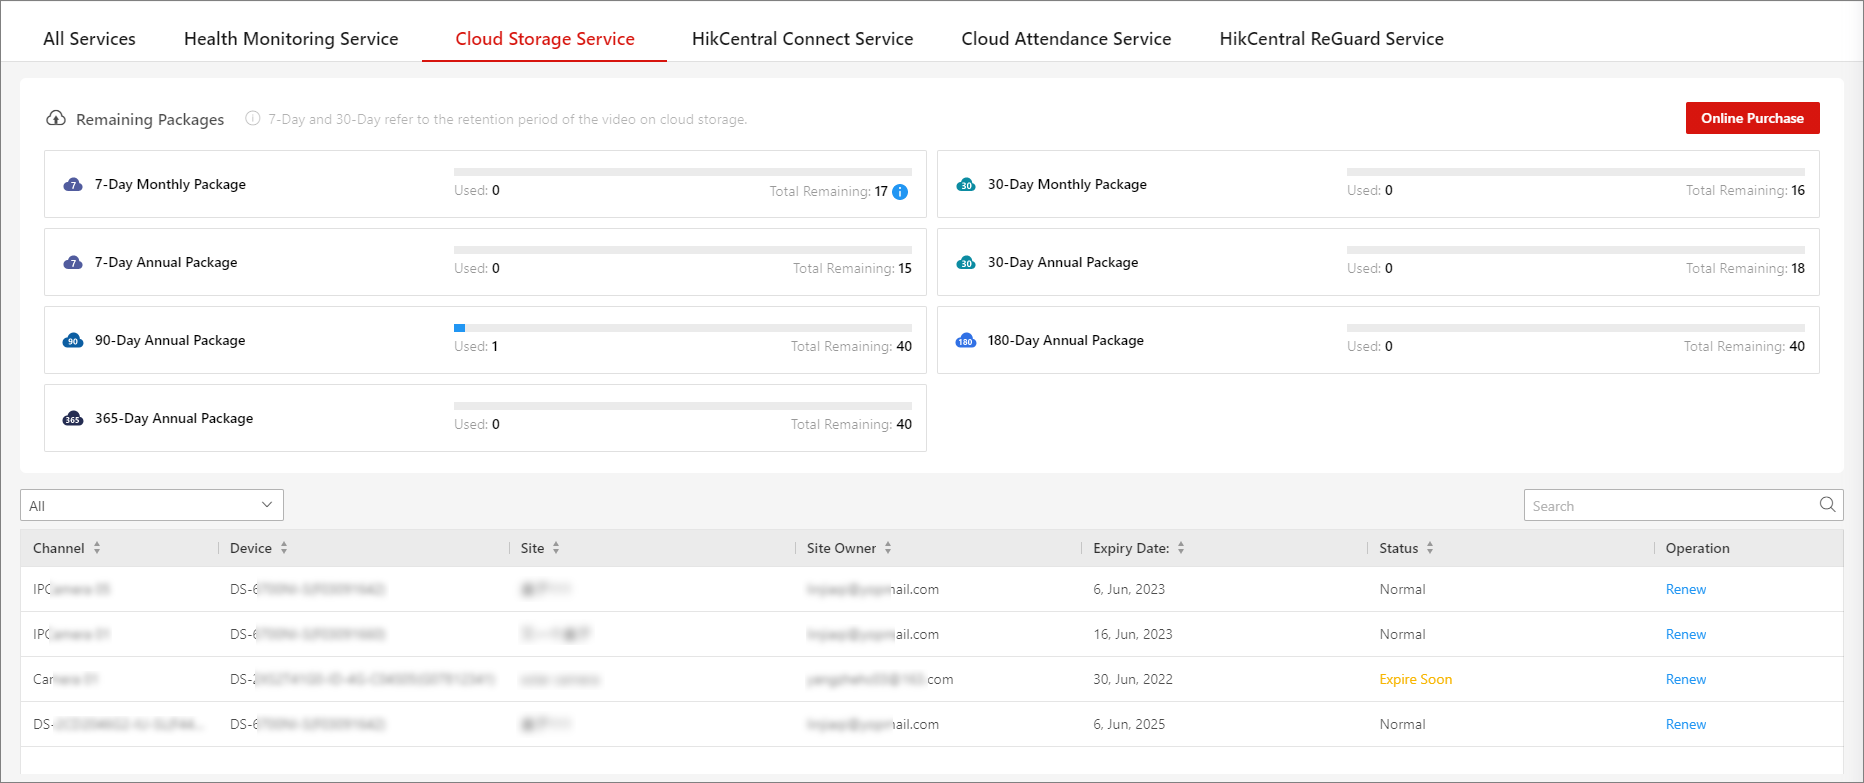
Go to .
|
Operation |
Description |
|---|---|
|
View Remaining Packages & Purchase More |
View the used number and remaining numbers of each type of cloud storage packages. Click Online Purchase or Activate by Service Key to get more packages. |
|
View Expiry Dates |
View service expiry dates of each channel. |
|
Renew Service |
Click in the Operation column. |
|
Transfer Service |
Click in the Operation column to transfer the remaining service time from the current device to another. |
 in the
Operation column.
in the
Operation column. in the
Operation column to transfer the remaining service time from
the current device to another.
in the
Operation column to transfer the remaining service time from
the current device to another.Manage Health Monitoring Service Using the Mobile Client
Tap Me at the bottom right, tap My Service, and tap Detail in the Cloud Storage Service section.
|
Operation |
Description |
|---|---|
|
View Remaining Packages & Purchase More |
View the used number and remaining numbers of each type of cloud storage packages. Tap Buy Now or Activate by Service Key to get more packages. |
|
View Expiry Dates |
View service expiry dates of each channel. |
|
Renew Service |
Tap on the device card. |
|
Transfer Service |
Tap on the device card to transfer the remaining service time from the current device to another. |