Parameters on Edit Camera Page
For Current Site
Basic Information
- Live View
-
Click to view the live view of the camera and click again to switch to playback.
Note-
If the device supports PTRZ, you can long press / to rotate by clockwise/anticlockwise during live view.
-
You can click to set rotating speed, and click to refresh the live view.
-
For cameras accessed via ONVIF protocol, you can set the main and sub-stream.
-
 /
/ to rotate by
clockwise/anticlockwise during live view.
to rotate by
clockwise/anticlockwise during live view. to set
rotating speed, and click
to set
rotating speed, and click  to refresh
the live view.
to refresh
the live view.Recording Settings
The parameters vary according to the site (current site or Remote Site) you selected previously.
- Auxiliary Storage
-
Switch on to configure another storage location for the video files.
Note-
If Cluster Storage, Hybrid Storage Area Network, pStor, or pStor Cluster Service is set as the auxiliary storage location, you can select Real-Time Storage to store recorded video files or select Scheduled Copy-Back to copy recordings from the encoding device or pStor (main storage) to specified auxiliary storage location according to the scheduled period.
-
Before setting Scheduled Copy-Back, make sure you have configured real-time recording schedule stored in device local storage or pStor for the main storage.
-
The recordings can be copied only from the encoding device to Hybrid Storage Area Network, Cluster Storage, pStor or pStor Cluster Service, or from pStor to another pStor.
-
- Get Device's Recording Settings
-
Get recording schedules of the device.
- Storage Location
-
If you select Encoding Device as the storage location, you needn't select the storage type.
If you select Hybrid Storage Area Network, Cluster Storage, pStor, or pStor Cluster Service, specify a server and (optional) select a Streaming Server to get video streams from cameras via it.
When the storage location is set to pStor and the device supports third stream, the Stream Type can be selected as third stream.
- Storage Type
-
- Real-Time Storage
-
Store the recorded video files in the specified storage location in real time.
- Scheduled Copy-Back
-
Copy the recorded video files from the encoding device or pStor to the specified storage location according to scheduled period.
NoteThe recordings can be copied only from the encoding device to Hybrid Storage Area Network, Cluster Storage, pStor or pStor Cluster Service, or from pStor to another pStor.
- Recording Schedule Template
-
Set the template which defines the time periods to record the camera's video.
- Upload Time
-
Specify the time period to copy the recorded video files to the specified storage location.
- Recording for Copy-Back
-
Select the type of recorded video file to backup. The event-based recording schedule can not be configured for the Cluster Storage, and the command-based recording schedule can not be configured for the Cluster Storage and pStor.
- Stream Type
-
Select the stream type as main stream, sub-stream or dual-stream.
NoteFor storing on Hybrid Storage Area Network, Cluster Storage, pStor or pStor Cluster Service, dual-stream is not supported.
- Pre-Record
-
Record video from periods preceding detected events. For example, when someone opens a door, you can see what happens right before the door opened.
This field displays when the storage location is set as Encoding Device, Cluster Storage, pStor, or pStor Cluster Service. And it is available for the camera that is configured with event-based recording.
- Post-Record
-
Record video from periods following detected events.
This field displays when the storage location is set as Encoding Device or Hybrid Storage Area Network. It is available for the camera that is configured with event-based recording.
- Video Expiry Time
-
If you select Encoding Device as the storage location, switch on Video Expiry Time and enter expiration day(s).
Automatically delete the oldest videos after the specified retention period. This method allows you to define the longest time period to keep the videos as desired and the actual retention period for the videos depends on the allocated quota.
- Enable ANR
-
If you select the Encoding Device or Hybrid Storage Area Network as the storage location, check Enable ANR to turn the automatic network replenishment on to temporarily store the video in the camera when network fails and transport the video to storage device when network recovers.
- Max. Copy-Back Speed (KBps)
-
Enter the maximum copy-back speed.
Smart Functions
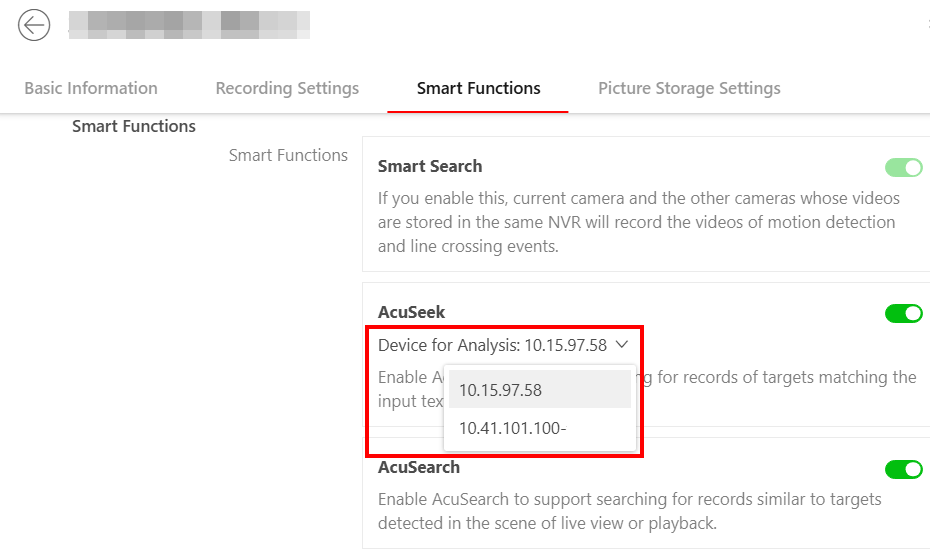
Enable AcuSeek / AcuSearch / Smart Search to enable these capabilities for the device.
When using the intelligent analysis server for AcuSeek analysis, it is necessary to select the associated intelligent analysis server for the camera.
Picture Storage Settings
-
If you select System Management Server, the pictures will be stored on the SYS server. Click Configure to view the disk on SYS server and storage quota, which can be edited via the Web Client running on the SYS server. Refer to Set Storage on System Server for details.
-
You cannot configure the storage location for the captured undercarriage pictures, which are stored on the UVSS device.
For Remote Site
If you are using a Central System with a Remote Site Management module, you can edit the cameras, doors, and elevators that have been added to the Remote Site.
- Parameters on Edit Camera Page
-
- Basic Information
-
- Name
-
If you change the camera's name, you can click on the added camera list page to apply the new name to the device.
- Live View
-
You can view the live view of the camera and hover over the window and click in the lower-right corner to switch to playback.
NoteDouble authentications is required for live view and playback on the camera editing page. For details about configuring double authentications, refer to Set Basic Security Parameters.
- Recording Settings
-
For recording settings, if no recording settings have been configured for the camera, click Configuration on Site to set the parameters.
 on the
added camera list page to apply the new name to
the device.
on the
added camera list page to apply the new name to
the device. in the
lower-right corner to switch to playback.
in the
lower-right corner to switch to playback.